WebEx Teams guide
Download and Install
- In a browser, go to https://www.webex.com/downloads.html
- On the right, click “Download for Windows/mac”
- Download and install Webex Teams
First Time Setup
- Opening WebEx Teams for the first time will first ask for you work email address
- Use “your UW username”@uwaterloo.ca and it will redirect you to a dual authentication sign in
- Again enter “your UW username” @uwaterloo.ca then click next and enter your UW password
- You should now see the WebEx Teams main page
Navigation Bar
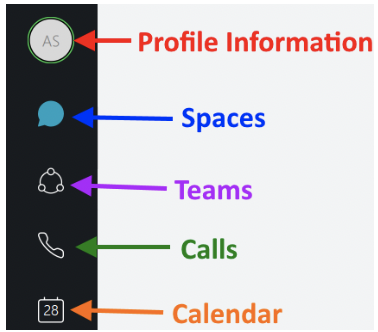
Once signed in, you can access the different windows of the program with the Navigation Bar on the left
By default, you start on the Spaces window.
Before getting into what spaces are and how to use them, first you’ll want to set up your profile
Edit Your Profile
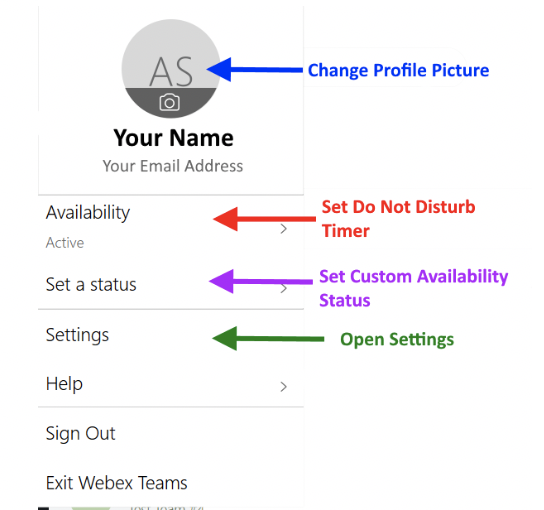
You can access your profile by clicking the “Profile information” button which either contains your initials or profile picture.
This opens a menu where you can change your Profile Pic, change Availability status, and customize your experience in Settings
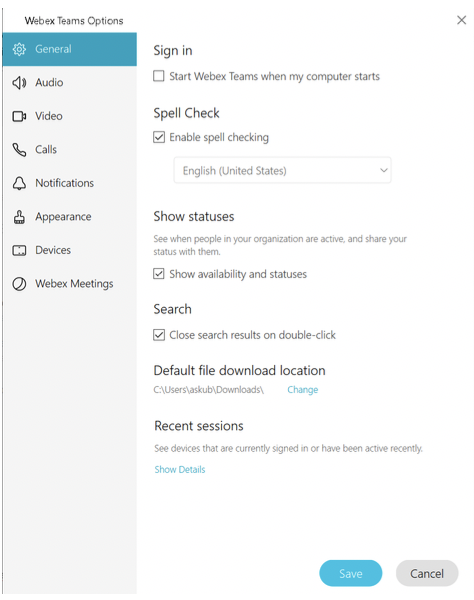
Settings
General – Account settings like sign in options, spell check, show statuses, download location, etc
Audio – Select your devices for microphone, speakers, and ringtone speaker
Video – Select device and test webcam
Calls – Enable your webcam to be automatically enabled when answering an incoming call
Notifications – Choose what types of messages cause notifications (all messages vs @mentions), when you’re notified for scheduled meetings, and the sounds for your ringtones
Appearance – choose a colour theme for the application and other display options for the list of spaces
Devices – Connection options for external cisco WebEx devices
WebEx Meetings – allows you to connect your WebEx Meetings personal room to WebEx Teams (for more info, see Calendar, pg 17)
This is all a preference, but a couple recommendations are:
- Under Calls, uncheck “Start calls with video on for incoming calls” – lets you choose if and when you enable your webcam
- Under Appearance, check “Show Favorites on top” and check “Show separate tabs for People and Spaces” – makes your spaces easier to navigate
Availability Statuses
When you click on Availability, you can set “Do Not Disturb” for a given amount of time. This and other automatic statuses will be displayed to others through your profile picture as follows:
Green Outline – Active | Camera – Currently in a meeting |
Clock – Inactive | Windows – Currently screen sharing |
Phone – Currently on call | Moon – Do not disturb |
Spaces
Spaces are where all your work takes place. They’re a way to communicate and collaborate with colleagues and coworkers through messages, calls, screensharing, and whiteboards. Each space you’re in has its own set of options, activities and a sophisticated messaging system. There are three different types of spaces, Group Spaces, Direct Messages (1-on-1 space), and Team Spaces.
Create a Space
Group Space
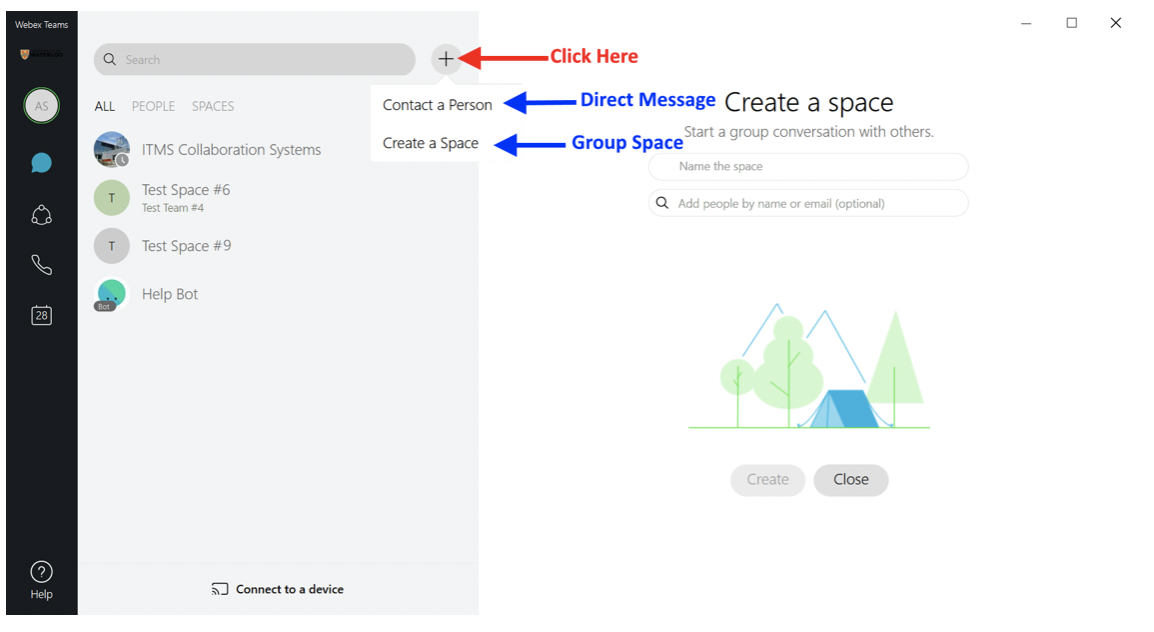
- a) Webex Teams automatically opens with the “Create a space” page on the right
b) You can also go to Spaces in the navigation bar, click the Plus icon and select Create a space - Name the space and type the names of contacts you’d like to add below
- Click Create when ready to create the space
Direct Message
- Click the Plus icon and select Contact a person
- Type in their name and click on the contact to open the space
Team Space
A Team is a collection of related Group Spaces for larger scale collaboration and group projects. Any Group Space that is in a Team is known as a Team Space. For information on creating and using Team Space, see Teams
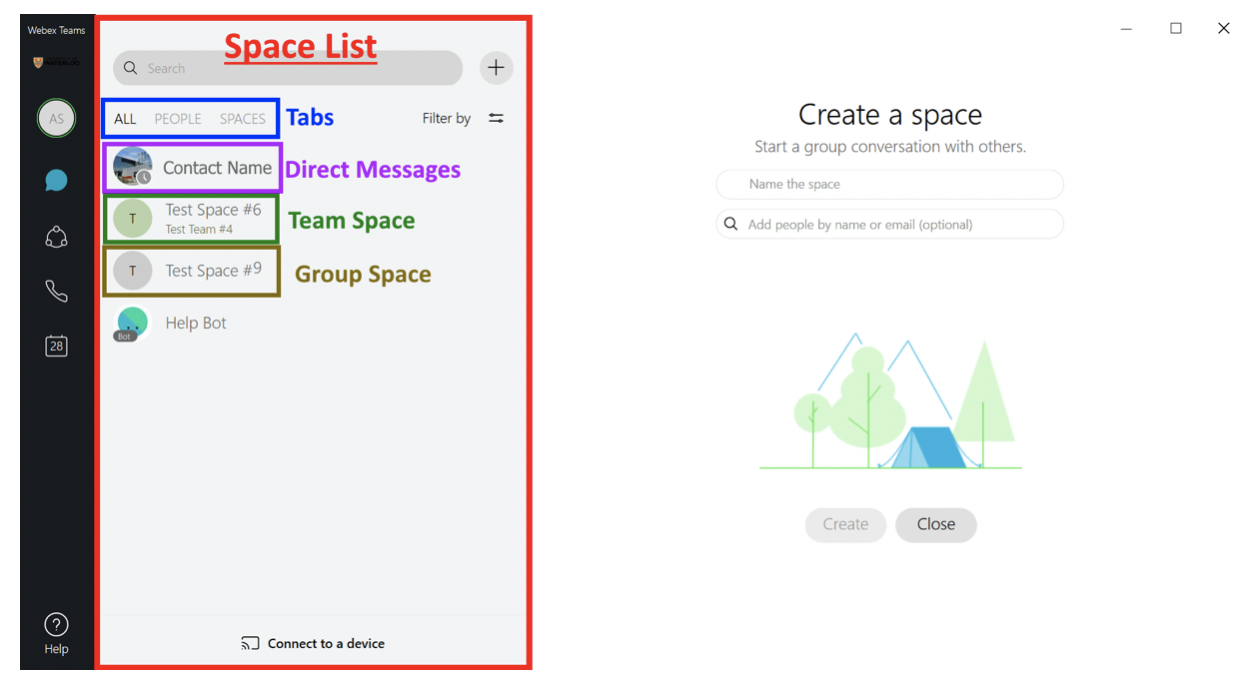
Space List
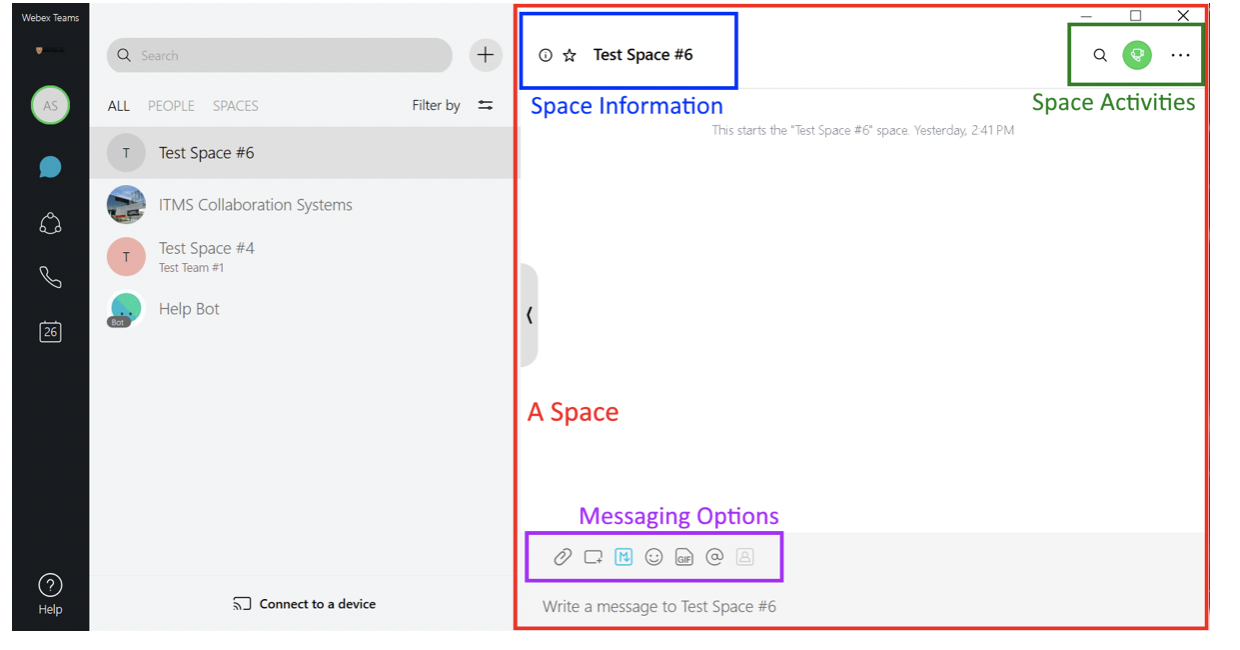
The Space List is the list of every space you belong to and is accessed by clicking the chat bubble icon in the Navigation Bar
Tabs
If you followed the recommended Appearance changes under Settings there will be tabs that can separate your list by “All”, “People” (Direct Messages), and “Spaces” (Group & Team Spaces).
Types of Spaces
- Group Spaces are displayed as the space name
- Direct Messages are shown as the contact’s name
- Team Spaces display the team name below the space name
Filters
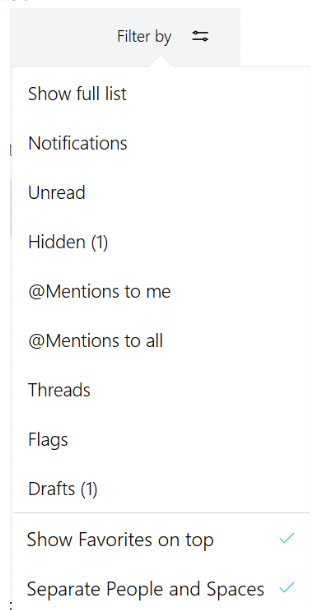
Clicking “Filter by” allows you to filter which spaces are shown to you in the space list
Show full list – all your spaces
Notifications – Spaces that you have notifications from
Unread – Spaces with unread messages
Hidden – Spaces you’ve hidden (right click space and click “Hide space”)
@Mentions to me – Spaces you’ve been @Mentioned in
@Mentions to all – Spaces with an @Mention to all (more on @Mentions, pg 10)
Threads – Spaces where you’re a part of a message thread
Flags – Spaces with messages you’ve flagged
Drafts – Spaces where you’ve typed a message but haven’t sent it yet
At the bottom there is another option to enable the recommended Appearance changes that are also in the Settings (“Show Favorites on top” and “Separate People and Spaces”)
Notifications
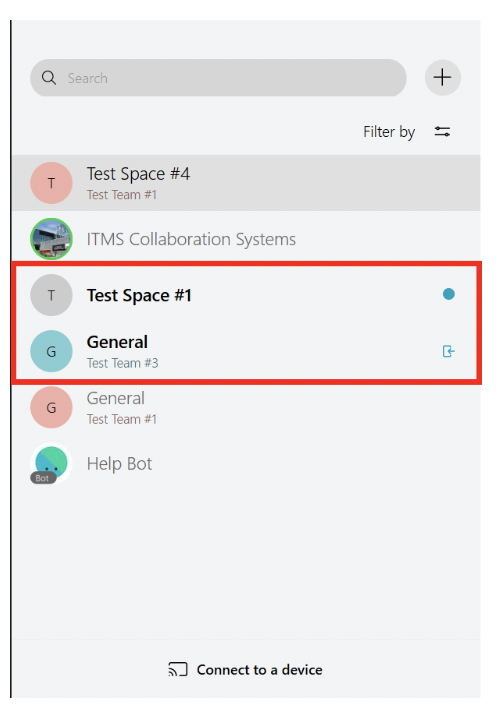
When a space has unseen content, the name of the space will become bolded and there will be a blue icon on the right indicating the type of notification
The icon means there are unread messages in that space
The icon means you have recently been added into that space
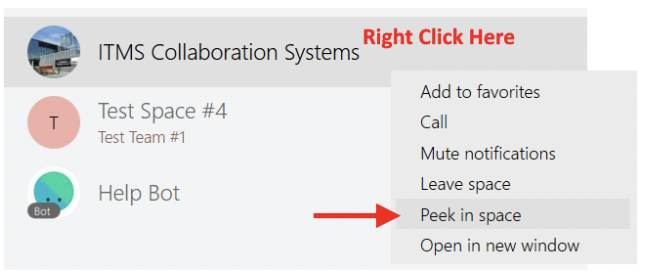
You can access a space without removing the notification and without sending read receipts to the other participants by right clicking the space and clicking “Peek in Space”
Search
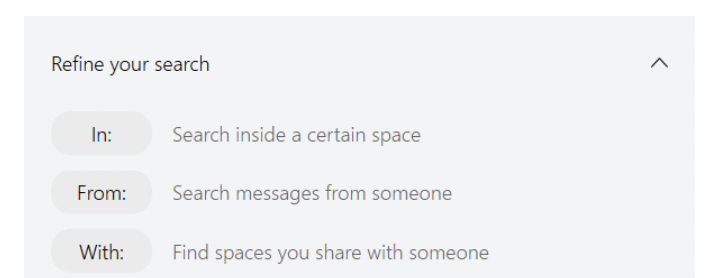
You can use the search bar at the top of the space list to search for people, spaces, messages, and files. You can also click on “Refine your search” at the bottom to make the search more specific
Connect to a Device
Connecting to an external Cisco WebEx device should happen automatically if you left the Devices options in the Settings as default but you can also click on “Connect to a device” at the bottom of the Space List to search and connect to them.
A Space
When you enter a space, it will appear to the right of the Space List. Each space has a “Space Information” area with space settings, some activities on the right, and messaging options at the bottom. These differ slightly between Direct Messages, Group Spaces, and Team Spaces.
Favorites
You can add a space to Favorites by clicking the icon.
When a team is favorited, the icon becomes
The space will now appear at the top of your Space list or under the Favorites filter.
Space Activities
On the right are activities that can be done within in the space
Search – Clicking allows you to search for messages or files within that space
Screen Share – Only in Direct Messages, clicking lets you start actively sharing your screen or other application to the other person
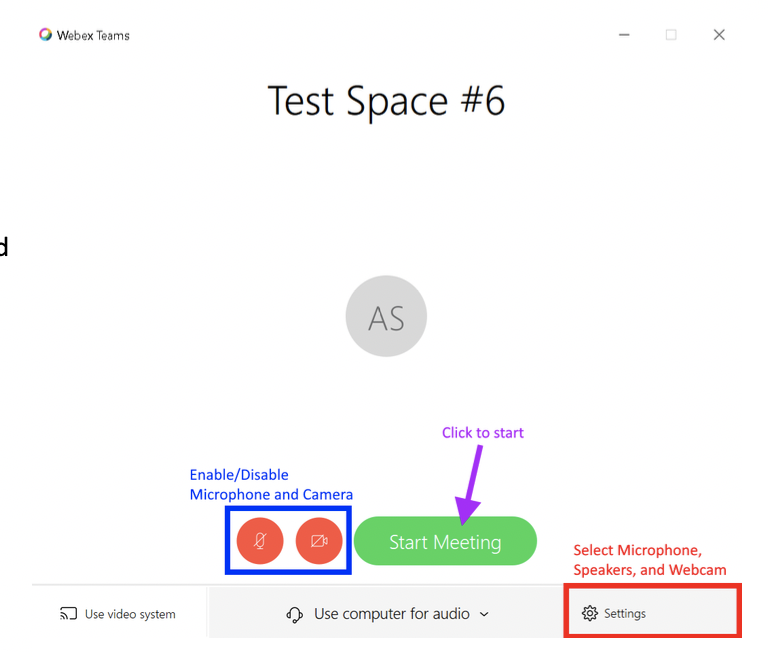
Calling – Clicking the call icon opens a window where you can start a meeting with members of that space (for Group Spaces)
Here you can choose which devices are active for your microphone, webcam and speaker
You can choose if you want to have your microphone and webcam initially disabled when the meeting starts
When you’re ready to begin, click “Start Meeting”
Others receive the following notification when you click “Start Meeting”:
Clicking in Direct Messages brings down a menu where you can choose between Audio Call and a Video Call.
The only difference is a Video Call starts the call with your webcam enabled, otherwise the in-call interface is the exact same
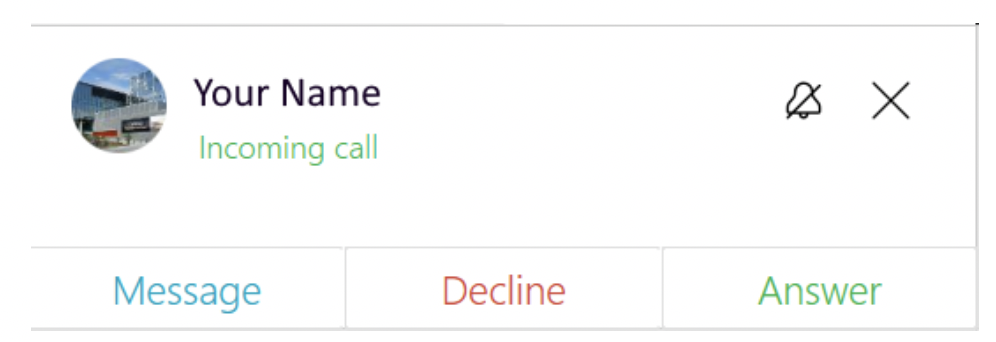
When you send a call through Direct Message, the recipient gets the following notification:
Calling/Meeting Interface
During a Direct Message call or Group Space meeting, there are the following control buttons along the bottom
- Mutes/unmutes microphone
- Enables/disables webcam
- Share content window – lets you screenshare applications, webpages or your entire screen
- Displays a list of current members in the meeting (not in Direct Message calls)
- Opens the space’s messages on the right of the meeting window
- Brings up a window with two additional options
- Add someone to the meeting (doesn’t have to be in the space
- Bring up a blank whiteboard to share and annotate on
- End or leave the meetings
Activities List
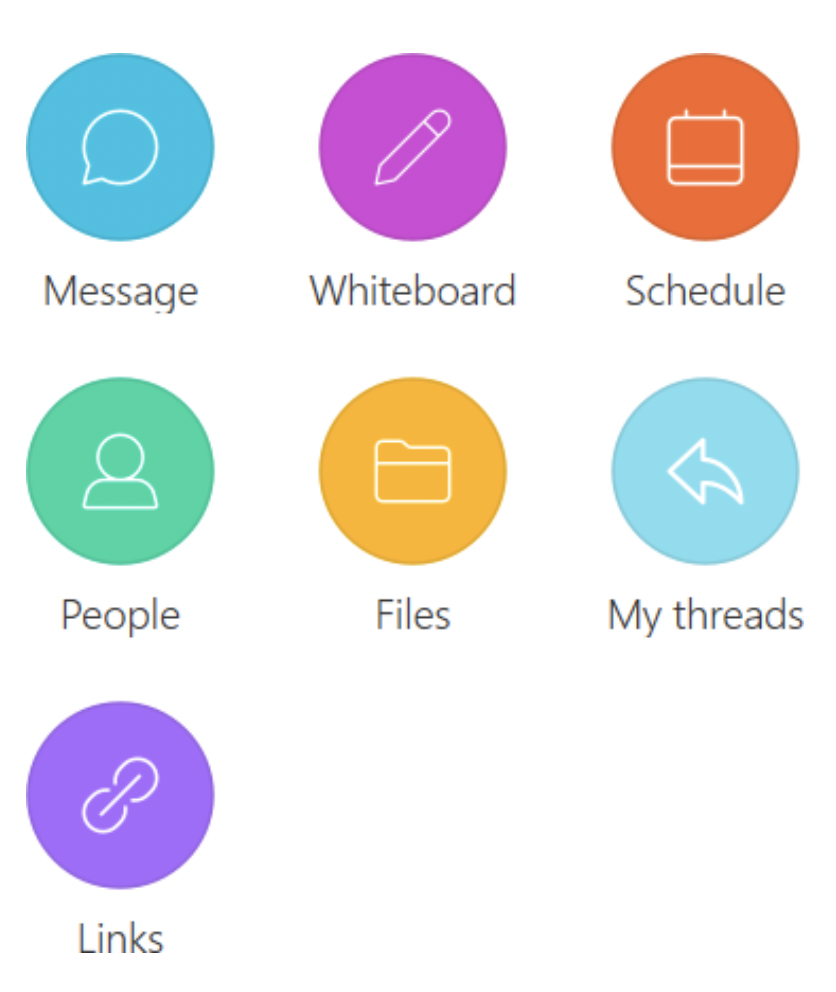
Clicking in the top right will open a list of space Activities
Message – Already open by default, allows you to send messages and chat in the space
Whiteboard – Lets you create and collaborate on a whiteboard and shows a list of previous whiteboards shared in the space
Schedule – Allows you to schedule and invite people to a space meeting using Microsoft Outlook or Google Calendar
People – Shows a list of space members and allows you to add new people to that space
Files – Displays a list of all files shared in the space
My Threads – shows all message threads you’re a part of
Links – Lists all links shared in the space
Messaging Options
When typing something to a space, there are options above the text box for enhancing the message
Attachment: Lets you attach and share a file with the message
Screen Capture: Opens screen capture mode to take, crop and attach a photo of your screen to the message
Format Texts: Gives aesthetic options for your message such as bold, numbered lists, and headings
Emojis: lets you add emojis to the message
GIF: You can search for and attach an animated GIF to your message
@Mentions: Places an @ in your message to search for and directly tag someone from the space
- This is a good way of notifying someone in a busy space of something important.
- Similarly, @All can be used to get everyone’s attention.
- This can also be done by simply typing the “@” itself
- Not available in Direct Messaging
My Personal Room Invite – Pastes link of your Webex Meetings Personal Room into message
- Only available if you’ve connected them through Settings
- More on Personal Rooms, see Calendar, pg 17
Message Response Options
When hovering over a message in a space (either from you or someone else), a few options for interacting with that message will appear
Edit Message: Only for your own message; allows you to edit the contents of your message
Start a Thread: Lets you reply directly to a message
- The responses are then posted directly below and connected to the first message
- The thread can be continually replied to keep a conversation together
- It can be easily found later through My Threads under Activities
Add a Reaction: Lets you attach the following emojis to someone’s message:
Quote Message: Copies that message as a quote into your next message
Forward Message: Brings up a search bar to find a contact or space to forward the message to
Flag Message: Marks the message as important, can be found by filtering the Space List for Flags
Delete Message: Only for your own message (unless you’re a moderator of a Moderated Space)
- Deletes the message from the space
Moderated Spaces
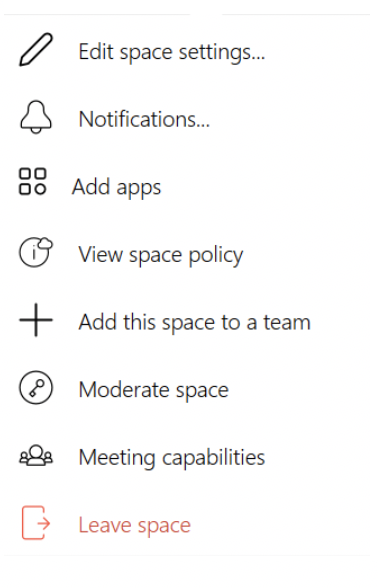
If you recall earlier, you can turn a Group Space into a moderated space under the Space Information menu. When a space is moderated, the following features become exclusive to the moderators:
- Editing space settings (name and picture)
- Adding or removing people to the space
- Assigning others as moderators
- Delete other people’s messages
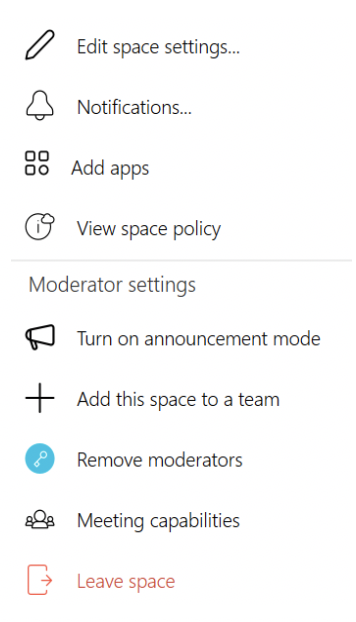
There is also the addition of “Moderator Settings” to the Space Information menu
Announcement Mode – this changes the space so only moderators can post content, start calls, schedule meetings, or use the whiteboards
Remove Moderators – Returns the space back to an unmoderated space
Teams
A team is for projects that have outgrown or are bigger than a single space. It is a way to have a group of related spaces put together under a common theme.
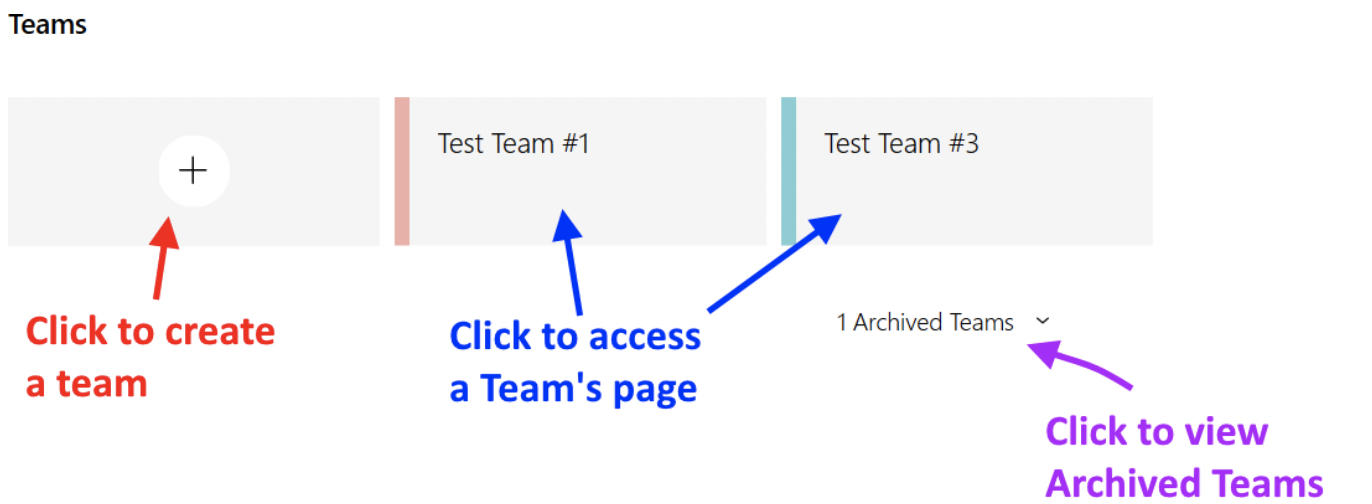
You can access your Teams by clicking on the Teams symbol in the navigation bar on the left.
Create a Team
- On the team page, click the plus icon to create a team
- It will then prompt you to name the team and optionally give it a description
- Click create and you’ll be taken to the Team’s page
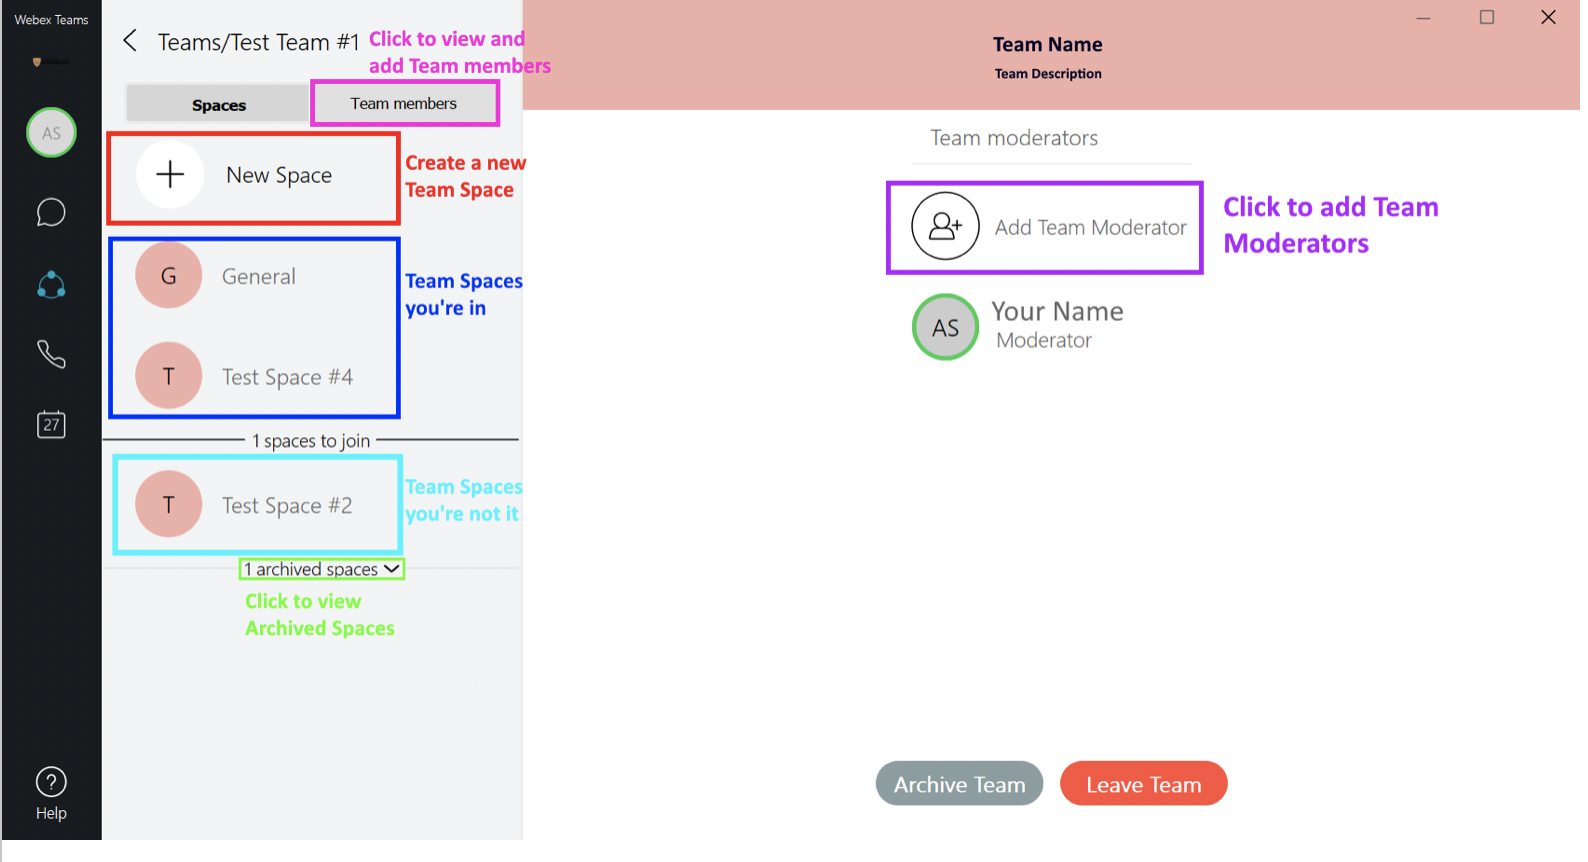
A Team’s Page
Team Moderators
When you create a Team, you automatically become a moderator for the team.
Team Moderators only have the following privileges:
- Adding or removing Team Members
- Editing the Team name and description
- Moderating the Team’s General Space (more on General Space below)
- Adding or removing Team Moderators
- Archiving the Team
Team Members
Anyone that has been added into the team (including moderators) is a Team Member.
Team Members have the following abilities:
- Create Team Spaces
- Adding or removing people from Team Spaces*
- Joining or leaving any Team Space
- Archiving a Team Space
- Utilizing any of the spaces’ activities (calls, whiteboards, etc)
*Team Members can add people into a Team Space without adding them into the Team. These people do not have access to the Team Page or the other Team Spaces
Team Spaces
Teams have two types of spaces. Each team has one General Space by default and any other space added in or created for the team is a Team Space
General Space
The General Space is a Team’s primary space that contains every Team Member (adding people into the space will add them into the team).
It is the only Team Space that can be moderated and is done so by the Team Moderators
It is also the only Team Space that cannot be archived
Team Space
A team space is any space that has been added into or created within a Team
You can Create a Team Space in two way
- Click “New Space” on the Team Page and type in a name for the space
- On a pre-existing team, go under Space Information and click “Add this space to a team”
Team Spaces can not be moderated so any member of the team can join, leave and edit the information for that space
Other than moderating, Team Spaces are the exact same as Group Spaces in terms of messaging, scheduling meetings, and engaging with activities (whiteboards, etc)
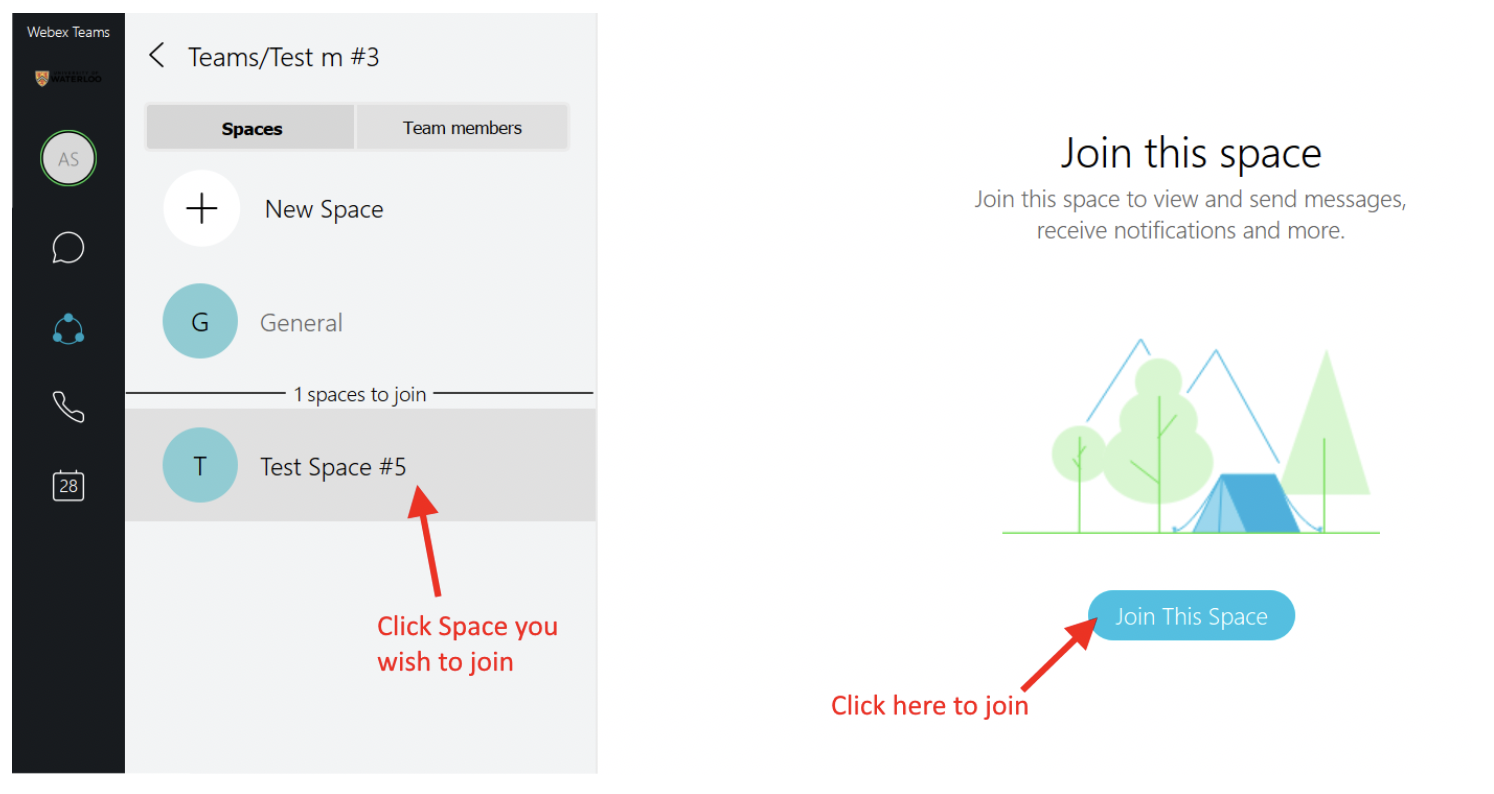
To join Team Space:
- Visit the Team Page with the Space you wish to join
- Spaces you don’t belong to are listed under “Spaces to join”
- Click on the space you wish to join and click “Join Space” on the right
Archiving a Team Space
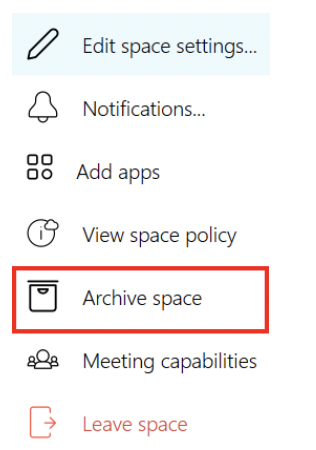
When a you and your team are finished using one of the Team Spaces it can be archived to keep it out of the way without deleting any of the important content. To archive a Team Space
- Visit the Team Space you wish to archive
- Access the Space Information list
- Select “Archive Space”
When a space is archived, none of the members of the space will be able to access it unless it is reactivated. You can do this by:
- Go to the Team’s Page and click the drop-down menu “archived spaces”
- Select the space to reactivate and click “Make Active”
Note: you do not have to be a Team Moderator to archive or reactive spaces
Archiving a Team
When you are finished with a Team, it and all it’s spaces can be hidden by archiving the team. You can do so by
- Visit the Team Page for the team you’d like to archive
- At the bottom of the screen, click “Archive Team”.
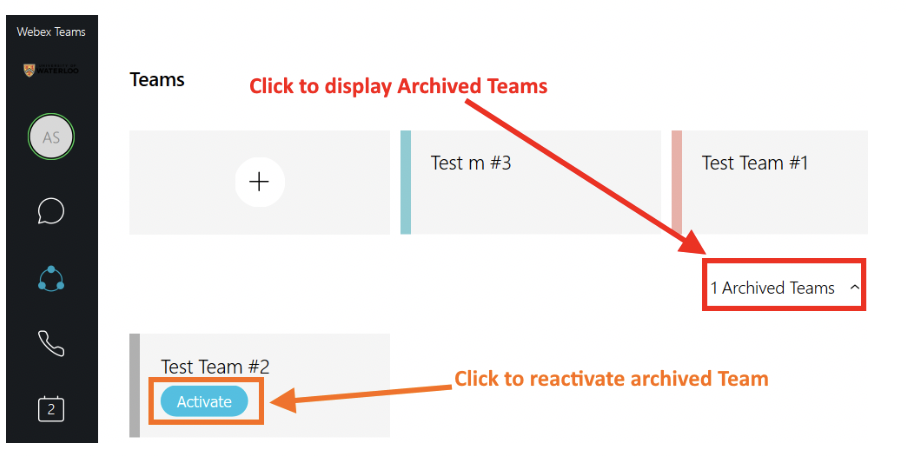
One archived, no Team Members will be able to see the Team or the Team Spaces. The team can be reactivated by:
- Visit the list of Teams by clicking the team icon in the navigation bar
- Click the drop-down menu labeled “Archived Teams”
- Find the team you wish to reactivate and select “Activate”
Calls
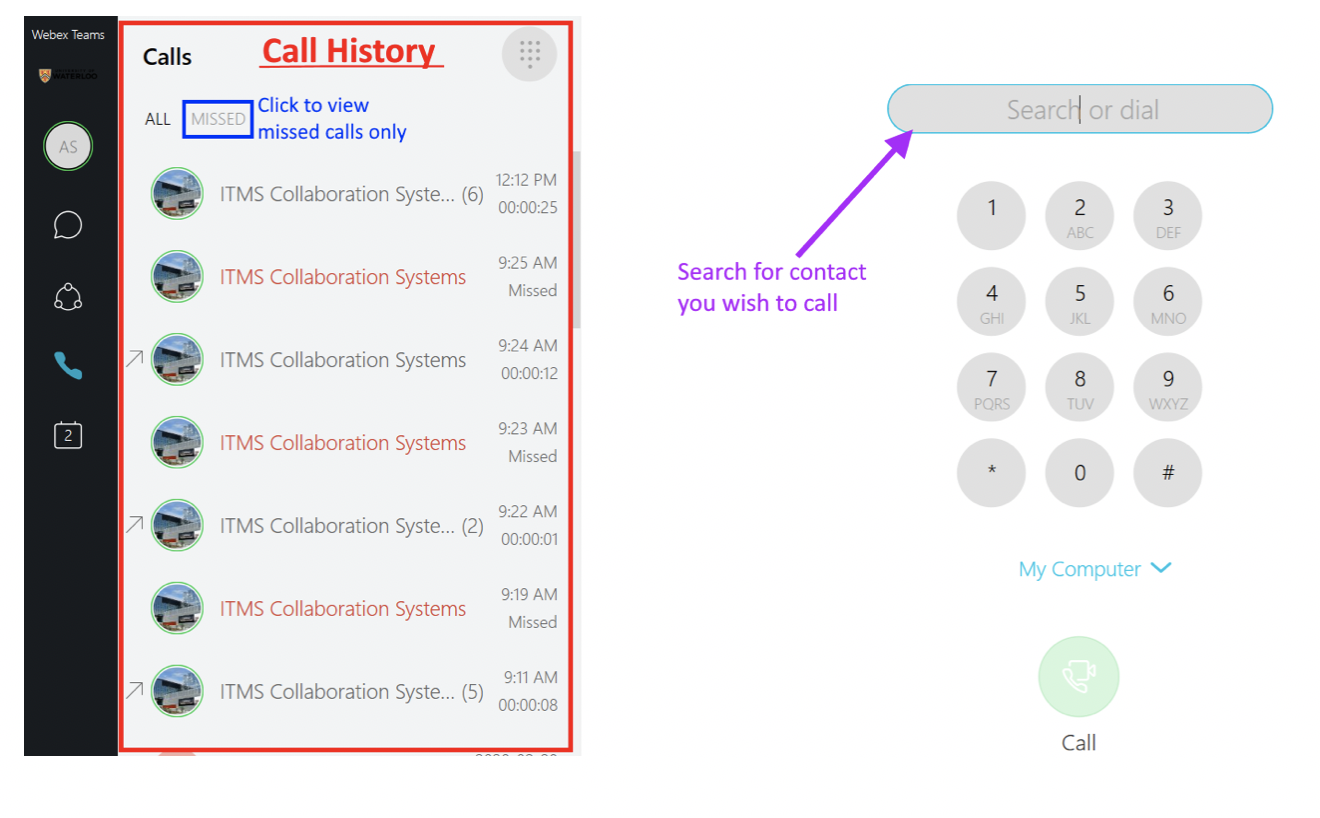
Clicking the phone icon in the Navigation Bar brings you to the Calls page.
Along the left is a list of your previous calls and meetings
On the right is a search bar and number pad. Once a contact is found, click “Call” at the bottom to initiate the call
You also have the option to use the drop-down menu currently displaying “My Computer” if you have any external Cisco devices connected that you’d like to use for the call
You can also click on any call along the left to view more information about the call with an option call them back
The arrow indicates the call was an outgoing call
Note: The University of Waterloo does not allow you to call actual phone numbers
Calendar
The final window you can access through the Navigation Bar is the calendar
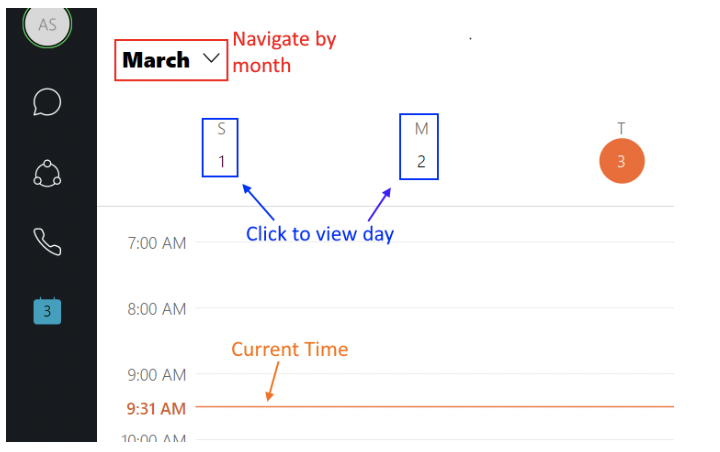
This calendar shows all your scheduled meetings from all your spaces
You can navigate months by clicking on the drop-down menu
Navigate the days by clicking on the day you wish to view
The current time is also displayed with an orange bar
WebEx Meetings Personal Room
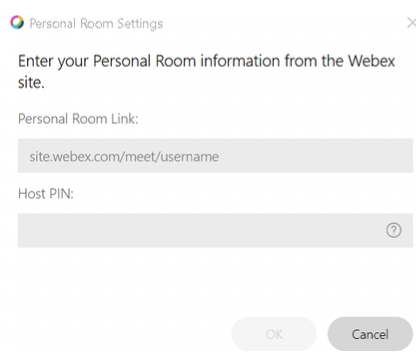
At the top of the Calendar window is an option to set up your WebEx Meetings Personal Room with WebEx Teams.
This opens the settings where you put in your Personal Room Link and “Host Pin”
WebEx Meetings is a program similar to skype that focuses on live collaborative meetings, video chat, and screen sharing.
A Personal Room is a meeting space associated with you that can be accessed with a specific and permanent link
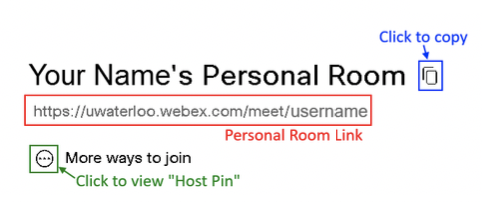
The Personal Room link and host pin can be retrieved by signing into the homepage of uwaterloo.webex.com which looks like:
Connecting the Personal Room with WebEx Teams allows you to have meetings in WebEx Teams with people who aren’t using WebEx Teams (i.e. WebEx meetings, video systems, etc)
Once connected, the top of the Calendar window becomes:
