Introduction to Using Breakout Rooms in WebEx Training
Breakout allows you to split the participants of your class session into separate rooms called Breakout Rooms, where students can collaborate in teams. Each session has its own presenter where content can be shared independently of the overall session. To begin
- Open your WebEx Training room.
- Click on Breakout from the navigation bar along the top of the application
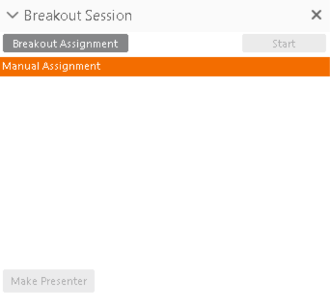
- Select Open Breakout Session Panel and Breakout Session Panel (pictured right) will appear in the bottom right corner of the screen
- Click on Breakout Assignment to setup the Breakout Rooms in a new window (pictured below)
Here you can create the rooms manually or automatically.
Creating Breakout Rooms in WebEx Training – Manually
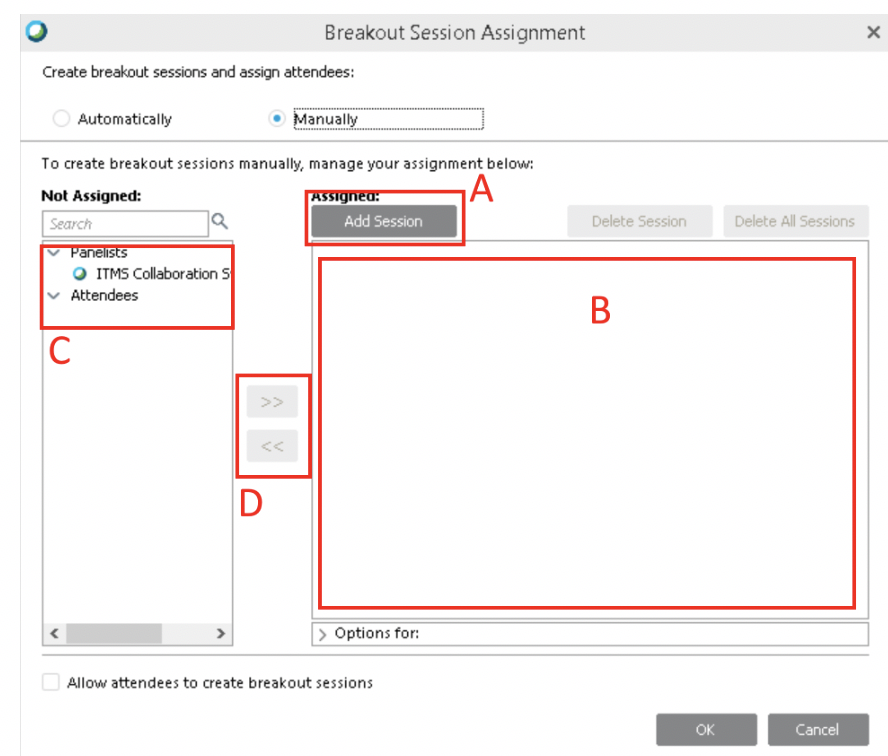
- Click on Add Session (A) to create a Breakout Room. For example, if you wanted 4 separate rooms, you would click this 4 times. Each room would appear listed below (B)
- Along the right (C) is a list of attendees who have yet to be assigned to a Breakout Room. Add them to a room by clicking on their name and clicking on the desired Breakout Room in B so that they are both highlighted in blue. Then click the arrow pointing to the right (D). (Left arrow removes them from the room)
- Once everyone has been added into a Breakout Room, click OK at the bottom (Note: This doesn’t start the sessions)
Creating Breakout Rooms in WebEx Training – Automatically
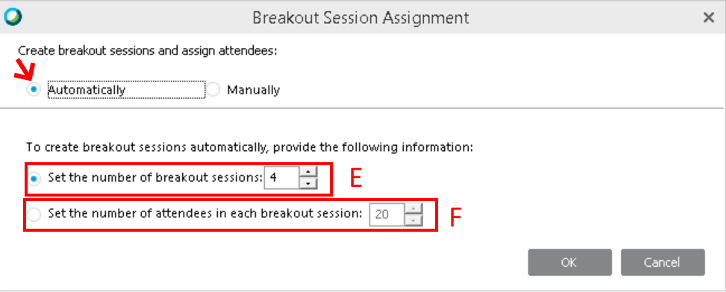
- To create rooms automatically, select Automatically from the top
- Choose between E, where it splits your session evenly into a desired number of rooms or F where it creates a specific number of rooms each containing the desired amount of people
- Once you’ve selected E or F and chosen the value, click OK (Note: this doesn’t start the sessions)
Starting the Breakout Room Session
Once the rooms have been created, you’ll see them in the Breakout Panel.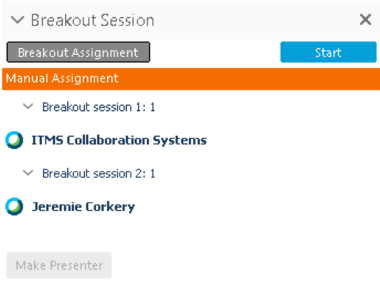
Each room has its own presenter (the blue/white ball) which can be chosen by the host. (Select name and click Make Presenter).
When you’re ready to begin the breakout, click Start.
Functions Within the Breakout Room
Once started, it informs each room’s presenter that they are the presenter and asks if they would like to start the session. It also asks everyone if they’d like to switch voice conference from the main session to the breakout session. Tell your TAs/students to click Yes for both
The presenter of each room can then share content in the same way they would outside the Breakout room (clicking Share in the navigation bar and choosing an application)
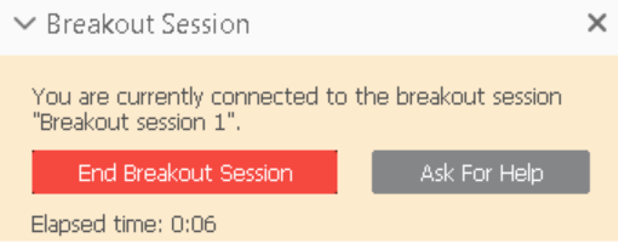
When inside a room, the Breakout Panel now looks like this for presenters
As the host, you will not see the Ask for Help option.
If you are not the presenter, it will say Leave Breakout Session instead of End Breakout Session.
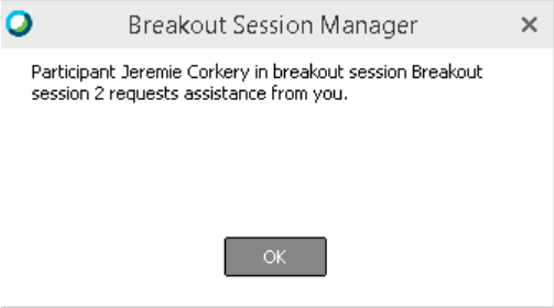
If someone clicks Ask For Help, the following notification appears on the host’s screen:
Host Functions Outside the Breakout Rooms
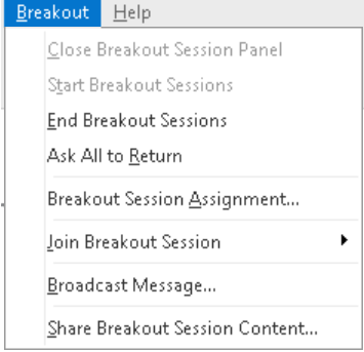
During and after the breakout session, the host can do a few things through the Breakout option in the navigation bar.
End Breakout Sessions will end every Breakout Room and return the participants to the main room.
Ask All to Return informs the presenters you wish them to end their session so they can do so and return to the main room manually.
Join Breakout Session displays all the rooms that you can join or leave as the host (For example this is what you would do if someone “asks for help”).
Broadcast Message lets you type out a message that is displayed in each Breakout room.
Share Breakout Session Contents can be used after you’ve ended all breakout sessions. You can select something that was done in any of the rooms (i.e. a whiteboard) and share it to the main room.
Related articles