Skip to end of metadata
Go to start of metadata

You are viewing an old version of this page. View the current version.

Compare with Current View Page History

« Previous Version 23 Next »

This article only applies to users with a Skype for Business phone extension. Skype for Business phone extensions start with the number 4.

 Make a call

Search for a user name

  1. In Skype for Business, click the contact button or the dial pad button and type the user's name into the search bar.


  2. Right-click the user's name, point to Call, and then choose the option you want to use to call them.

Call using the dial pad (External Contacts)

  1. Click the dial pad button, dial the number, and click the Call button. You can treat this dial pad like a regular phone.
    This is how you would call contacts outside UW. Note that you do not need to dial 6 before the number to make external calls.

 Voicemail

To access your voicemail from Skype for Business:

  1. Click the dial pad button.

  2. Click the voicemail icon.

  3. Choose Call Voicemail and it will call and connect to your voicemail.

 Add Skype for Business to your cell phone

**IMPORTANT** This option is only applicable to individuals whose roles DO NOT require calling students.

If you wish to use your personal cell phone to make/receive calls, you need to add the Skype for Business app to your phone.

 Install Skype for Business on your personal laptop

If you wish to install Skype for Business on your personal laptop:

 Forward/Redirect calls

Set up a Delegate

Before you can forward your calls to a different number, you need to set up a delegate.

Your delegate MUST also have a Skype for Business extension or this won't work.


  1. At the top of the Skype for Business main window, click the Options 

    The Options button on the Skype for Business main window.

     button.

    Skype for Business Main Menu Options
  2. In the window that opens, choose Call Forwarding and then click Edit my delegate members.

  3. Click Add and then type the same of the person who will be your delegate. Select that person and click OK.

  4. Congratulations!, You now have a delegate.

Turn Call Forwarding on or off

You can turn Call Forwarding on or off a couple of ways.

Option 1: The Options button

  1. At the top of the Skype for Business main window, click the down-arrow next to the Options The Options button on the Skype for Business main window. button.

    Skype for Business Main Menu Options
  2. Select Tools > Call Forwarding Settings.
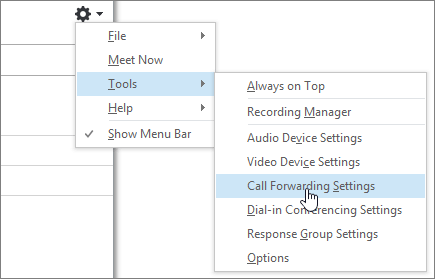
    Options Menu Call Forwarding
  3. Select Forward my calls to and then choose an option from the drop-down menu. If you choose My Delegates, it will forward your calls to the delegate(s) you set up in the section above.
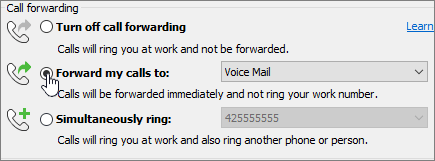
    Skype Call Forwarding Forward My Calls


  4. To turn off Call Forwarding, select Turn Off Call Forwarding.

Option 2: The Call Forwarding button

  1. At the bottom of the Skype for Business main window, click the Call Forwarding button.

    Skype for Business main menu Call Forwarding button
  2. Select Forward my calls to and then choose an option from the drop-down menu. If you choose My Delegates, it will forward your calls to the delegate(s) you set up in the section above
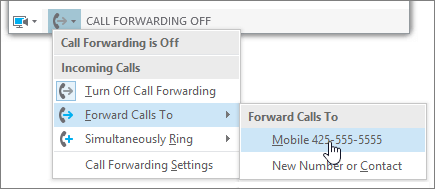
    Main Menu Call Forwarding Dropdown Menu


  3. To turn off Call Forwarding, select Turn Off Call Forwarding.

 Block incoming calls when in a call

If you need to block incoming calls while doing a call, you will have to set your Skype status to Do Not Disturb . Notice that you would need to change the status back to Available once you are finished with your call and would like to receive new ones.


  • No labels