Stress and Strain
Table of Contents
Introduction
Stress can be described as the intensity of an internal force acting on a cross-section passing through a point [1] and is calculated by dividing the force P with the area A of the given cross-section (σ = P/A). The SI unit for stress is newtons per square metre (N/m²), as stress is essentially the distribution of a force over an area. One newton per square metre is also equal to one pascal (1 Pa = 1 N/m²), and it is common to instead see megapascals being used in engineering applications (1 MPa = N/mm²) as many stresses end up in the millions range when using pascals.
Strain refers to the quotient of the change in dimension and the original dimension [2]. Note that the application of stress causes strain. Strain is unitless due to the definition of strain. To calculate strain, the units must be the same for the numerator and denominator, i.e. mm/mm, ft/ft, m/m, etc. If the strain of a material is equal to zero after the applied stress is removed, then the type of deformation is known as elastic. And if the strain of a material is not equal to zero after the applied stress is removed, then the type of deformation is known as plastic.
Types of Stress
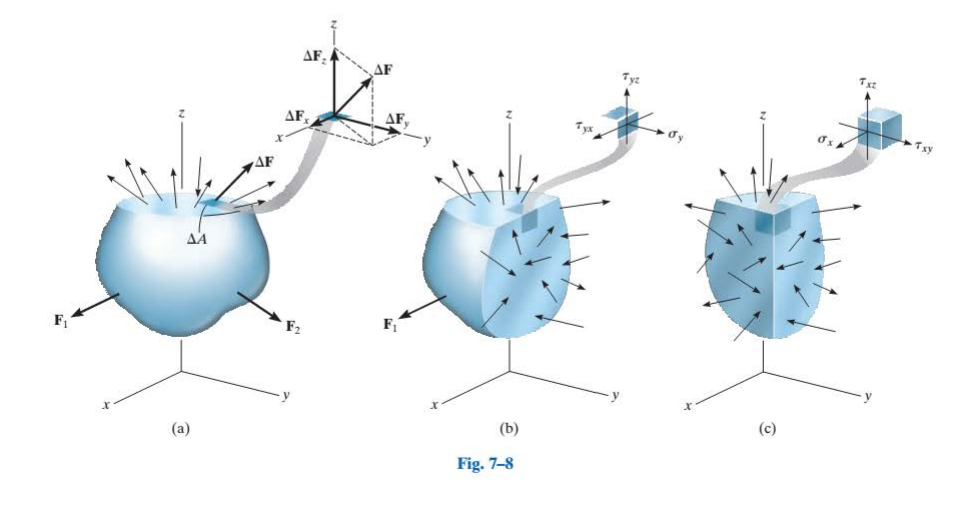
Normal Stress. The intensity of the force acting normal to the cross-section area is referred to as the normal stress, σ [1]. If the normal force ΔFz "pulls" on ΔA as shown in Fig. 7-8a, it is tensile stress, and if it "pushes" on ΔA it is compressive stress.
Shear Stress. The intensity of force acting tangent to ΔA is called the
shear stress, τ (tau) [1]. In Fig. 7-8a, the force ΔFy or ΔFz would be the contributing force to the shear stress.
| Resultant Effects of the Distribution of Loading that Acts over the Sectioned Area [1] |
Types of Strain
Since strain is caused and depends on the type of stress, the different types of stress cause different types of strain. With that, the types of strain are normal strain and shear strain. Normal strain is based on the elongation of the specimen, while shear strain is based on the change in angle of a specimen.
Normal Strain
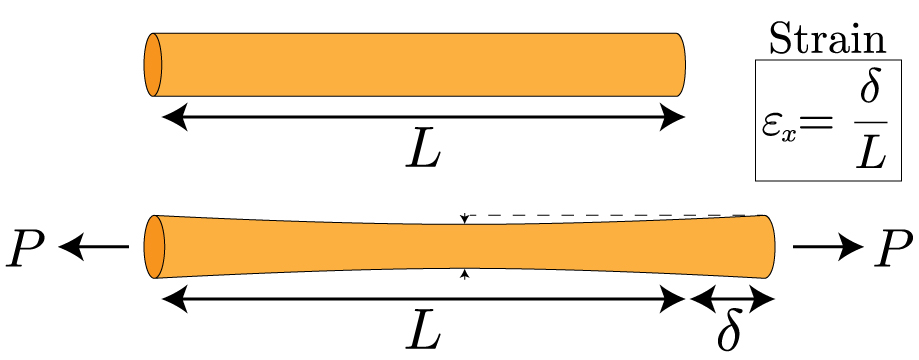
As shown in the figure below from [3], the application of a uniaxial load (normal stress) causes the specimen to elongate by 𝛿. Which can then be used to calculate the normal strain. In the figure below, L is the original length, 𝛿 is the increase in length and ε is the strain. Since, the specimen is a 3 dimensional object, the application of a uniaxial load causes strain in all axes. So the strain must be identified with a subscript of the strain in the specific axis.
| Normal Strain Caused by Uniaxial Load [3] |
Shear Strain
Compared to normal stress, a shear stress doesn't cause the specimen to elongate, rather it causes the geometry of the specimen to deform. For that reason, there needs to be a distinction between normal strain and shear strain. As shown in the figure below from [3], the application of a force that causes shear stress causes the specimens vertices angles to change. Like normal strain, shear strain is also unitless and the components of strain should have the same units. In the figure below, ΔL is the change in length from the original position, h is the height of the specimen and γ is the shear strain.
Shear Strain Caused by Load V [3] |
The Stress-Strain Diagram
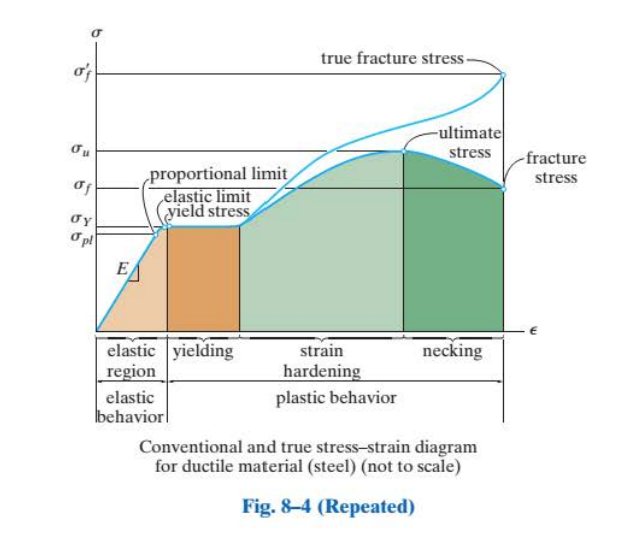
After stress and strain data is obtained from the tension and compression test, the results can be plotted to create a curve called the stress-strain diagram (Fig. 8-4). In a conventional stress-strain diagram, the engineering stress and strain of the specimen being tested is plotted onto the diagram. Engineering stress is determined by dividing the applied load by the specimen's original cross section. This calculation assumes the stress is constant throughout the cross section and length of the specimen. Engineering strain is found by dividing the new length of the specimen by the original length [1].
An interesting observation to note is that an when an object loaded up to its elastic limit (σy) has its loading removed, the object will return to its original shape, with minimal damage done to the material [1].
In most real world engineering applications, engineering stress and strain are used despite calculations being based on an objects original area before strain occurs. This is because most engineering design is done within the elastic region of a material.
| Stress-Strain Diagram [1] |
Materials Testing
Materials behave differently according to the type of loading, the temperature of the material, the speed at which the force acts onto the specimen, the way the material is manufactured, and a lot more variables. Material testing is a method to get the material properties which can be used when designing products, and making sure the material selection is correct.
Tension and Compression Test
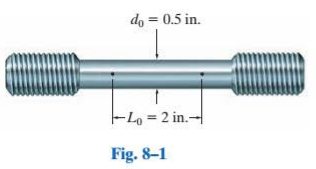
The strength of a material and its tendency to deform under stress can be gauged using the tension and compression test. To perform a tension or compression test, a specimen (Fig. 8-1) of the material is made into a "standard" shape and size [1]. The specimen is made with a constant circular cross section, sometimes with enlarged ends so that when tested failure will occur somewhere within the central region of the specimen. A testing machine is then used to apply a load on the specimen at a constant rate until failure occurs. The relation between stress and strain can then be acquired by measuring the rate at which the load is applied to the specimen and the elongation of the specimen from the load.
| Calculating Load [1] |
Impact Testing
Impact testing is done to determine the amount of energy absorbed by a material during fracture. This test also allows engineers to determine the toughness of a material, as well as if the material is brittle or ductile in nature [4].
Charpy Impact Test
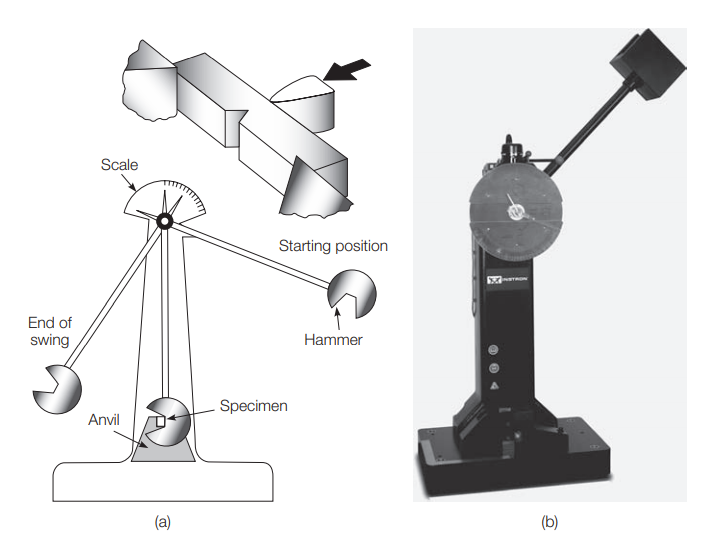
The Charpy V Notch impact test is an ASTM standard test used to measure the toughness of a material or the energy required to fracture a V-notched simply supported specimen. The specimen is first inserted into the Charpy V notch impact-testing machine as shown below. The swinging arm of the machine has a striking tip that impacts the specimen on the side opposite the V notch. By measuring the height the strike head reaches after striking the specimen, the energy required to fracture the specimen is computed [5]. This absorbed energy is a measure of a given material's notch toughness and acts as a tool to study temperature-dependent ductile-brittle transition [4]. This energy is measured in m • N, measured by a gauge on the machine.
Izod Impact Strength Test
Izod impact testing is an ASTM standard method of determining the impact resistance of materials. The Izod impact test differs from the Charpy impact test in that the specimen is held in a cantilevered beam configuration as opposed to a simply supported configuration. A pivoting arm is raised to a specific height (constant potential energy) and then released. The arm swings down hitting a notched sample, breaking the specimen. The energy absorbed by the specimen is calculated from the height the arm swings to after hitting the sample. A notched sample is generally used to determine impact energy and notch sensitivity [4]. An Izod impact testing machine can be seen below.
| Charpy V Notch Impact Testing Machine [5] | Izod Impact Testing Machine [6] |
Flexural Testing
Flexural testing is a ASTM test method for measuring behavior of materials subjected to simple beam loading. The specimen is set up as a simply supported beam and a load is applied at its midpoint. Maximum stress and maximum strain are calculated for increments of load. Results are plotted in a stress-strain diagram, and maximum stress at failure is flexural strength. Flexural yield strength is reported for materials that do not crack. The purpose of flexural testing is to ensure primary failure results from tension or compression. When a load is applied to a simply supported beam at its midpoint, the beam experiences compression on the concave side and tension on the convex side. This creates an area of shear stress along the midline, which must be minimized to ensure it does not cause failure. Flexure testing is often done on relatively flexible materials such as polymers, wood and composites [7].
Three-point Flexural Test
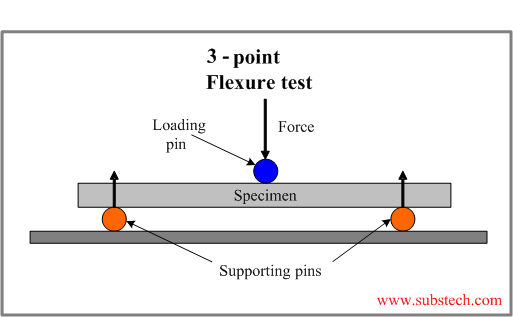
An example of a three-point flexural test can be seen in Figure 1 below. In a 3-point test the area of uniform stress is quite small and concentrated under the center loading point [7].
Four-point Flexural Test
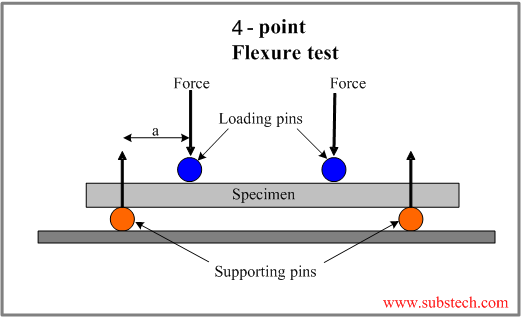
An example of a four-point flexural test can be seen in Figure 2 below. In a 4-point test, the area of uniform stress exists between the inner span loading points [6].
| Three-Point Flexure Test [8] | Four-Point Flexure Test [8] |
Fatigue Testing
Fatigue testing is the process of determining the behavior of materials under cyclic loads. During fatigue testing a specified mean load (that could be zero) and an alternating load are applied to a specimen, and the amount of cycles required to reach failure is recorded. This process is normally repeated with identical specimens and different loads. Loads may be applied axially, in torsion, or in flexure. Data from fatigue testing is often presented in an S-N diagram, as seen below in Figure 3 [8].
| Figure 3, S-N Diagram of 1045 Steel and 2014-T6 Aluminum [10] |
Finite Element Method
The finite element method, or FEM for short, is a mathematical way of determining the reaction of a structure to different conditions [11]. FEM is a useful tool when designing a product, since usually perfect solutions aren't required, and FEM provides a close enough. In order to use FEM, a CAD file must be made of the structure. Once uploaded into the FEM software, a mesh is created. A mesh is the collection of elements that make up the structure. FEM divides the structure into a finite number of elements and makes nodes that can be thought of as pin connections between the different elements [12]. Since real-world structures are continuous objects, if a finer mesh (more elements) is generated, the result would be closer to the real world reaction. A lot of algebra is then used to determine the reaction of the structure to the applied condition. After obtaining the output, the engineer can use their discretion to optimize the product as they see fit. A more detailed and in-depth method of using the FEM to analyze structure can be found at [13].
Stress Distribution
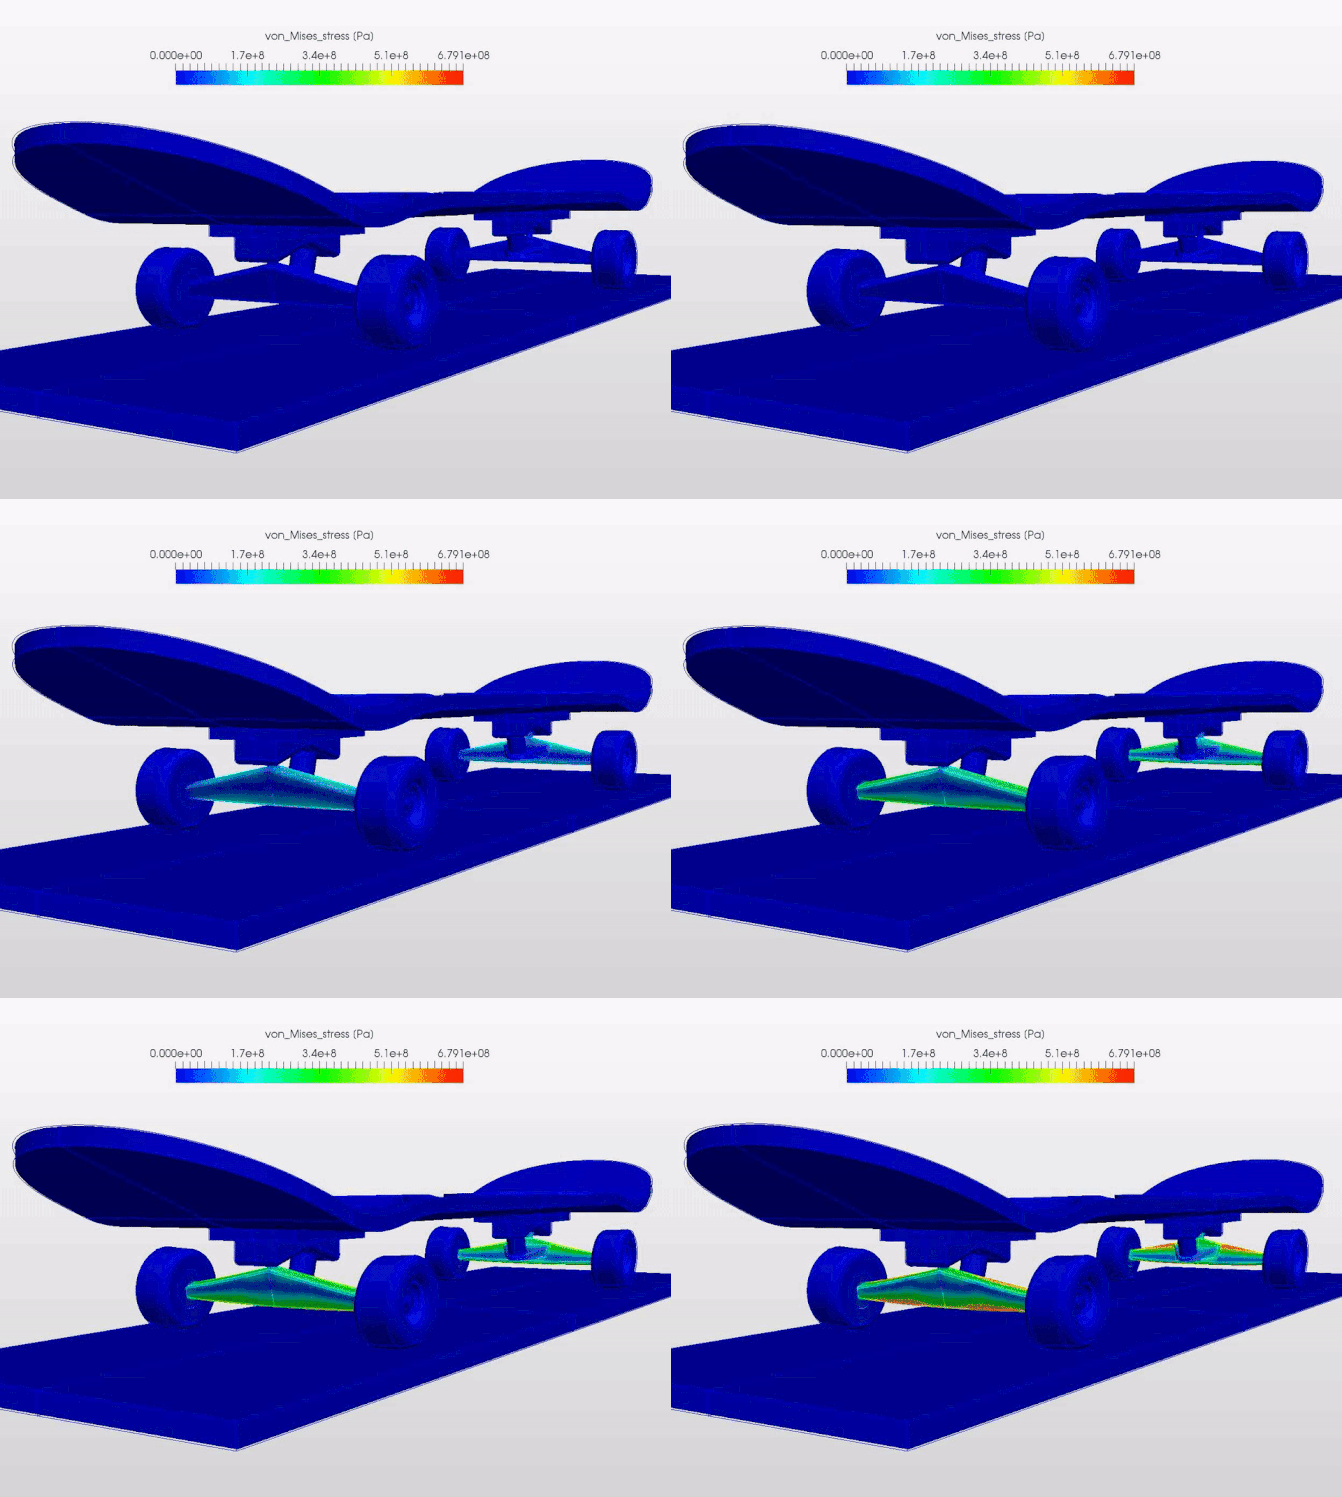
Finite element analysis, or FEA for short, is when the FEM is used to analyze a structure's behavior. If there is a load on the structure the stress distribution can be determined. Using the stress distribution, a prediction of where the structure will fail can be made. And if needed, changes to the design and CAD can be made to have a better product that can withstand a higher load. To use FEA software, the material properties of the structure must be used. A CAD model of any structure can be imported to perform an FEA of the stress distribution.
The displacement of a structure can also be modelled using FEA. Finding the displacement of a structure due to an applied load can be useful if the structure is required to be rigid. Depending on the product and the specifications, some flexibility may be required. An example of a stress distribution output is below.
| Stress Distribution on the Trucks of a Skateboard [14] |
Stress Concentrations
Stress concentrations are places on a structure that have a lot of stress. Stress concentrations are mainly due to the geometry of the structure. It is common practice to try to reduce stress concentrations to avoid premature failure. Stress concentrations are mainly located in "small radii and sharp corners that are in a load path" [15]. To reduce stress concentrations, fillets should be used instead of corners, and holes should be in the shapes of circles. For fillets, it's important to note that even a small fillet will have a stress concentration. So the larger the fillet, the less stress concentration. A good rule of thumb is to make the fillet as larger as possible within the requirements. Using fillets and circles will not eliminate stress concentrations, but rather decrease the maximum stress. This paragraph was written based on the article from [15].
Instrumentation
Calculating theoretical values is useful for designing a structure. But in order to accurately predict when and where the structure will fail, tests must be done on the manufactured part. Testing a sample of manufactured parts is required since the manufacturing of the product may cause a changes to the way the product reacts to real forces. The testing methods in the sections above are used for testing different materials. To test a part that is in use, the part must be instrumented with sensors to measure the stress and strain.
Strain gauges
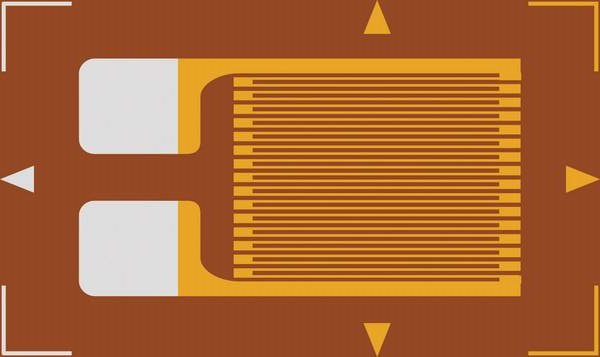
Strain gauges are simple electrical components that change resistance when deformed from an external force. The purpose of strain gauges is to measure the change in length of an object, which can then be converted to the load. Strain gauges come in different shapes, sizes and resistances. Note that strain gauges are directional since strain is also directional. Strain gauge rosettes are used when torsion and other complicated loading is being applied to the part being tested. As shown in the image below, a strain gauge is made up of thin parallel wires, and two large solder pads. Strain gauges are glued to the surfaces of materials using a special adhesive and procedure.
| Strain Gauge [16] |
Wheatstone Bridge Circuit
In order for a strain gauges to be useful, the change in resistance must be converted to a change in voltage. Which then can be fed into an ADC (analog to digital converter) to be able to practically read the values. A Wheatstone Bridge circuit can be used to convert the change in resistance to a change in voltage.
Load cells
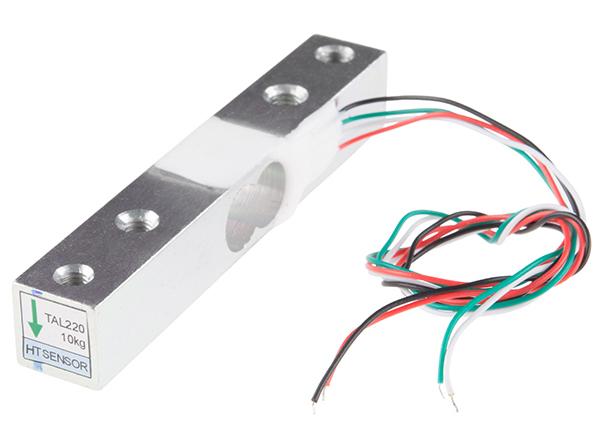
Load cells are used to convert a mechanical force into an electrical output [17]. Load cells can be used for a lot of different testing and weighing applications. There are different types of load cells such as strain gauge load cells, pneumatic load cells, and hydraulic load cells [17]. The most common type of load cell is the strain gauge load cell. Strain gauge load cells use integrated strain gauges and a full Wheatstone bridge connected directly onto the load cell. Load cells are loading specific. Loading specific means there are specific load cells for measuring tension/compression, shear, bending, etc. An example of a straight bar load cell is below.
| Straight Bar Load Cell [17] |
References
[1] R. C. Hibbeler, Statics and Mechanics of Materials, 5th ed. Pearson Education, 2016.
[2] D. R. Askeland and W. J. Wright, The Science and Engineering of Materials, Boston: Cengage Learning, 2016.
[3] Boston University, "Mechanics of Materials: Strain," [Online]. Available: https://www.bu.edu/moss/mechanics-of-materials-strain/. [Accessed 5 February 2021].
[4] Westmoreland Mechanical Testing & Research, Impact Testing, 2021. [Online]. Available: https://www.wmtr.com/en.impact-testing.html#:~:text=Impact%20test%20determines%20the%20amount,brittle%20or%20ductile%20in%20nature. [Accessed: 23-Feb-2021].
[5] M. S. Mamlouk and J. P. Zaniewski, Materials for civil and construction engineers. Pearson Education, 2018.
[6] “Izod Impact Test,” Goban Engineering Notes, 2021. [Online]. Available: https://sites.google.com/site/gobanengineeringnotes/materials-testing/impact-testing/izod-impact-test. [Accessed: 23-Feb-2021].
[7] Instron, “Flexure Test,” 2021. [Online]. Available: https://www.instron.us/en-us/our-company/library/glossary/f/flexure-test. [Accessed: 23-Feb-2021].
[8] D. Kopeliovich, “Flexural strength tests of ceramic,” SubsTech, 01-Jun-2012. [Online]. Available: https://www.substech.com/dokuwiki/doku.php?id=flexural_strength_tests_of_ceramics. [Accessed: 23-Feb-2021].
[9] Instron, “Fatigue Test,” 2021. [Online]. Available: https://www.instron.us/en-us/our-company/library/glossary/f/fatigue-test. [Accessed: 23-Feb-2021].
[10] eFunda, “High-Cycle Fatigue,” 2021. [Online]. Available: https://www.efunda.com/formulae/solid_mechanics/fatigue/fatigue_highcycle.cfm. [Accessed: 23-Feb-2021].
[11] IEEE, "What is the Finite Element Method?," IEEE, [Online]. Available: https://innovationatwork.ieee.org/what-is-the-finite-element-method/. [Accessed 24 February 2021].
[12] O. de Weck and I. Y. Kim, "Engineering Design and Rapid Prototyping: Finite Element Method," 12 January 2004. [Online]. Available: http://web.mit.edu/16.810/www/16.810_L4_CAE.pdfx. [Accessed 24 February 2021].
[13] K.-J. Bathe, "Finite Element Procedures," 2014. [Online]. Available: http://web.mit.edu/kjb/www/Books/FEP_2nd_Edition_4th_Printing.pdf. [Accessed 24 February 2021].
[14] A. Hussain, "Drop Test of a Skateboard - von Mises Stress," 2016 July 2016. [Online]. Available: https://www.simscale.com/projects/ahmedhussain18/dynamic_drop_test_of_a_skateboard/. [Accessed 24 February 2021].
[15] S. Thomas, "Stress Concentrations: How to Identify and Reduce Them in Your Designs," 22 March 2017. [Online]. Available: https://www.fictiv.com/articles/stress-concentrations-how-to-identify-and-reduce-them-in-your-designs. [Accessed 24 February 2021].
[16] Conrad, "Strain gauge 1 pc(s) ECF-350-1.5AA-(23)-O-SP (L x W) 4.5 mm x 3.5 mm," Conrad, [Online]. Available: https://www.conrad.com/p/strain-gauge-1-pcs-ecf-350-15aa-23-o-sp-l-x-w-45-mm-x-35-mm-1207591. [Accessed 24 February 2021].
[17] S. Al-Mutlaq, "Sparkfun: Getting Started with Load Cells," [Online]. Available: https://learn.sparkfun.com/tutorials/getting-started-with-load-cells/all. [Accessed 24 February 2021].
Contributors:
| User | Last Update |
|---|---|
| Mayurakhi Khan | 1114 days ago |
| Former user (Deleted) | |
| Former user (Deleted) | |
| Former user (Deleted) |
