Microsoft 365 Group provides a way for teams to work together more efficiently and effectively, by bringing together various Microsoft tools and services into a single platform. Microsoft Groups allows people to collaborate on projects, and files, schedule meetings and communicate with each other using various Microsoft applications, such as Outlook, Teams, and SharePoint. Groups also provides the ability to manage permissions and access to resources, such as shared calendars and OneDrive for Business.
In this article:
How to create a Microsoft 365 Group
A Microsoft 365 Group is auto-created when a Team is created within Microsoft Teams. A group can also be created after requesting a distribution list. Microsoft Groups include a shared calendar, a shared mailbox, and a SharePoint site where team members can collaborate on files.
To request a Microsoft Teams, complete this request form: https://uwaterloo.atlassian.net/servicedesk/customer/portal/137
To request a distribution list, complete this request form: https://uwaterloo.atlassian.net/servicedesk/customer/portal/2/group/410/create/1598 (Select New Mailing List > Distribution List)
When sending an email, you can share with Teams using the following selection:

It is possible to send emails to the Teams Group(s) however this is not a commonly used feature. If you accidentally send an email to the wrong Group, all members of the Group will be able to view it. If you do not want to retract an email sent to the Group, follow the instructions to recall and recover the email.
How to recall and recover an email sent to a Group
To recall and replace a message
Open the Outlook desktop app and on the left panel, choose the Sent Items folder.
Double-click to open the message you want to recall in a new window.
If you have the Classic Ribbon, from the Message tab, select Actions > Recall This Message.

If you have the Simplified Ribbon, select the Message tab and select (...). Select Actions and then choose Recall This Message.

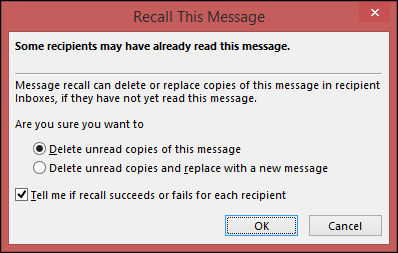
Select Delete unread copies of this message or Delete unread copies and replace with a new message, and then select OK.
If you’re sending a replacement message, compose the message, and then select Send.
Emails cannot be recalled within the Outlook web app or if the email is protected by Azure Information Protection.
To check on the recall
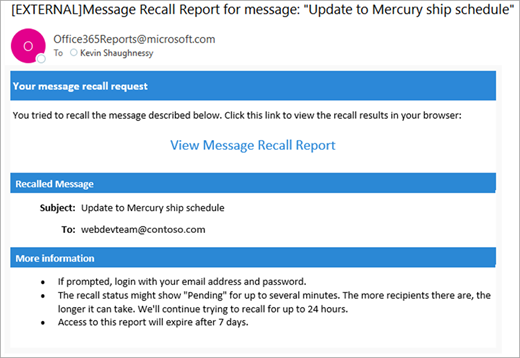
After submitting a recall request, you will get an email notification with the subject "Message Recall Report for message [message subject]".
Select the View Message Recall Report link to view the report in your browser. If you’re prompted, log in with your mailbox credentials to view the report.
Recall actions are typically quick, regardless of how many recipients are involved. However, if the recall request can not be executed right away for some reason (e.g., the recipient’s mailbox is temporarily unavailable) it'll continue to retry for up to 24 hours before marking the recall as failed.
The time to receive status updates can vary. For a very large number of recipients (thousands), the recall itself can take up to 30 minutes to retrieve the recall status for all recipients.
Related articles
Need help?
Contact the IST Service Desk online or 519-888-4567 ext. 44357.
Article feedback
If you’d like to share any feedback about this article, please let us know.