The Quiz Tool is used to create and manage quiz assessments. You can use these tools to help evaluate student progress and learning outcomes. When creating a quiz it is important to consider the design of your question(s). There are many different question types available, so you can choose the ones that best suit your course content. The quiz tool consists of three main areas: creating/managing quizzes, the question library, and quiz statistics.
Creating a quiz involves two parts: creating/importing the quiz questions and selecting your desired quiz settings
This article describes how to create a quiz. Please see /wiki/spaces/LEARN/pages/43596669803.
Please see the /wiki/spaces/LEARN/pages/43596668638 available regarding the New Quiz experience
In this article:
Please note that as of August 24 2023 there were changes to Quiz Timing Options and Auto Submit for Quizzes. See Quiz Timing Changes Overview
Creating a Quiz
Login to LEARN and navigate to your course.
Select Submit from the course navbar and select Quizzes from the drop-down menu.
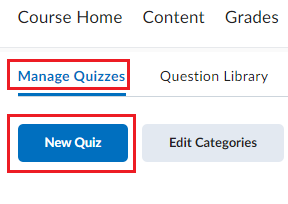
Click the New Quiz button under the Manage Quizzes tab.
Enter a Name for the quiz.
Click the Not in Grade Book dropdown menu to choose either Edit or Link to Existing to connect the quiz to an existing grade item or Add to Grade Book to create a new quiz.
If you have a grade book item for the quiz you are creating, click the Edit or Link to Existing option. You will then see the dropdown menu of Grade items already in your course to choose from. Once you select the corresponding grade item, click OK to save.
If you do not have grade items created, click the In Grade Book option and choose Add to Grade Book to create a grade item. You will then see an error message for the Grade Out Of score where you will need to enter the out of score for the quiz to remove the error message.
Once you enter your Grade Out Of score (this should match what the quiz is out of) the error message will go away and you can continue applying settings like the Due Date.
A Due Date is an instructor-given date (and time) deadline for submitting a quiz. However, a student may submit after the Due Date (up until an End Date, if one is set), in which case it is marked late, in red, in both the instructor and student view.
Include a Description if so desired, otherwise, you can move on to applying the additional settings on the right-hand panel, where you will see multiple sections where settings can be applied.
Note If a description is included, students will be able to see the text included in the description field unless the quiz is hidden. Applying a start date will not hide the description from students prior to its arrival.
Before moving on you’ll have to decide whether the quiz is going to be Asynchronous or Synchronous.
Asynchronous quiz
If you create an asynchronous quiz, students can start the quiz anytime between the start and end dates. The timer starts for each student when they click on “Start Quiz”. When the countdown timer for each student runs out, their quiz attempts can be automatically submitted (recommended in most cases), or you can choose to allow the student to keep working.
If a student experiences technical problems during the quiz, the timer keeps going, but as long as there is time left on the timer, they can re-enter anytime between the start/end times.
This is a good option if you want to give students a little flexibility.
Synchronous quiz NEW
If you create a synchronous quiz, this most closely mimics the “in-person” experience. All students can start the quiz at the exact same time, and when time runs out, their quiz attempts will be automatically submitted. If a student joins late, they will have less time to complete the quiz. If a student experiences technical problems, the timer keeps going, but as long as there is time left on the timer, they can re-enter anytime between the start/end times.
To set up an Asynchronous quiz
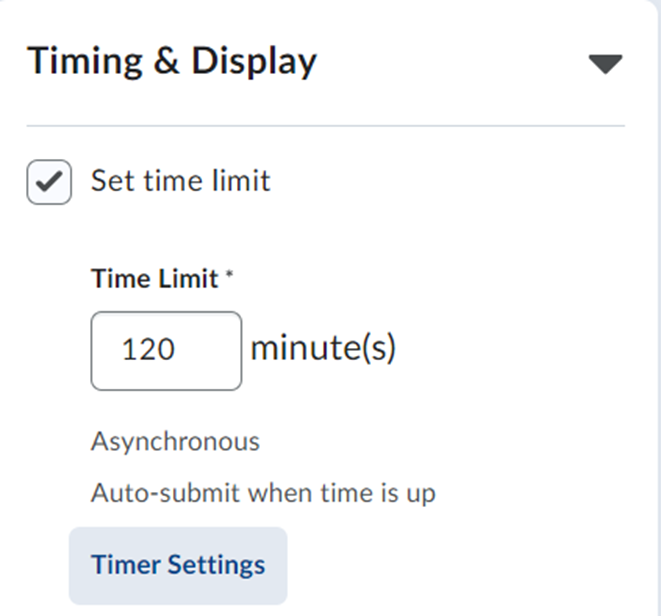
First set a start and end date and time under “Availability and Conditions” in the top right. Click on the name of the Timing & Display panel to expand it. Click on “Set Time Limit” under the Timing & Display drop-down menu and enter the time limit in minutes
The Start Date indicates when the assignment is released to students. Prior to the Start Date, students will be able to see the quiz (unless it is hidden), but they will not be able to access it.
The End Date is more restrictive. It cuts off the quiz at the End Date and time set, where the student can no longer start the quiz.
3. Click on the name of the Timing & Display panel to expand it.
The Timing & Display section is where you can set
Asynchronous or Synchronous quiz
A time limit for the quiz
Determine how many questions will display on each page, if you want to shuffle questions,
Allow hints
Disable email, instant messages and Alerts within LEARN.
To set a time limit for your Asynchronous quiz, first set a start and end date and time under “Availability and Conditions” above. Then click on the name of the Timing & Display panel to expand it. Click on “Set Time Limit” under the Timing & Display drop-down menu and enter the time limit in minutes.
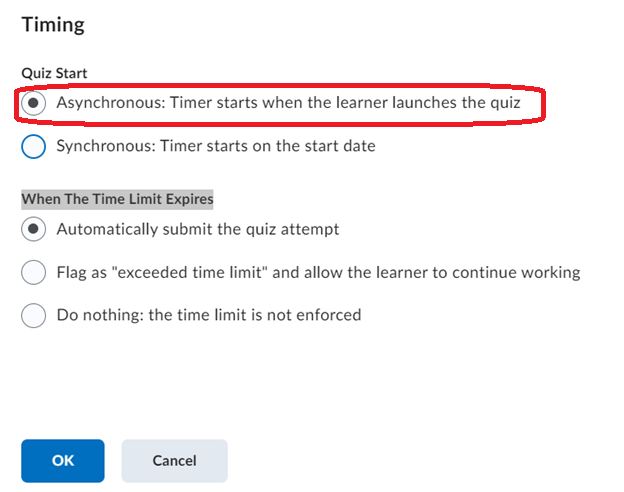
Click on Timer Settings and choose “Asynchronous: Timer starts when the learner launches the quiz” and then choose what you want to happen when time expires under When The Time Limit Expires:
You can decide how the questions will appear in the Paging section, under the Paging and Display drop-down menu. Options include All the questions displayed together, 1, 5 or 10 questions per page or you can Add page breaks after each section or if you want to Prevent users from going back to previous pages.
In the Shuffle section, you can decide if you want to Shuffle questions and sections within the quiz or not.
The Display section contains the option to Allow hints and to Disable Email, Instant Messages, and Alerts within LEARN. Please use the option to disable email, instant messages and alerts with caution. When this option is selected, it applies to all the student’s messages and alerts in LEARN for all courses, not just the course with the quiz where this setting is applied.
Finally, you can click Manage Header and Footer and add the appropriate text for the header and footer areas of the popup window.
If you will not be using Synchronous Quizzes, move on to the Attempts & Completion Tab below.
Synchronous Quiz NEW
Important Considerations for Synchronous Quizzes
D2L recommends not using an end date for synchronous quizzes because the calendar entry will then indicate the end-date and not the actual timing of when the synchronous quiz is happening. To show the actual quiz time on the calendar, do not set an end date (Preferred) or set an end date and time to exactly match the end of the quiz.
The default setting is auto-submit, and it is recommended that this setting is used as given that these sorts of quizzes will likely be used in higher-stakes midterm or exam situations. Instructors and students wouldn’t want attempts to not be graded because they are still pending submission.
Instructors will want to emphasize for students that a synchronous quiz is different than their previous quizzing experiences.
Clearly communicate in advance the time the quiz will occur, so that students can plan to be available.
Be cautious about making changes to the timing, once advertised, so students aren’t inconvenienced in adjusting their schedules again.
Instructors of fully Online classes will need to accommodate students that are not available at the time of the synchronous class since this isn’t a required meet scheduled in Quest. (E.g., they could have another class at that time.)
Instructors should be very clear that the advertised timing is Eastern Standard Time or Eastern Daylight Time. Students need to realize if they are elsewhere, the time of the quiz auto-adjusts and displays the equivalent time in their time zone and that regardless of where they are located, they are all writing the quiz at the same time.
To set up a Synchronous quiz “NEW”
First set a start date and time under “Availability and Conditions” in the top right:
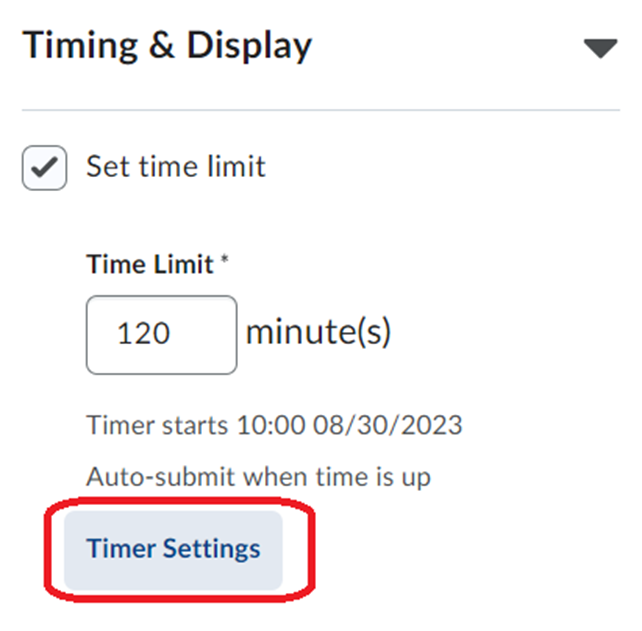
Then click on the name of the Timing & Display panel to expand it. Click on “Set Time Limit” under the Timing & Display drop-down menu and enter the time limit in minutes:
Then Click on Timer Settings. In the popup window that appears, select Synchronous: Timer starts on the start date. You will see the “Start Date” and “Time’s Up” date/time appear below this.
Please leave “When The Time Limit Expires” set to “Automatically submit the quiz attempt”:
You can decide how the questions will appear in the Paging section, under the Paging and Display drop-down menu. Options include All the questions displayed together, 1, 5 or 10 questions per page or you can Add page breaks after each section or if you want to Prevent users from going back to previous pages.
In the Shuffle section, you can decide if you want to Shuffle questions and sections within the quiz or not.
The Display section contains the option to Allow hints and to Disable Email, Instant Messages, and Alerts within LEARN. Please use the option to disable email, instant messages and alerts with caution.
When this is selected, it applies to all the student’s messages and alerts in LEARN for all courses, not just the course with the quiz where this setting is applied.
Finally, you can click Manage Header and Footer and add the appropriate text for the header and footer areas of the popup window.
Attempts & Completion Tab
The next section of the quiz settings is the Attempts & Completion section.
You can set the number of attempts a user will have to complete the quiz by clicking the Manage Attempts button.
Once the attempts window loads you will see the option to change the number of attempts from 1 to 10 or unlimited. You will also see the option to select the attempt that is graded. The options are available from the drop-down menu.
This section also allows you to place the quiz in a category if they exist and you can enter a Notification email(s) to alert someone of new attempts submitted.
Evaluation & Feedback tab
The Evaluation & Feedback section allows you to determine how the quiz interacts with the grades area of the course.
You are also able to Customize Quiz Results Displays by clicking the link and either editing the current view or creating an Additional View.
In the Customize Quiz Results Displays window, you can determine the date and time the view will be available or if the view will be available for a limited duration. If the option to limit the duration for which the view will be available is selected, enter the number of minutes the view will be available. The view will disappear once the designated time limit arrives.
The custom display will also let you enter a specific Message NEW that users will see when they access the view and if the attempt grades will be visible to users.
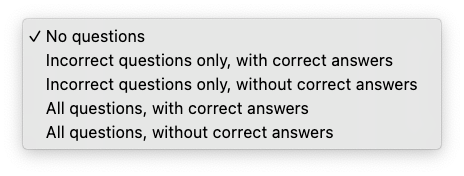
There are also multiple question view options in the custom display available. These include not showing any questions.
The following three options regarding showing the question are available. Multiple options can be shown at the same time.
If you choose to display Incorrect questions only with the learner’s responses or Correct questions with only the learner’s responses, you will only see two additional options for showing correct answers and showing the learner’s grade for the displayed questions.
Finally, you can determine if you will allow users to see statistics for the quiz by choosing to Display class average or Display grade distribution.
Negative grading can be enabled as an option in courses by a LEARN admin upon request. Please see How to Create a quiz with negative grading for more details.
Release Conditions and Special Access
Add Release Conditions to the quiz. You can choose to Create New or Add Existing condition(s).
Clicking either
Create New or Add Existing will open a pop-up window with the available Release Conditions you can apply.
If any users require Special Access to the quiz, click on the
Manage Special Access button in the Availability Dates & conditions drop-down menu. This will open a pop-up window, click on the Add Users to Special Access button.
This will allow you to set an alternate
Due Date, Start Date and End Date, provide a modified time limit as well as override the number of Attempts allowed. For detailed instructions please see the Special Access instructions.
Once you have set the special access for the user(s) who requires them, click on the
Save button to return to the previous popup window.
Click Save and Close.
Passwords can also be set for individual quizzes by entering the desired password in the text field available.
IP restrictions can be applied for a quiz but can only be used if you have an IP range that you can use that students will access the quiz from like in a Lab on campus etc.. Note: If you plan to use the IP restrictions, you will need to enter the starting and ending IPs in the sequence.
Need help?
Contact LEARNhelp at learnhelp@uwaterloo.ca or 519-888-4567 ext. 41744 for assistance.
Article Feedback
If you’d like to share any feedback about this article, contact LEARNhelp at learnhelp@uwaterloo.ca.

