...
Log in to Sendit using your UWaterloo username and password (Your username is your 8-character username, i.e. myuserna)
Enter the fields as shown in the screenshot below:
Recipient Email: email address(es) of the individual(s) to whom you want to send files
Subject: a subject for your message
Message (optional): enter the text of the email message to your recipient(s)
Notify when download occurs?: use the dropdown arrow to choose whether you want a notification when the file(s) are downloaded
Download Password (optional): The recipient can access the file simply by clicking on the link included in the email from the sender
or you have the option to secure the file transfer using a password, by entering a password in the Download Password field
**When setting the password, please note that the password must:Be a minimum of 6 characters
have at least one non-alpha-numeric character is required
The username, first name or last name is not supported
The less than/greater than and quotation symbols (i.e. <, >, ") cannot be used in the password
The password needs to be communicated to the recipient via phone or another method.
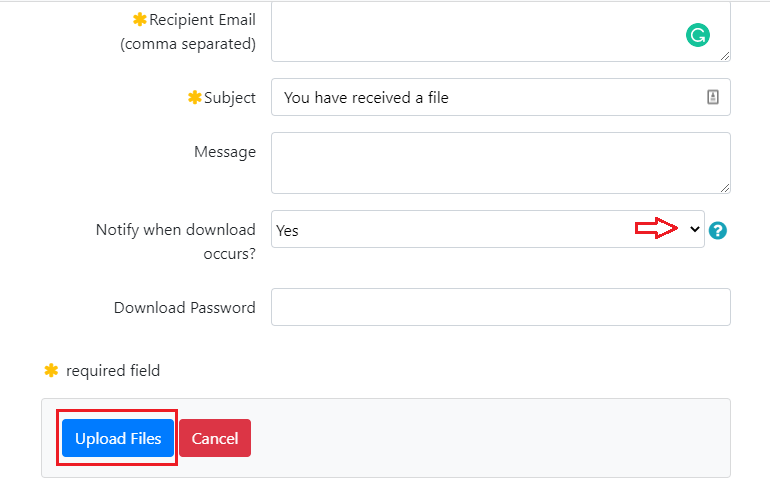
Click on the Upload Files button to browse for files to upload and send. **Important: make sure that the text and email address(es) are correct before you click on the "Upload Files" button as you will not be able to come back and edit these entries after you select the files to upload
Navigate to files and directories to choose the file(s) that you wish to send. Note If you want to send a folder, it will need to be zipped.
To remove a file selected in the transfer queue, click on the red Clear Queue button on the top right-hand side of the window. Note: If you return to edit the email or navigate away from the file upload page, you will need to re-select your files again (the list of selected files is not saved)


Once you have selected all of the files to transfer, click on the Start Upload button and the file transfer will start. You will see the Progress of the upload as well as the Time Remaining and the Status


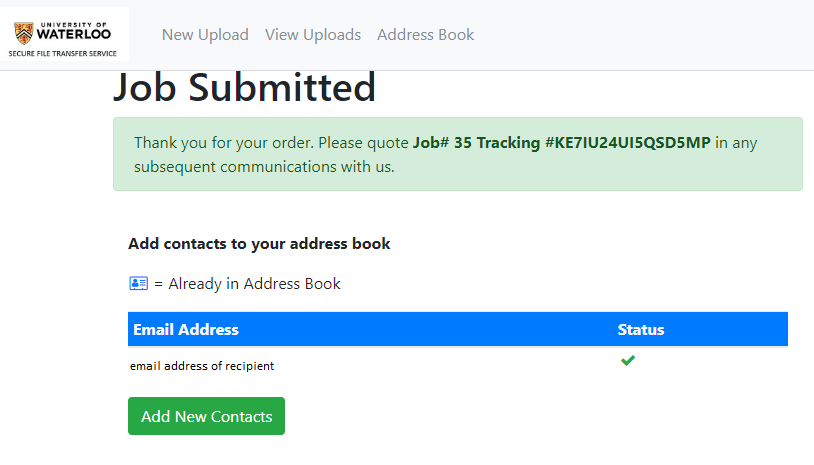
Once the file has been successfully sent, you will see a Job Submitted confirmation screen with your Job tracking number and the list of emails address to which the files were sent.

An email will be sent to the recipient(s) with a link to the download and the tracking number that will allow them to see and download your files (and only your files). (If the files are not downloaded within 10 days, you will need to upload them again.)
You will receive a confirmation email from IST administrator with the tracking number, date, and transaction details.
As the sender, you will be notified by email:
...
| Tip |
|---|
Article feedbackIf you’d like to share any feedback about this article, please let us know. |