...
| Anchor | ||||
|---|---|---|---|---|
|
Click the Meetings tab in the navigation menu on the left-hand side
Users can also schedule events from the homepage by following the steps outlined below
Click the down arrow beside the Schedule a meeting button
From the dropdown menu, click Schedule an event

On the scheduling page, adjust the settings explained below to meet your needs:
Basic Information:
...
Topic: Give the Event a title or topic name
Password: Set an Event password
Date and Time: Set the date and time of your event and indicate the estimated duration
Panelists: Enter the email addresses of the users you want to invite as panelists
Panelist password: Set a password that the panelists will use to enter the Event
...
Click the event you want to review, and you will be redirected to the page shown below. If you see a green join button, someone else is hosting this event. The green start button means that you are the host and can start the event by clicking the button.
...
Left to right
Edit: You can edit this event by clicking the pencil icon
Cancel: You can delete the event by clicking the trash icon
Click Manage registration to view the registration list, and accept or reject registrants
Click Customize your event pages to edit the page users will see when they register for the event
Click to the green Start Event button to begin the session
| Anchor | ||||
|---|---|---|---|---|
|
...
Attendees don’t need an account and do not present information. Event attendees are invited through the following methods:
Forwarding the invitation email. Hosts can send the email received titled (Forward to attendee), which contains information for the attendee to join. If registration is required they will be prompted to register and then sent the joining information once registration is accepted.
Hosts can also provide attendees with information found Event information so that they can join the event:
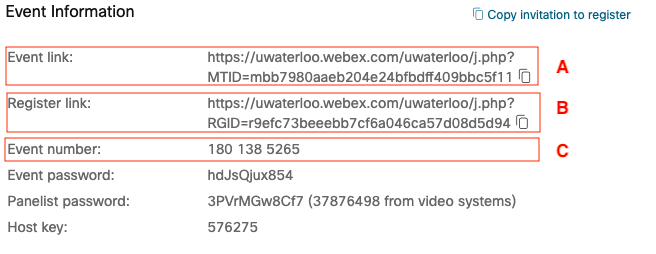
Event link: Hosts can copy the event link and send it to attendees however they see fit. If there is no registration required, attendees will be prompted to join the meeting as soon as they click the event link.
Register link: When registration is required, hosts will be provided with a register link to send to attendees. Attendees will receive an email with a join link once their registration is accepted.
Event number: This number should be sent to anyone who will be joining by telephone.
Inviting Panelists
Panelists are assigned by the event host. Panelists can share content during the event. Panelists can be invited through the following methods:
Assign panelist during scheduling: Hosts can enter the email address(es) to the users they want to add as panelists. The panelist will receive an email to join the event as a panelist. The Panelist password will be included in the email and users must enter this password to join the event as a panelist.
Assign panelist after scheduling: Hosts can add panelists to pre-existing events by clicking the title of the event and adding the email address of the user in the Panelist section on the right-hand side.
...
| Anchor | ||||
|---|---|---|---|---|
|
View and Manage Registration for Events (New)
Go to uwaterloo.webex.com and log in with your UW credentials
Select Meetings in the navigation menu on the left-hand side
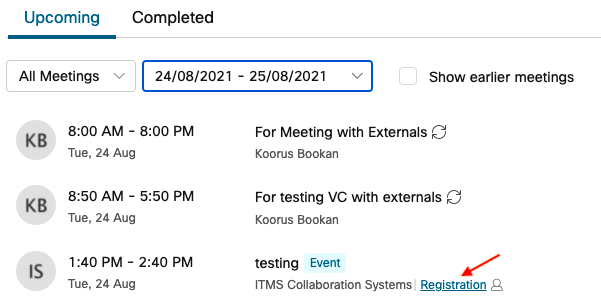
Find the event in the upcoming meetings list and select the Registration button below the title
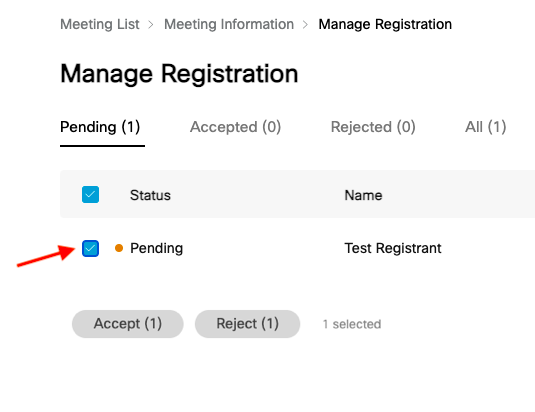
You will be redirected to a Manage Registration page where you can view and manage pending, approved, and rejected requests.
Click the check box beside each registrant and then click Accept or Reject.
An email will be sent to accepted registrations with information to join the meeting. An email will also be sent to rejected registrants, informing them that they have been rejected.
Hosts can also change the status of accepted or rejected registrants
To accept a rejected registrant: Select the registrant in the Rejected or All list, then select Accept
To reject an accepted registrant: Select the registrant in the Accepted or All list, then select Reject
| Filter by label (Content by label) | ||||||||||||||
|---|---|---|---|---|---|---|---|---|---|---|---|---|---|---|
|
| Info |
|---|
Need help?Contact the IST Service Desk online or 519-888-4567 ext. 44357. |
| Tip |
|---|
Article feedbackIf you’d like to share any feedback about this article, please let us know. |