Microsoft 365 Group provides a way for teams to work together more efficiently and effectively, by bringing together various Microsoft tools and services into a single platform. Microsoft Groups allows people to collaborate on projects, and files and , schedule meetings and to communicate with each other using various Microsoft applications, such as Outlook, Teams, and SharePoint. Groups also provides provide the ability to manage permissions and access to resources, such as shared calendars and OneDrive for Business.. Additional information about Microsoft groups is available: https://learn.microsoft.com/en-us/microsoftteams/office-365-groups
In this article:
| Table of Contents | ||||
|---|---|---|---|---|
|
Integration of Teams and Outlook
When you create a group in Outlook, you can manage the group's shared calendar, shared mailbox, and other resources. You can also use the group's email address to communicate with other members of the group.
When you create a team in Teams, a Microsoft 365 Group is automatically created for the team. This group includes a shared calendar, a shared mailbox, and a SharePoint site where team members can collaborate on files. If you create a Microsoft 365 Group in Outlook, you can use it with Teams by adding the group to a new or existing team. This way, you can access the group's shared resources directly from Teams.
If you create a new team in Teams, you can create a new Microsoft 365 Group that includes a shared mailbox and calendar for the team to use. You can also invite people from your Outlook contacts to join the team.
...
Open Outlook on the web
In the left pane, under Groups, select New group or right-click Groups and select New group.Note: If you don't see Groups in the left pane, your organization may not have turned on Groups.
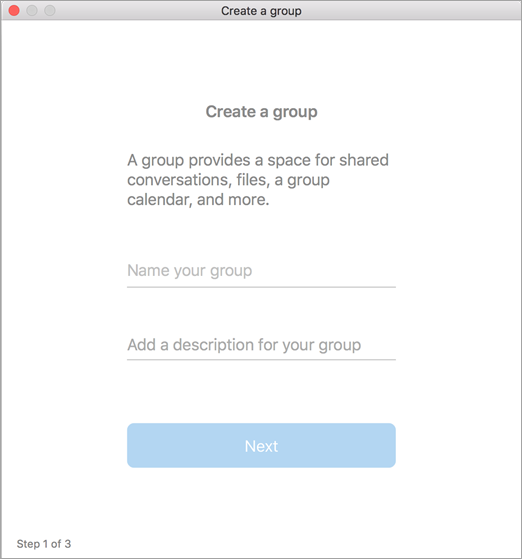
Fill out group information:
Group name: Create a name that captures the spirit of the group.
Once you enter a name, a suggested email address is provided. "Not available" means the group name is already in use and you should try a different name. Note that once you choose a group name, it cannot be changed.
Description: Optionally, enter a description that will help others understand the group's purpose. This description will be included in the welcome email when others join the group.
Privacy: By default, groups are created as Private. This means only approved members in your organization can see what's inside the group. Anyone else in your organization who is not approved cannot see what's in the group.
Select Public to create a group where anyone within your organization can view its content and become a member.
Select Private to create a group where membership requires approval and only members can view group content.
Classification: Choose a classification. Options available depend on what your organization has set up.
Send all group conversations and events to members' inboxes Optionally, check this box to enable members to see all group conversations and events in their inbox without having to visit separate group workspaces. Members can change this setting for their own mailboxes.
Select Create.
...
Instructions for classic Outlook on the web
Open Outlook on the web.
In the left pane, next to Groups, select the + button. (If you don't see the + button, hover your mouse over the left pane.)
Note: If you don't see Groups in the left pane, your organization may not have turned on Groups.
Fill out the group information.
Group name: Create a name that captures the spirit of the group.
Once you enter a name, a suggested email address is provided. "Not available" means the group name is already in use and you should try a different name. Note that once you choose a group name, it cannot be changed.
Description: Optionally, enter a description that will help others understand the group's purpose. This description will be included in the welcome email when others join the group.
Privacy: By default, groups are created as Private. This means only approved members in your organization can see what's inside the group. Anyone else in your organization who is not approved cannot see what's in the group.
Select Public to create a group where anyone within your organization can view its content and become a member.
Select Private to create a group where membership requires approval and only members can view group content.
Classification: Choose a classification. Options available depend on what your organization has set up.
Send all group conversations and events to members' inboxes Optionally, check this box to enable members to see all group conversations and events in their inbox without having to visit separate group workspaces. Members can change this setting for their own mailboxes.
Select Create.
...
Instructions for Outlook on MAC
Open Outlook for Mac.
Select File > New > Group.
Fill out the group information:
Group name: Create a name that captures the spirit of the group.
Once you enter a name, a suggested email address is provided. "Not available" means the group name is already in use and you should try a different name. Note that once you choose a group name, it cannot be changed.
Description: Optionally, enter a description that will help others understand the group's purpose. This description will be included in the welcome email when others join the group. Click Next.
Type member email addresses or select members from the contact list to add to the group. You can add guests who are people outside your school or your organization to the group.
Privacy: By default, Groups are created as Private. This means only approved members in your organization can see what's inside the group. Anyone else in your organization who is not approved cannot see what's in the group.
Select Public to create a group where anyone within your organization can view its content and become a member.
Select Private to create a group where membership requires approval and only members can view group content.
Classification: Choose a classification. Options available depend on what your organization has set up.
Click Create. You'll see a welcome mail in your newly created group inbox.
Instructions for Outlook on Windows
Open Outlook for Windows.
Select Home > New Group.
Fill out the group information.
...
Group name: Create a name that captures the spirit of the group.
Once you enter a name, a suggested email address is provided. "Not available" means the group name is already in use and you should try a different name. Note that once you choose a group name, it cannot be changed.
Description: Optionally, enter a description that will help others understand the group's purpose. This description will be included in the welcome email when others join the group.
Classification: Choose a classification. Options available depend on what your organization has set up.
Privacy: By default, Groups are created as Private. This means only approved members in your organization can see what's inside the group. Anyone else in your organization who is not approved cannot see what's in the group.
Select Public to create a group where anyone within your organization can view its content and become a member.
Select Private to create a group where membership requires approval and only members can view group content.
Send all group conversations and events to members' inboxes Optionally, check this box to enable members to see all group conversations and events in their inbox without having to visit separate group workspaces. Members can change this setting for their own mailboxes.
Select Create.
...
Open the Outlook mobile app.
...
Select Groups from the folder pane.
...
In the Groups header, tap +.
...
On the New Group page, type a name for the group > Next.
On the Settings page, enter the required information, including privacy level, (Public or Private), classification, and whether group members should follow group conversations and events in their personal inboxes.
Tap Create.
Type member email addresses or select members from the contact list to add to the group. You can add guests to the group.
Tap Add. You'll see a welcome mail in your newly created group inbox.
...
could we have screenshots:
Open Outlook
In the left navigation pane, click on Groups at the bottom.
Click on the New Group button on the top left.
Choose Create a group.
Select From a team or group and choose the desired team or SharePoint group from the list.
Follow the prompts to finish creating the group.
Once you have created the group in Outlook, you should be able to see the group's shared mailbox and calendar in Outlook. You can also send emails to the group's email address, and the emails will be visible to all members of the group in Teams or SharePoint.
...
| Note |
|---|
Be cautious when sending emails to Microsoft Teams groups from Outlook. If you accidentally send an email to the wrong group, all members of the group will be able to see the message. |
...
If you wish to send your email to your Teams or SharePoint group.
You may send an email to the group. You will receive this warning pop-up warning that the content of the message will be available to all members of the group.
...
If you realize you have accidentally sent an email to the wrong group or need to correct an error in the email, you can try to recall the message.
...
|
How are groups created in Outlook?
A group is automatically created in Outlook when a Team is created within the Microsoft Teams application. (To request a Team to be created, please complete the request form.)
A group can also be created after requesting a distribution list. To request a distribution list, complete the request form. Under topic select New Mailing List -> Distribution List.
A distribution list (DL) is similar to a mailing list. They are used to send emails to a group of people. With a DL, members of the list cannot reply to the DL’s to send emails to people in the group.
![]() If an email is moved from your personal mailbox into an Outlook group, the contents of the email will then be available and accessible to everyone within that group.
If an email is moved from your personal mailbox into an Outlook group, the contents of the email will then be available and accessible to everyone within that group. ![]() For example, if an email is moved from your personal inbox to the Green Office group, all members of the Green Office group can view that email. When moving that email to the group, the following prompt will appear.
For example, if an email is moved from your personal inbox to the Green Office group, all members of the Green Office group can view that email. When moving that email to the group, the following prompt will appear.
If you want to move the email to the group, select OK.
If you would not want to move the email to the group, select Cancel.
...
| Note |
|---|
If you unintentionally move an email to a group within Outlook, it can be recalled by following the instructions to recall and recover the email below. |
How to recall and recover an email sent to a group in Outlook
To recall and replace a message
Note: Emails cannot be recalled within the Outlook web app.
Open the Outlook desktop app and on the left panel, choose the Sent Items folder.
Double-click to open the message you want to recall in a new window.
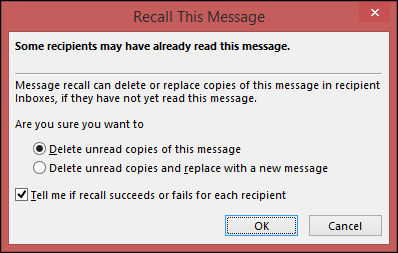
If you have the Classic Ribbon, from the Message tab, select Actions > Recall This Message.

If you have the Simplified Ribbon, select the Message tab and select (...). Select Actions and then choose Recall This Message.

Select Delete unread copies of this message or Delete unread copies and replace with a new message, and then select OK.
If you’re sending a replacement message, compose the message, and then select Send.
To check on the recall of a message
After submitting a recall request, you will get a status update via an email notification with the subject "Message Recall Report for message [message subject]". The time to receive status updates about the recalled email can vary. For a large number of recipients (i.e. thousands), it can take up to 30 minutes for the email to be recalled from all recipient’s inboxes.
Select the View Message Recall Report link from the email notification to view the report in your browser. If you’re prompted, log in with your mailbox credentials to view the report.
The message recall report will indicate whether
the email has been recalled
is currently in progress of being recalled
or if the recall has failed.

| Info |
|---|
Recall actions are typically quick, regardless of how many recipients are involved. However, if the recall request can not be executed right away for some reason (e.g., the recipient’s mailbox is temporarily unavailable) it'll continue to retry for up to 24 hours before marking the recall as failed. this failed status can be viewed by clicking onthe Message Recall Report. |
Related articles
| Filter by label (Content by label) | ||||||||||||||
|---|---|---|---|---|---|---|---|---|---|---|---|---|---|---|
|
...
|
...
|
| Info |
|---|
Need help?Contact the IST Service Desk online or 519-888-4567 ext. 44357. |
| Tip |
|---|
Article feedbackIf you’d like to share any feedback about this article, please let us know. |