...
Gradebook set-up using the Setup Wizard
Step-by-step guide
Select Grades from the course navbar.
It is recommended that the first time you create a gradebook, you select Setup Wizard.

Click on the Start button. As you go through the seven steps of the Grades Setup Wizard, it is recommended to leave the gradebook settings with the default choices.
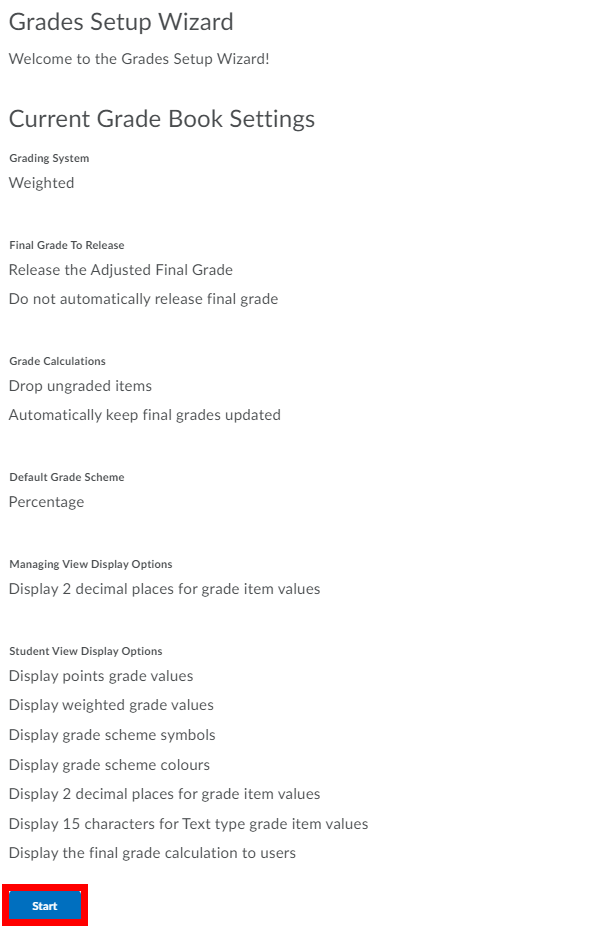
Click through until you hit Finish.
...
Gradebook Categories let you organize and group related grade items into sections (grade items are required in order to add marks). When grade items are grouped together in a category, you can distribute points equally across all grade items, weight individual items or drop the highest or lowest item in the group (e.g., weekly quizzes). For any gradebook item that can stand on its own (e.g., Final Exam), a category is not necessary.
Step-by-step guide
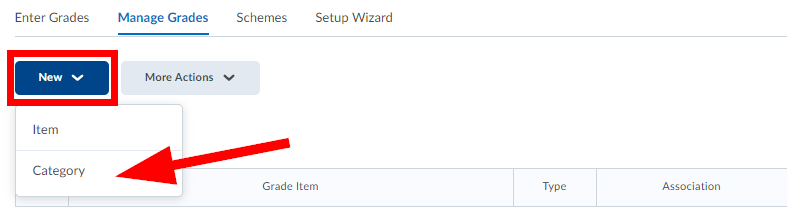
Select Grades from the course navbar.
Click the New button and select Category from the drop-down list.
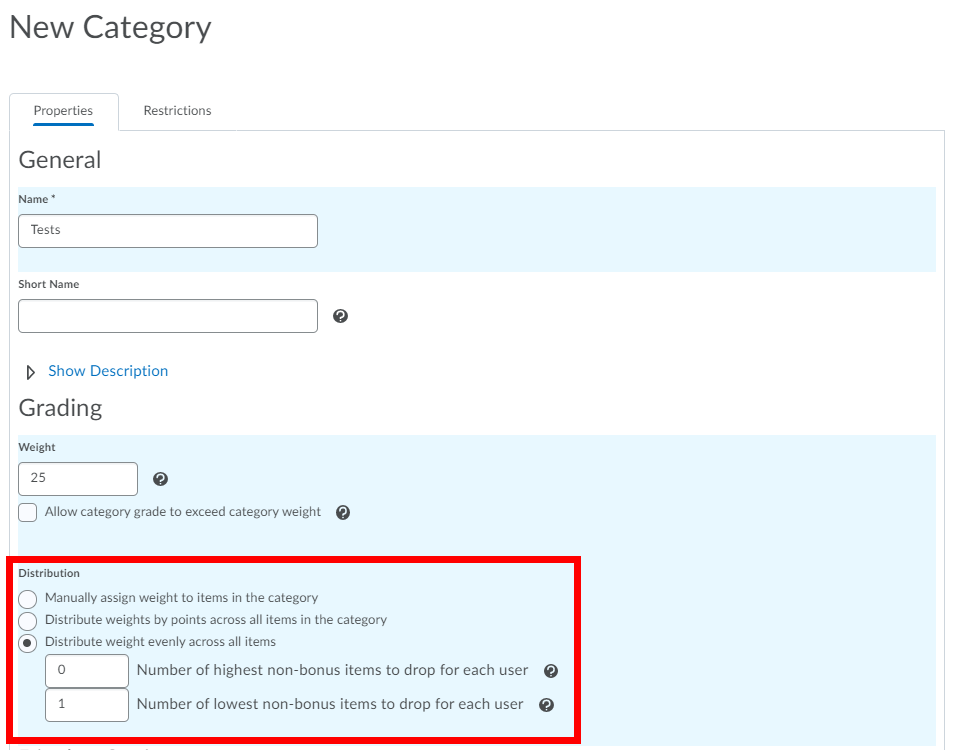
Enter a Name for the category.
Enter a Short Name to display in the grade book (optional).
If you want, type a Description of the category by selecting Show Description (optional).
Select the Allow users to view description check box if you want to make the category description available to users.
If you are using the Weighted system, enter the total Weight that you want the category to contribute towards the final grade.
Select Allow category grade to exceed category weight if you want to allow users' grades for the category to exceed 100%. E.g. 105%.
The Distribution of weight within the category will depend on how grade items will be treated within the category. For example, if you plan to have your students take 5 quizzes, but only count the top 4, your settings might look like the example below. Select one of the three distribution options.
Select Display Options to enable the following features:
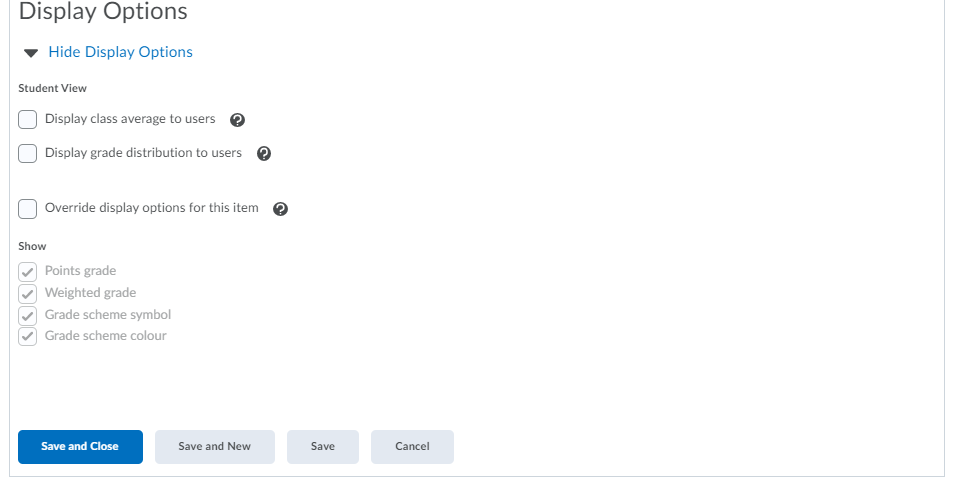
Display class average to users - allows users to see the class average on the item.
Display grade distribution to users - allows users to see a graph showing how grades were distributed between different percentiles.
Override display options for this item - allows for graded users to view grade information for this item differently from other items in the grade book. You can then select what you want to show.
Click Save and Close, Save or Save and New.
...
Creating a Number grade item (the most common grade item type)
Step-by-step guide
Select Grades from the course navbar.
From the Manage Grades area, click the New button and select Item from the drop-down menu.
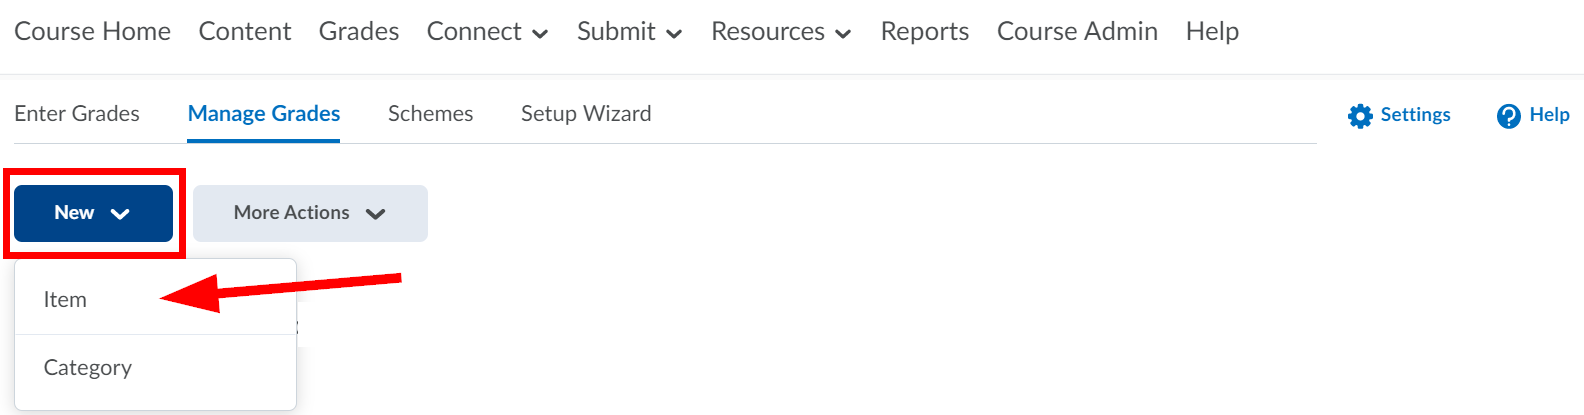
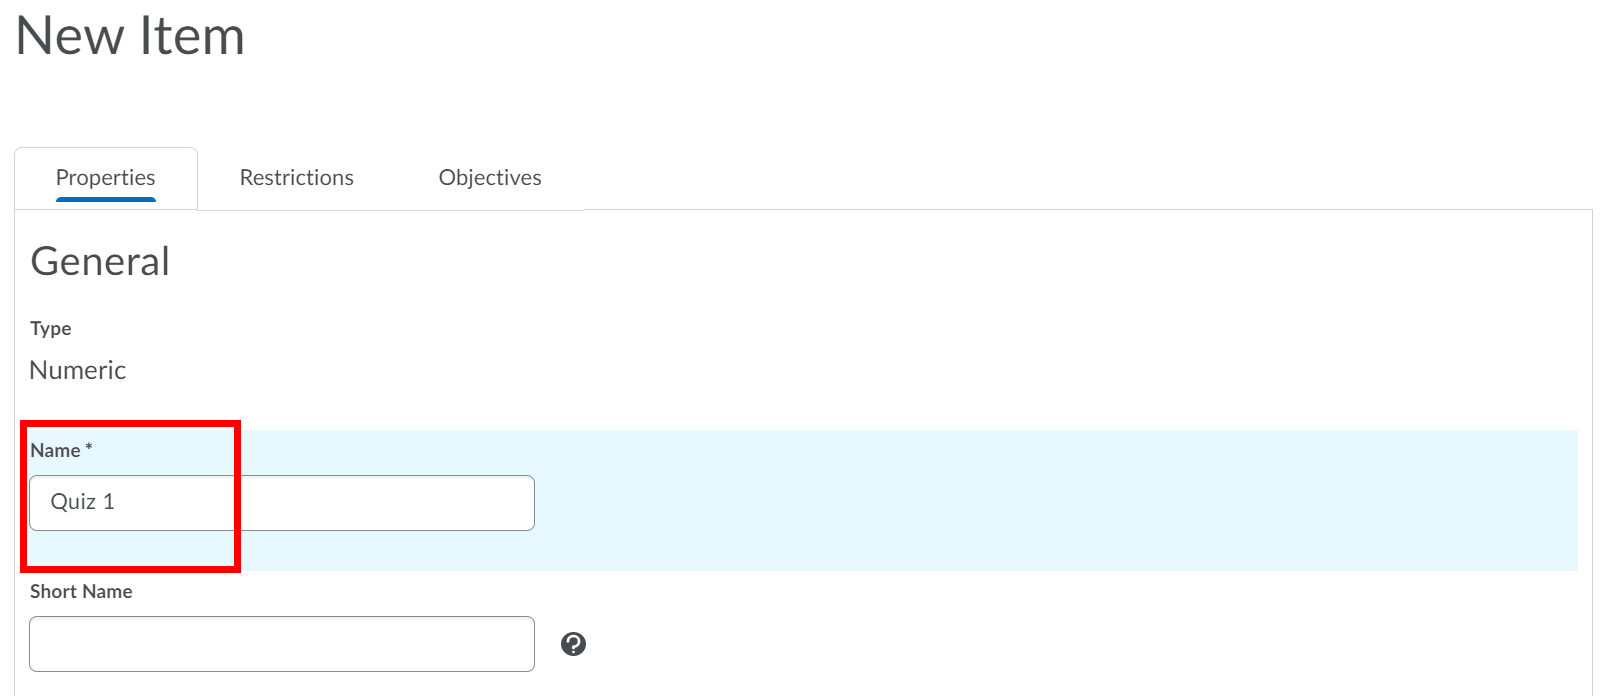
Select Numeric for the Grade Item Type.
Enter a Name for the grade item.
Enter a Short Name to display in the gradebook (optional).
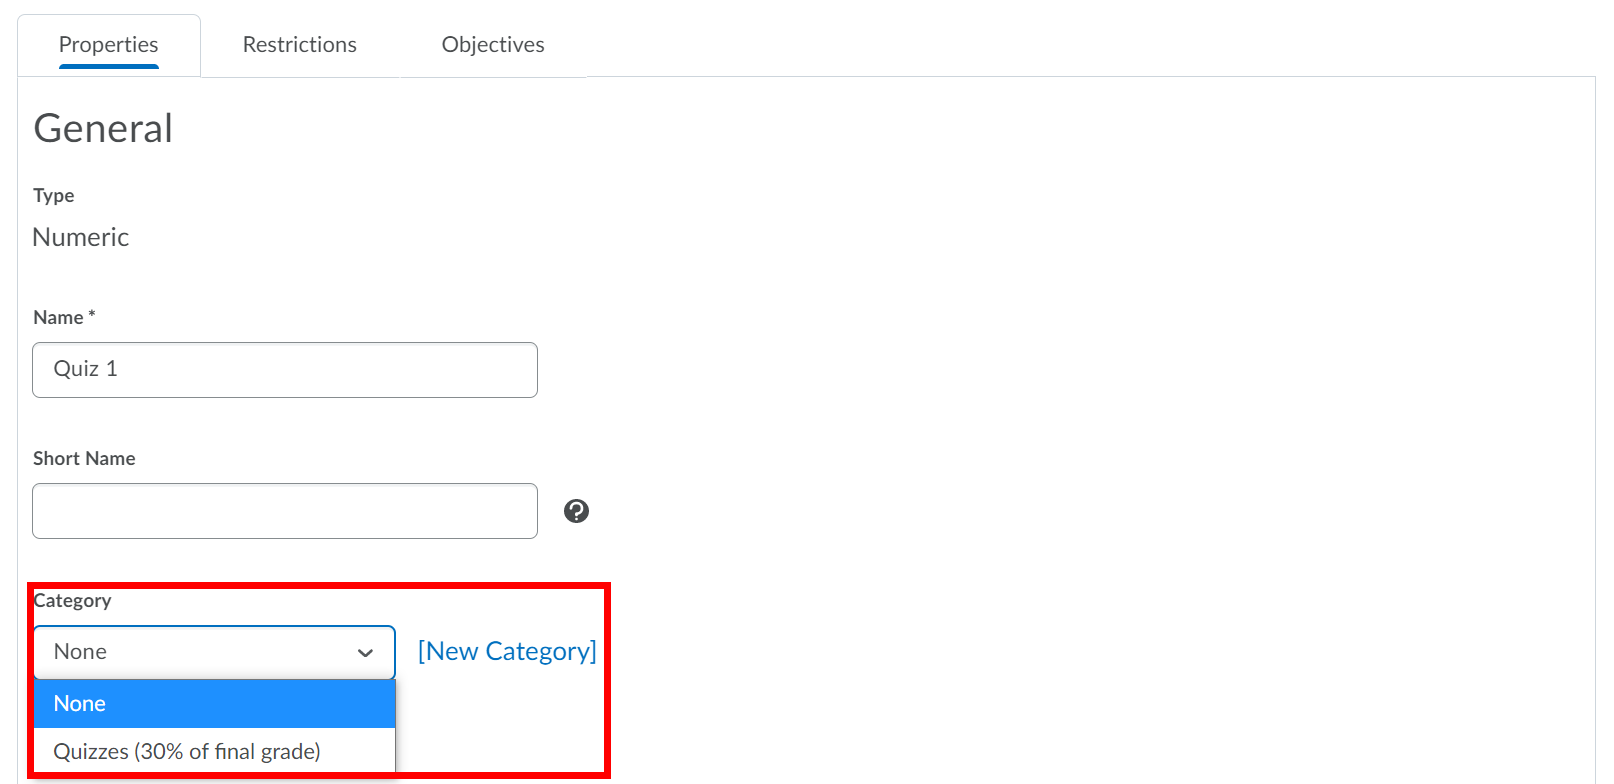
If you want the grade item to be associated with a category, select a category from the Category drop-down list. You can also create a New Category from this page.
Enter a Description of the grade item by selecting Show Description (optional). If you want to make the description available to users, select Allow users to view grade item description.
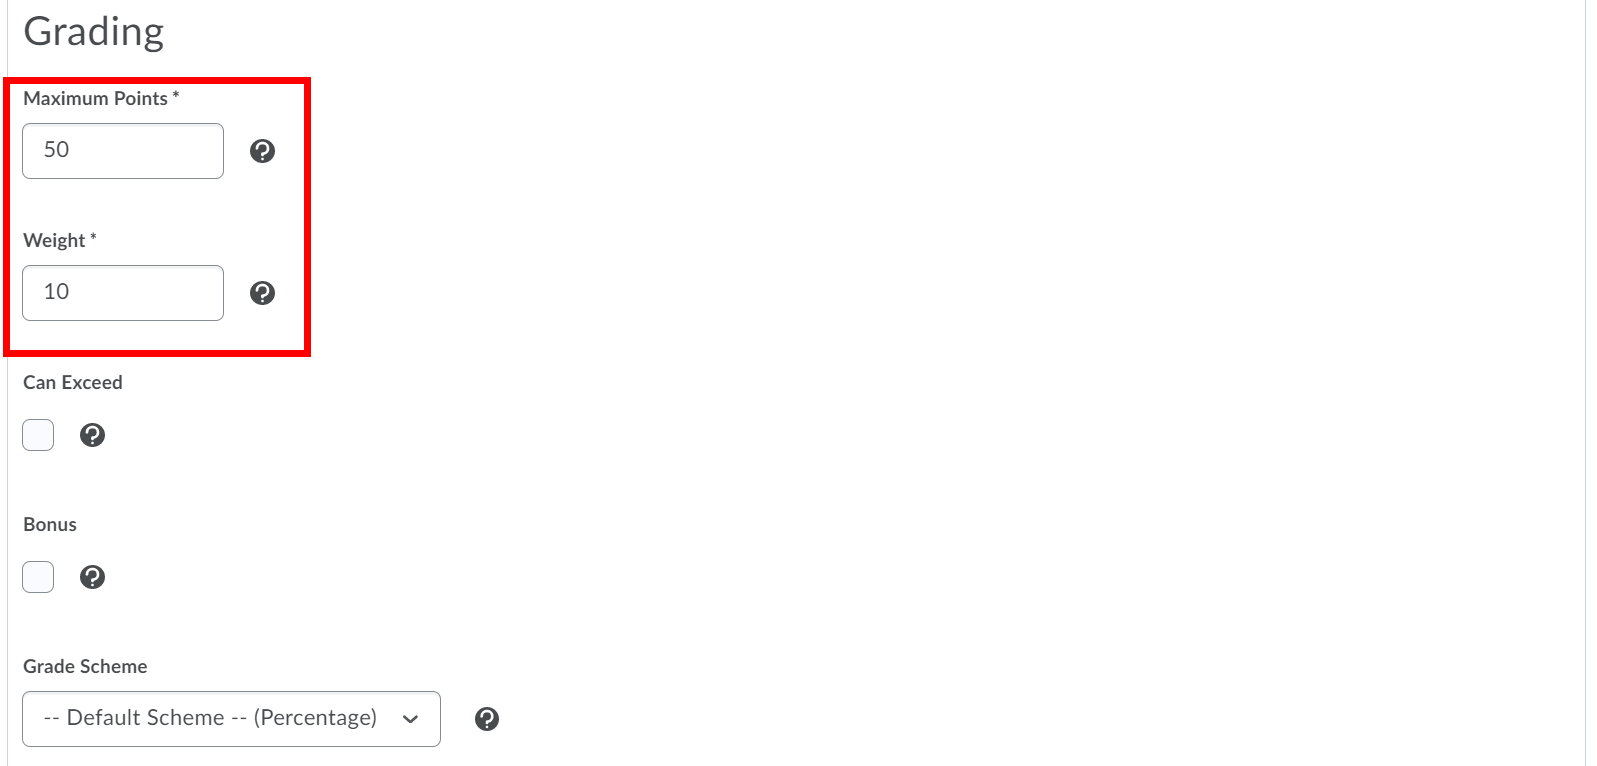
Enter the value you want the item to be graded out of in the Maximum Points field.
If you are using a category and selected, “Manually assign weight to items in the category” when creating the associated Category, enter the Weight you want the grade item to contribute to its category. If the item does not belong to a category, enter the Weight you want it to contribute to the final grade. For grades that are being recorded, but not included in the final grade calculation, you can set the Weight to 0.
If you want users’ grades to be able to exceed the total value of the item, select Can Exceed.
Select Bonus, if you want the item to be counted as a bonus item. Bonus items are not counted towards the maximum points for a category or final grade. Depending on how the extra marks will be used, you must select Can Exceed or Bonus to allow users' grades to exceed the maximum points specified. More on Bonus Grades in a later section of this document.
Select a Grade Scheme to associate with the item, if applicable. Grade Schemes let you represent users' grades with symbols or labels. E.g. A,B,C or 4.0, 3.5, 3.0. The default scheme is percentage.
If you would like to associate a rubric with the item, click Add Rubric to add an existing rubric or, select Create Rubric in New Window to make a new one. See the Rubrics documentation for more detailed information.
Select Display Options to enable the following features:
Display class average to users - allows users to see the class average on the item.
Display grade distribution to users - allows users to see a graph showing how grades were distributed between different percentiles.
Override display options for this item - allows for graded users to view grade information for this item differently from other items in the grade book. You can then select what you want to show.
Under Managing View, select override display options for this item if you want to view grade information for this item differently from other items in your grade book.
Click Save and Close, Save or Save and New.
...
Setting availability for a Category or Item
Step-by-step guide
Select Grades from the course navbar.
From the Manage Grades area, select the name of the category or item that you want to edit.
Select the Restrictions tab.
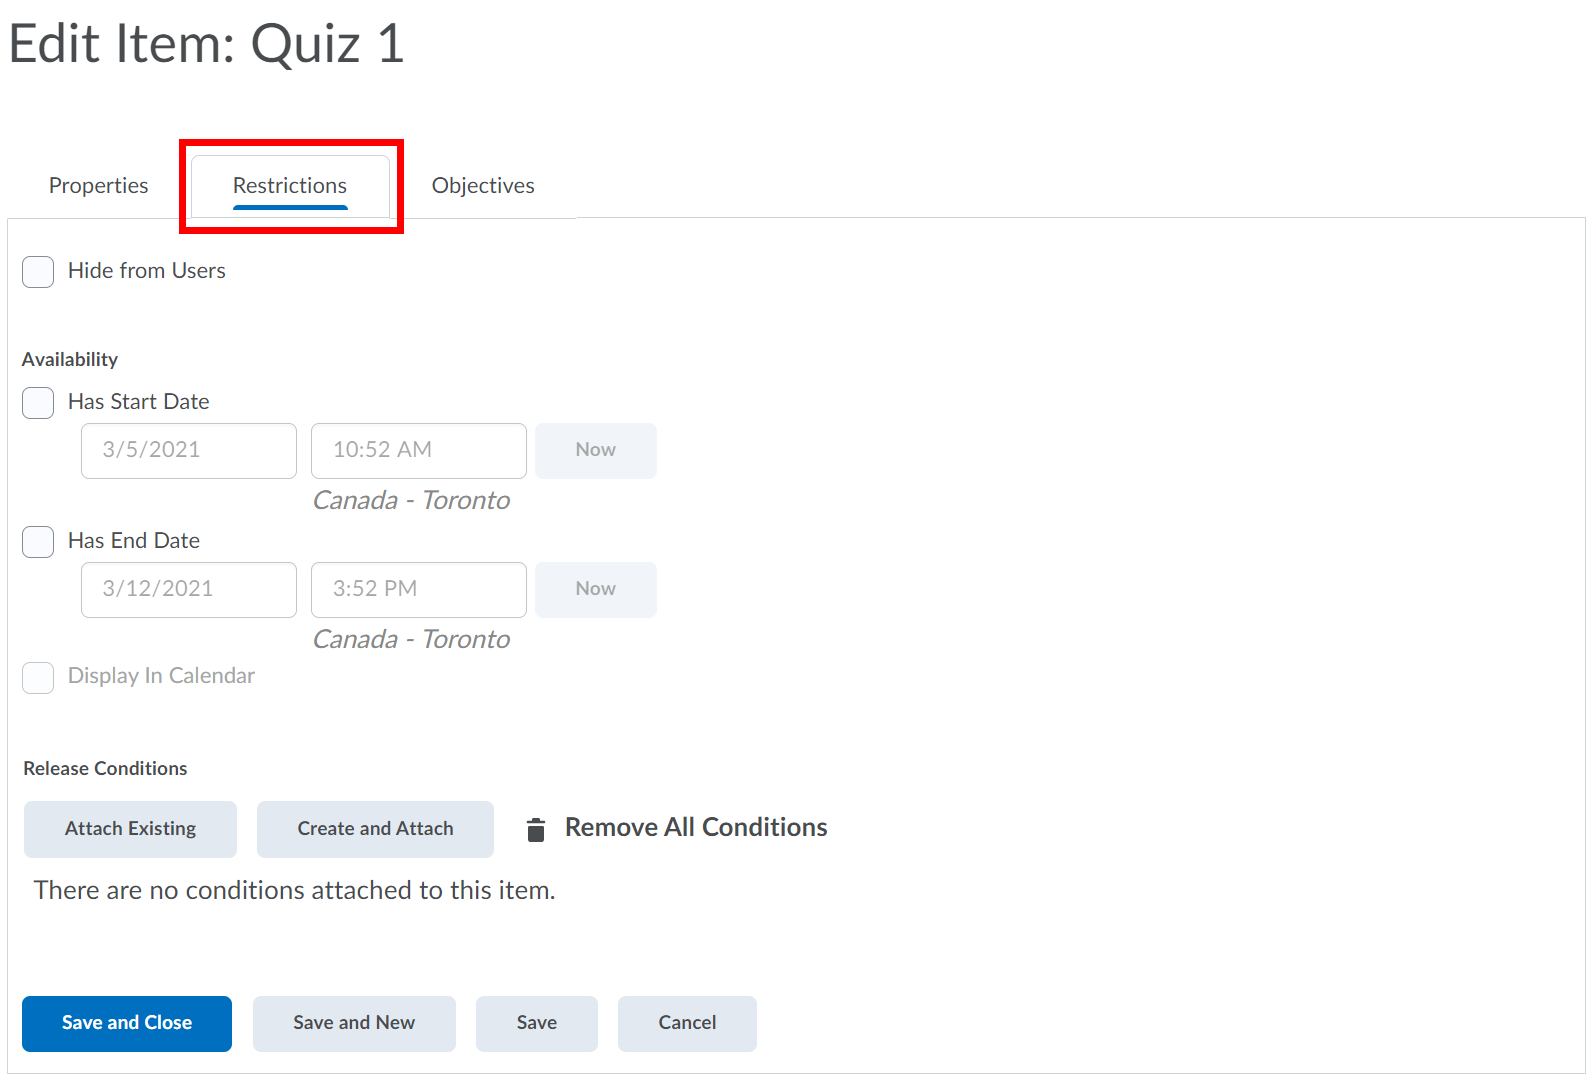
If you want to make the grade item available to selected users during a special time period, enter a Start Date and/or End Date in the Availability section. If you don’t want users to be able to see the grade item select Hide from Users.
Note: if you select "Hide from Users", that overrides the Start/End Date and it will remain hidden until "Hide from Users" is manually unchecked.If you add a start and/or end date you can select to Display in Calendar.
Click Save and Close, Save or Save and New.
...
Release conditions enable you to associate a category or item with other items in the Learning Environment. For example, you could require that users complete the last assignment in the category Unit 1 before the category Unit 2 appears in their gradebook. For additional information, see the Release Conditions documentation.
Step-by-step guide
Select Grades from the course navbar.
From the Manage Grades area, select the name of the category or item that you want to edit.
Select the Restrictions tab.
Under Release Conditions select either Attach Existing or Create and Attach.
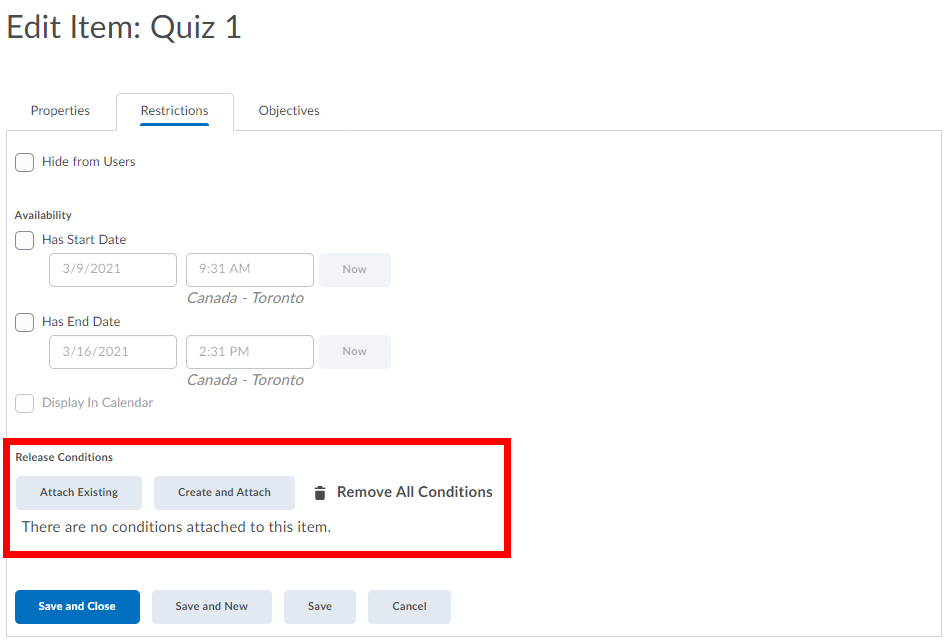
If creating a new one, select your condition type (e.g., Content Topic Visited -- students must read course requirements before marks will be released) and condition details and click Create.
Click Save and Close, Save or Save and New.
Reordering Categories and Grade Items
Step-by-step guide
Select Grades from the course navbar.
From the Manage Grades area, click the More Actions button and select Reorder from the drop-down menu.
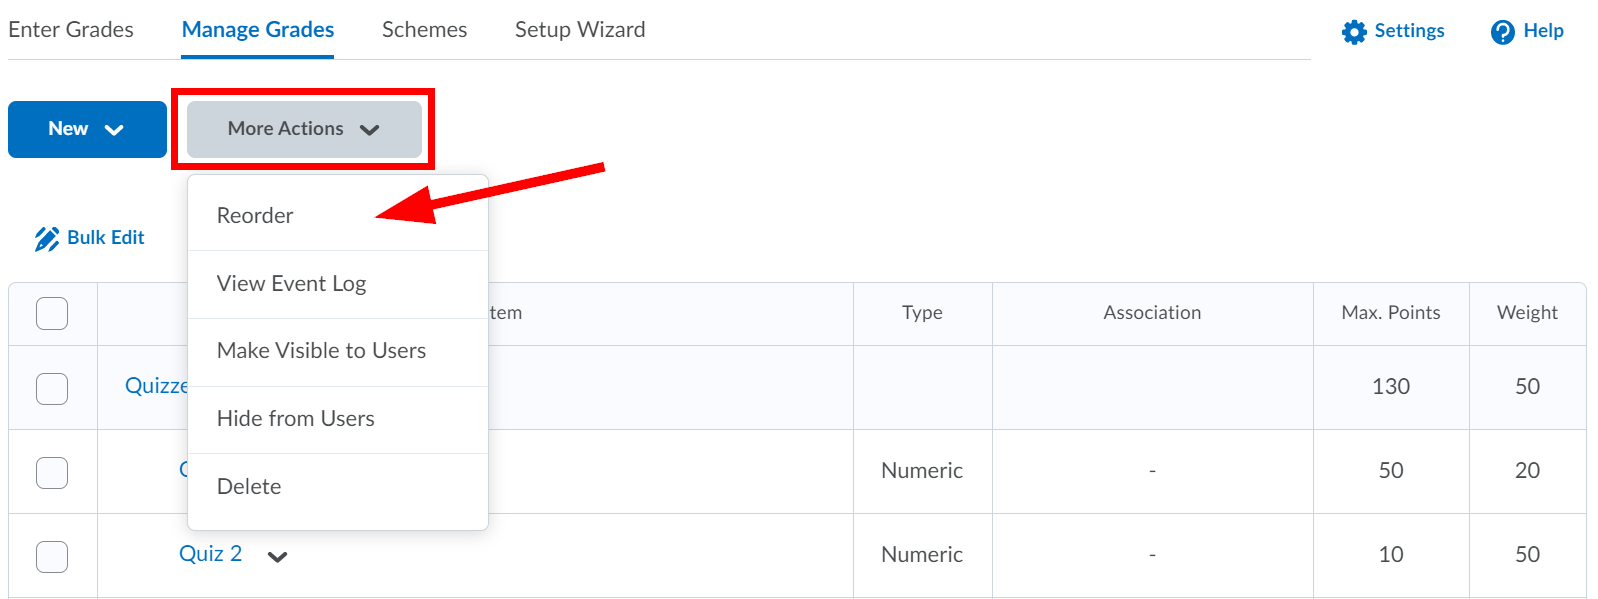
Select a new position for a category or grade item using the Sort Order drop-down menu beside its name. The positions of other categories and grade items adjust accordingly.
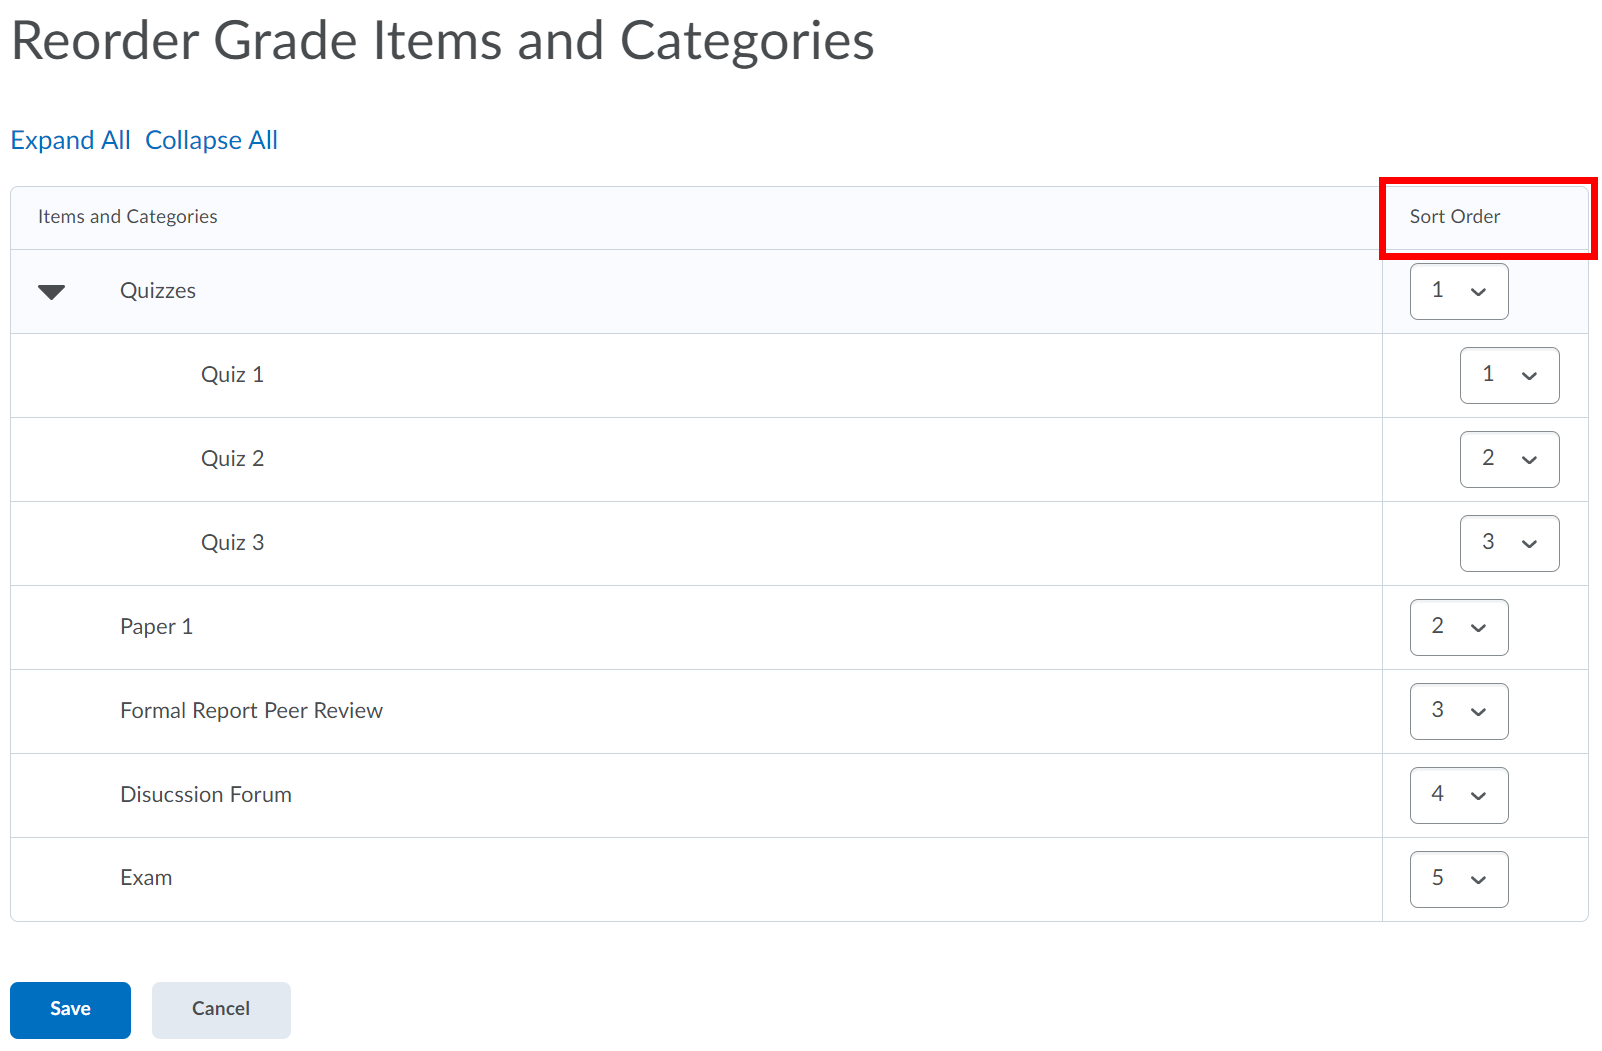
Click the Save button.
...
| Info |
|---|
You cannot delete grade items that are associated with another course object, such as a quiz, discussion topic, or dropbox folder. To delete the grade item you must first remove the association. Click the Information icon (?) next to a grade item with an association to view details about where the item is used. |
Step-by-step guide
Select Grades from the course navbar.
From the Manage Grades area, click the More Actions button and select Delete from the drop-down menu.

Select the checkbox beside the category or grade item you want to delete. Selecting a category does not select the grade items that reside in it. If you delete a category the grade items associated with it become independent grade items.
Click the Delete button and in the Confirmation window click Delete again to confirm the deletion.
...
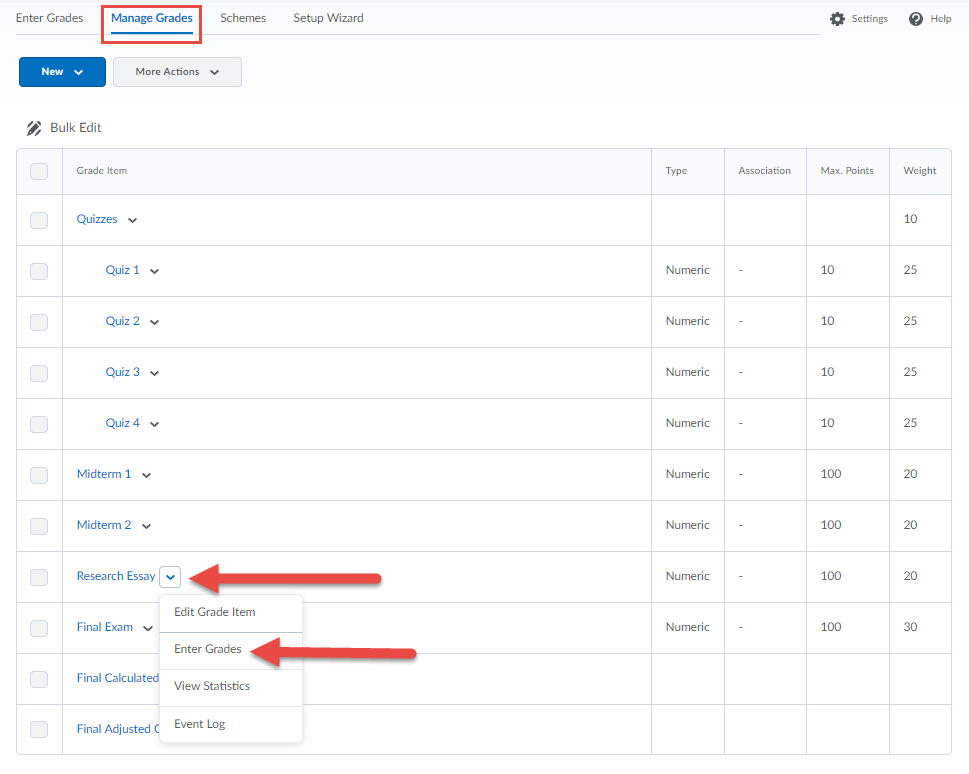
There are a couple of options for entering grades. The recommended option is described immediately below.
Step-by-step guide
Select Grades from the course navbar.
From the Manage Grades area, click the down arrow beside the grade item you want to enter grades for and select Enter Grades from the drop-down menu.
...
Exempting a Grade Item for a Student
Step-by-step guide
Select Grades from the course navbar.
From the Manage Grades area, click the down arrow beside the grade item you want to enter grades for and select Enter Grades from the drop-down menu.
Search for the student with the grade exemption and select the checkbox beside their name.
Click the Exempt button above the table.
...
Prior to uploading grades (exam results) from an Excel file confirm that the grade item into which the scores will be imported has been created in the course gradebook.
Step One:
In your Excel file, remove all columns with the exception of the username and raw test score from your CSV file.
Insert a blank row at the top of the file.
Save this file as a CSV file with a different name (so that you will have your original file left intact).
Step Two:
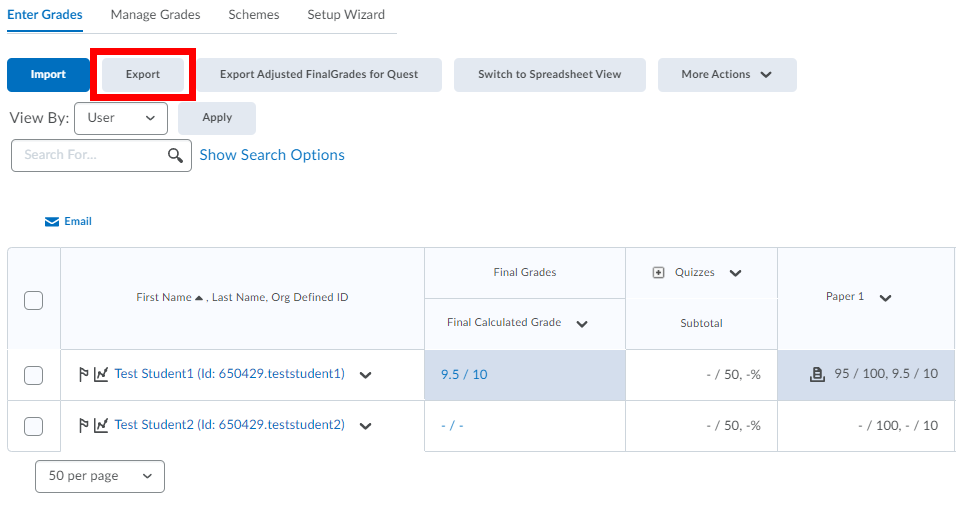
In your LEARN course, select Grades from the course navbar.
Select the Enter Grades tab from the upper left-hand corner.
Click the Export button.
Under Key Field, ensure that Username is selected and under Grade Values ensure that Points grade is selected.
Select the checkbox beside the grade item into which the grades will be imported from the list of grade items.
Click on the Export to CSV button.
Click on the filename and select Open.
Leave this file open as you will be copying and pasting field information.
Step Three:
Open your file from Step One
Make sure column A contains the usernames and add the title “Username” to cell A1.
Copy the grade item heading from the gradebook export file (from Step Two) and paste it into the first row of column B, cell B1 (which should contain the raw scores).
Add the End-of-Line Indicator to the first row of the third column, cell C1.
Populate each row with a number sign (hash mark). The easiest way to do this is to add a number sign into cell C2 then, hold down the mouse button to select the remaining rows in column C until you arrive at the last student then press Ctrl+D to autofill the cells.
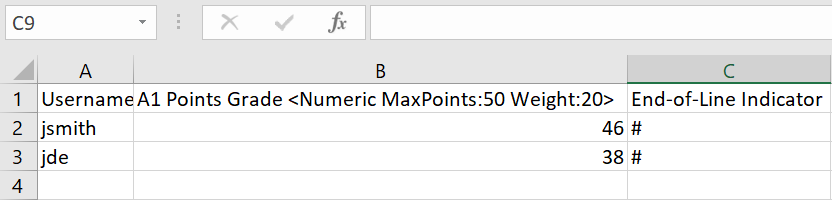
Save the CSV file.
Step Four:
In your LEARN course, select Grades from the course navbar.
Select the Enter Grades tab from the upper left-hand corner.
Click the Import button and browse for your CSV file from Step Three.
Select Next to finish the process.
Using Event Log to monitor grade entries
The Event Log allows you to see who has entered or modified grades. This is especially helpful when there are multiple TAs or Instructors enrolled in the course.
Step-by-step guide
Select Grades from the course navbar.
From the Manage Grades area, click the down arrow beside the grade item’s event log you want to view and select View Event Log from the drop-down menu.

Submission icons for reviewing grades
From the Enter Grades area, additional columns will appear for those grade items associated with an activity in the course (quiz, dropbox). Clicking on the submission icon will take you to the submission and clicking on the Assessment icon will access the rubric and feedback data.
In the example below, a dropbox is linked to the grade item.
...
Calculating Final Grades
To provide an opportunity for instructors to adjust final grades for individual students, the Final Adjusted Grade is the grade on record and the grade that will be ultimately exported to be uploaded to Quest.
Step One:
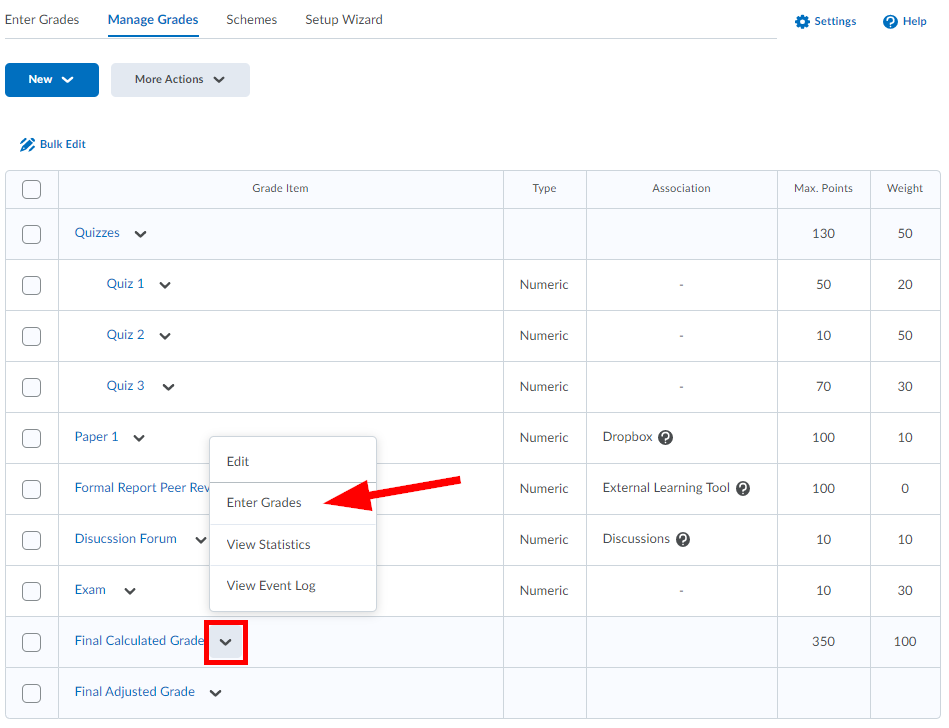
Select Grades from the course navbar.
From the Manage Grades area, select the down arrow beside Final Calculated Grades and select Enter Grades.
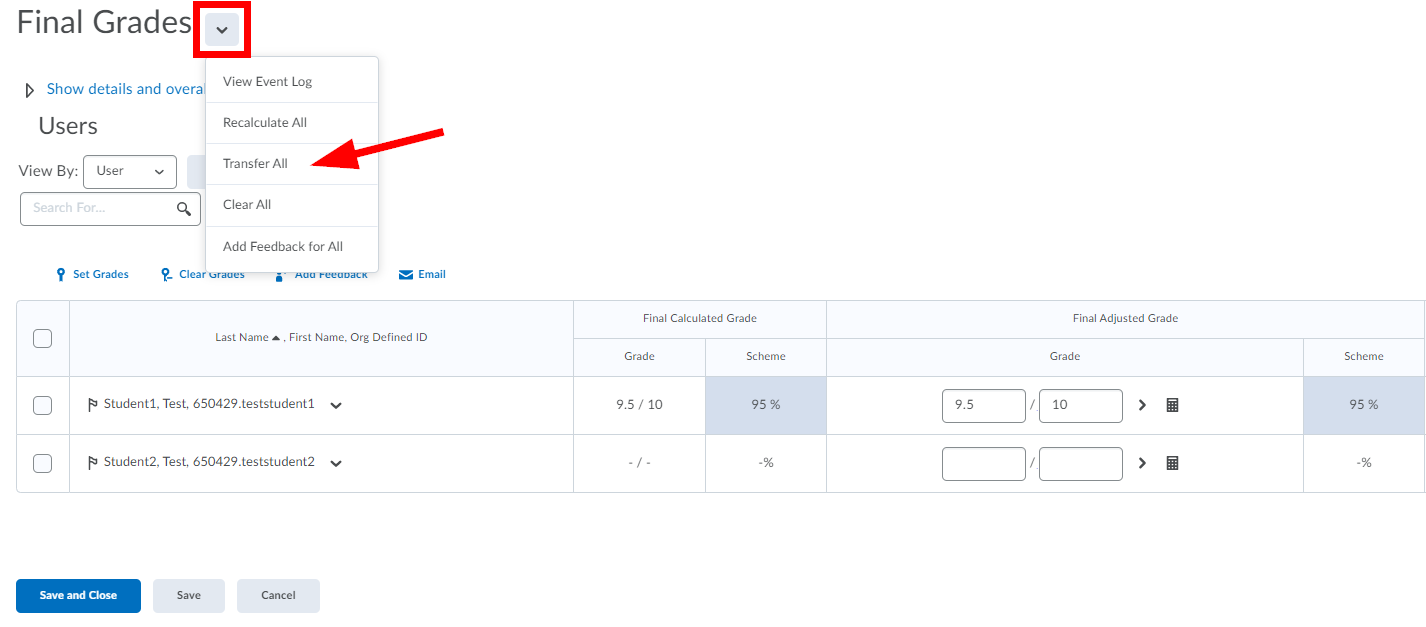
From the Final Grades page, select the down arrow and select Transfer All. This will transfer all final calculated grades to adjusted final grades. Any manually entered adjusted grade will be overwritten by this action.
Step Two:
This step is only necessary if there are students whose Final Calculated Grade needs to be adjusted to reflect a different marking scheme or requires alterations.
...
Export Adjusted Final Grades for Quest
Step Three:
Select Grades from the course navbar.
Select the Enter Grades tab from the upper left-hand corner.
Click the Export Adjusted Final Grades for Quest button.
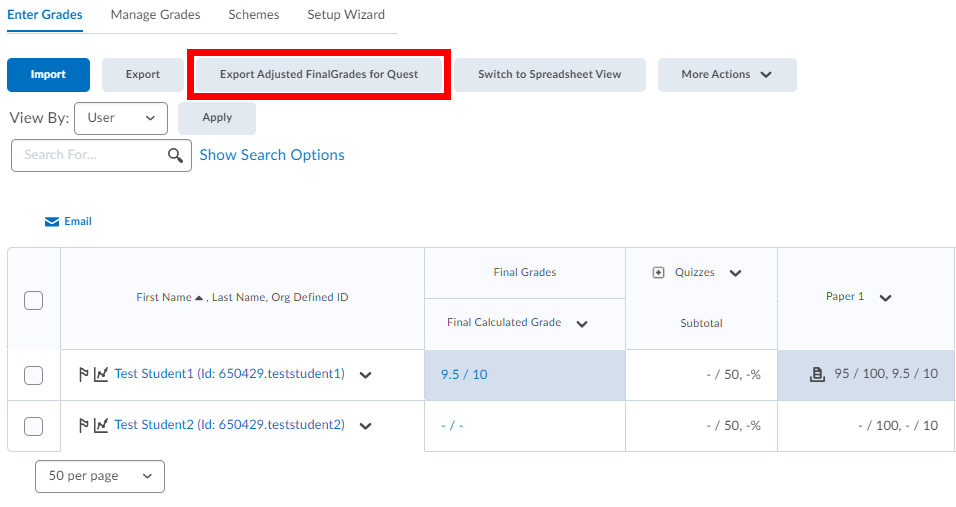
A window will appear with a hyperlink containing the file. Click on the hyperlink. Save this file onto your machine with a new name so that it can be easily identified in the future (e.g., SOC101FinalWinter2020.csv)
...
| Note |
|---|
Mac Users grade files must be comma-separated value files with the extension Windows Comma Separated (.csv) or Quest will import the file incorrectly. |
Step Four:
Log in to Quest and upload the file. Instructions for uploading grades to Quest see, How do I upload my final grades.
Export a local copy of course grades or produce a class list for grading offline
Step-by-step guide
Select Grades from the course navbar.
Select the Enter Grades tab from the upper left-hand corner.
Click the Export button.
Click the Export to CSV button.
...