...
For Clicker Cloud, please refer to the article iClicker Cloud LTI Integration with LEARN
iClicker Classic software setup
If you plan to use the desktop computer in the classroom, you will need to download the software and save it to a USB drive to use on the classroom desktop. Otherwise, you can download it to the laptop you will be bringing to the classroom to teach. This iClicker software contains iClicker/LEARN integration files.
Install the software
Go to https://www.iclicker.com/downloads/iclicker-classic/ and download the most recent version of iClicker Classic for your operating system.
For Windows: find the downloaded ZIP, and extract the files by right-clicking on the zip folder and selecting Extract all… Extract the files to a desired location on your computer.
For Mac: run the downloaded DMG file, follow the instructions to create a new folder in a desired location and copy the application there.Run the program once to finish creating all the required files, then close the program.
Copy the LMS_Wizard.xml file into the Resources folder that was created after running the program.
Create a Course
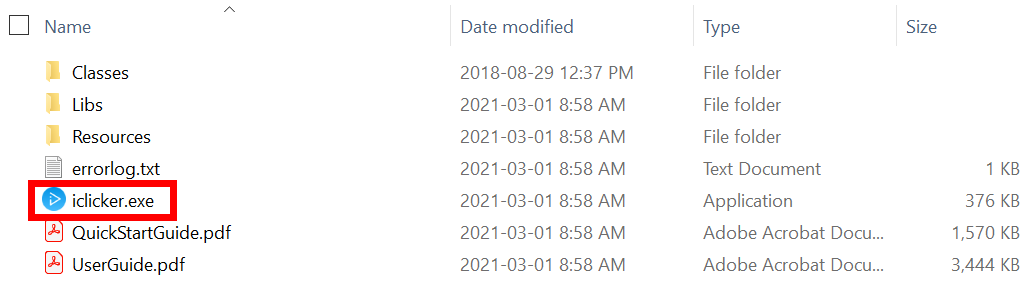
Once the files have been extracted, click on the iclicker.exe file to open it.
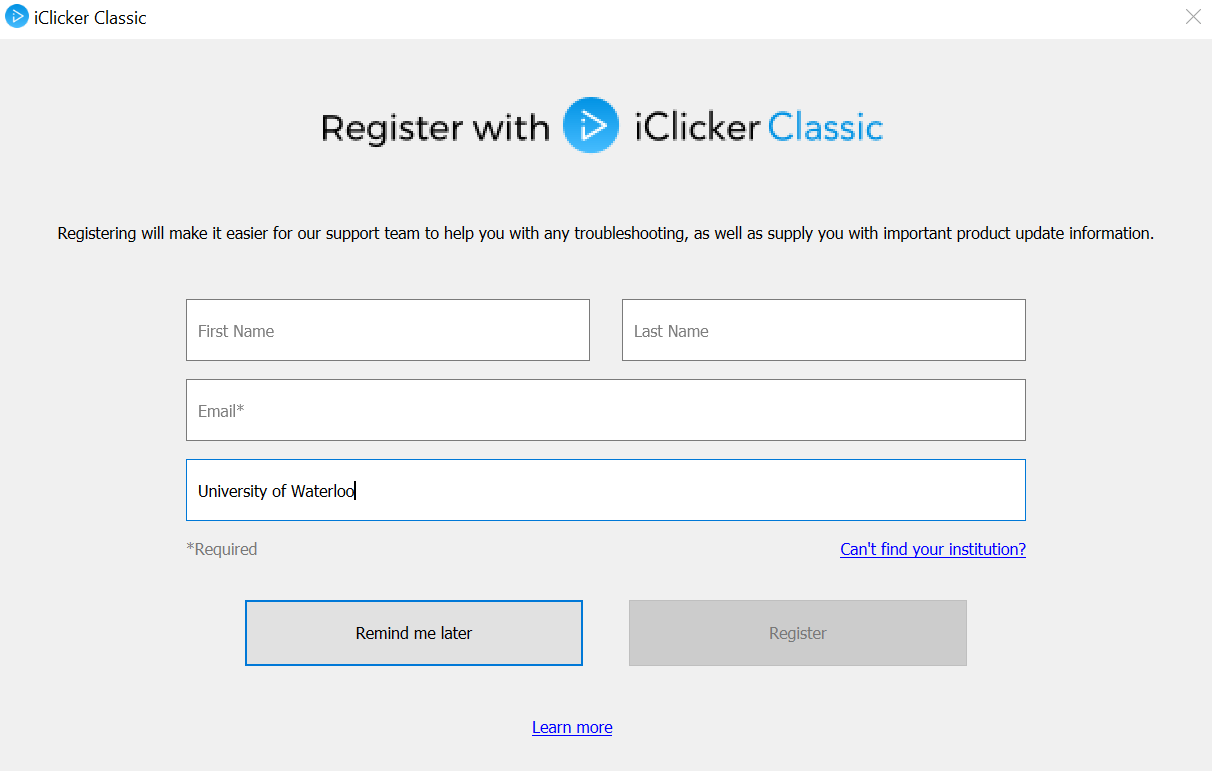
A “Register with iClicker Classic” window will open. This registration is optional. To skip this click the Remind me Later button. Input your First Name (optional), Last Name (optional), Email. For Primary Institution, enter University of Waterloo and select it from the list of options.
The “Welcome to iClicker” screen will open. Click the Create button to create a new course.
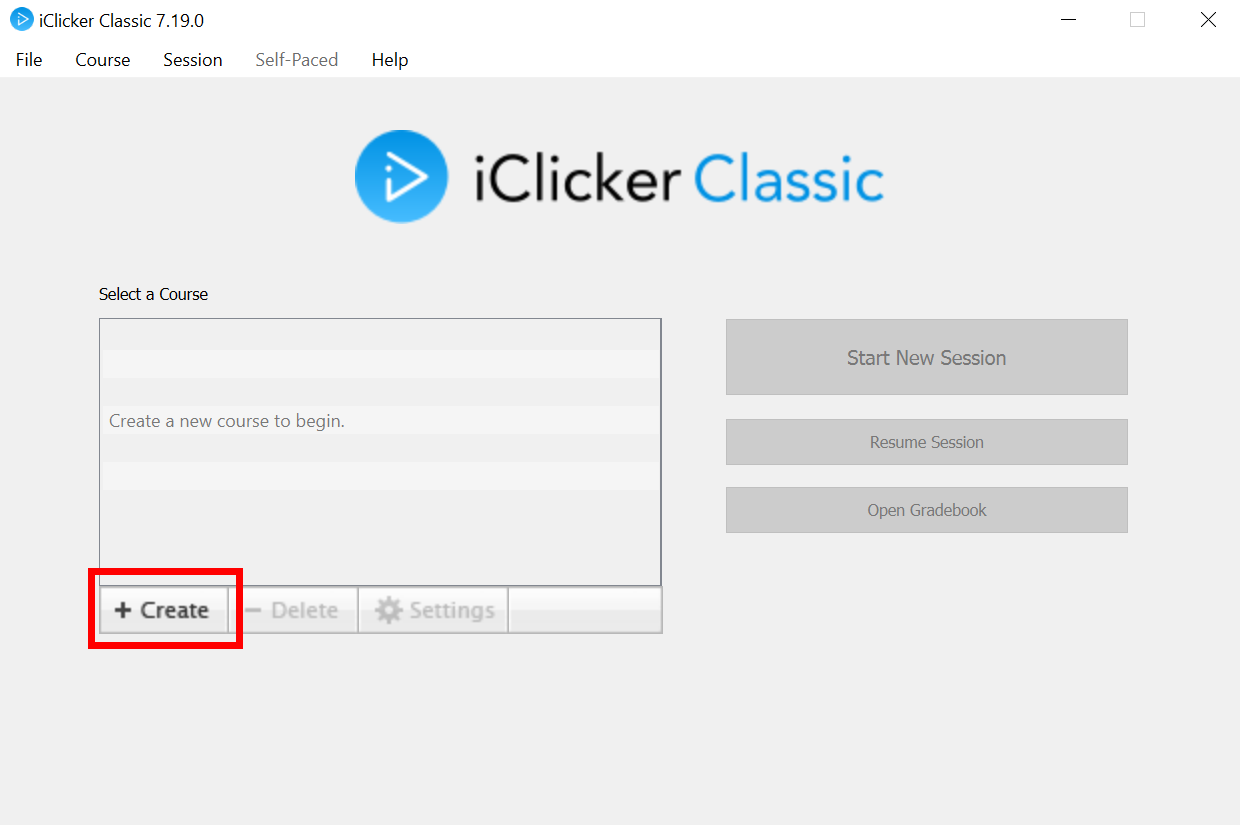
Add your course name and click the Create button. The course name does not need to match the course name in LEARN and the name can be changed later.
Course setup
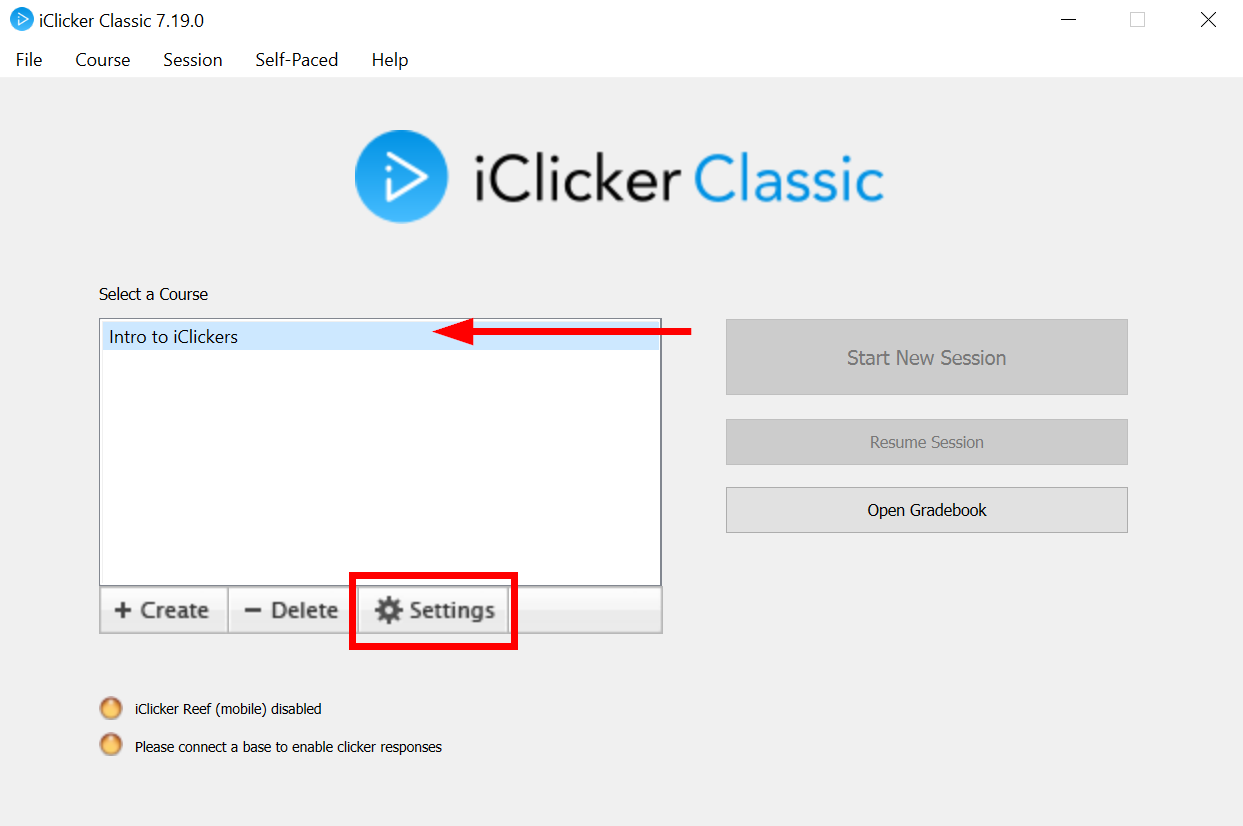
Now that your course has been created (steps above), select it and click the Settings button.
Gradebook settings
If you want to sync your iClicker Classic roster and/or scores with LEARN, you need to adjust the iClicker Classic Gradebook settings. This will allow iClicker Classic to import your class roster and export your iClicker Classic scores in a format that LEARN can read.
Open a web browser and log into LEARN.
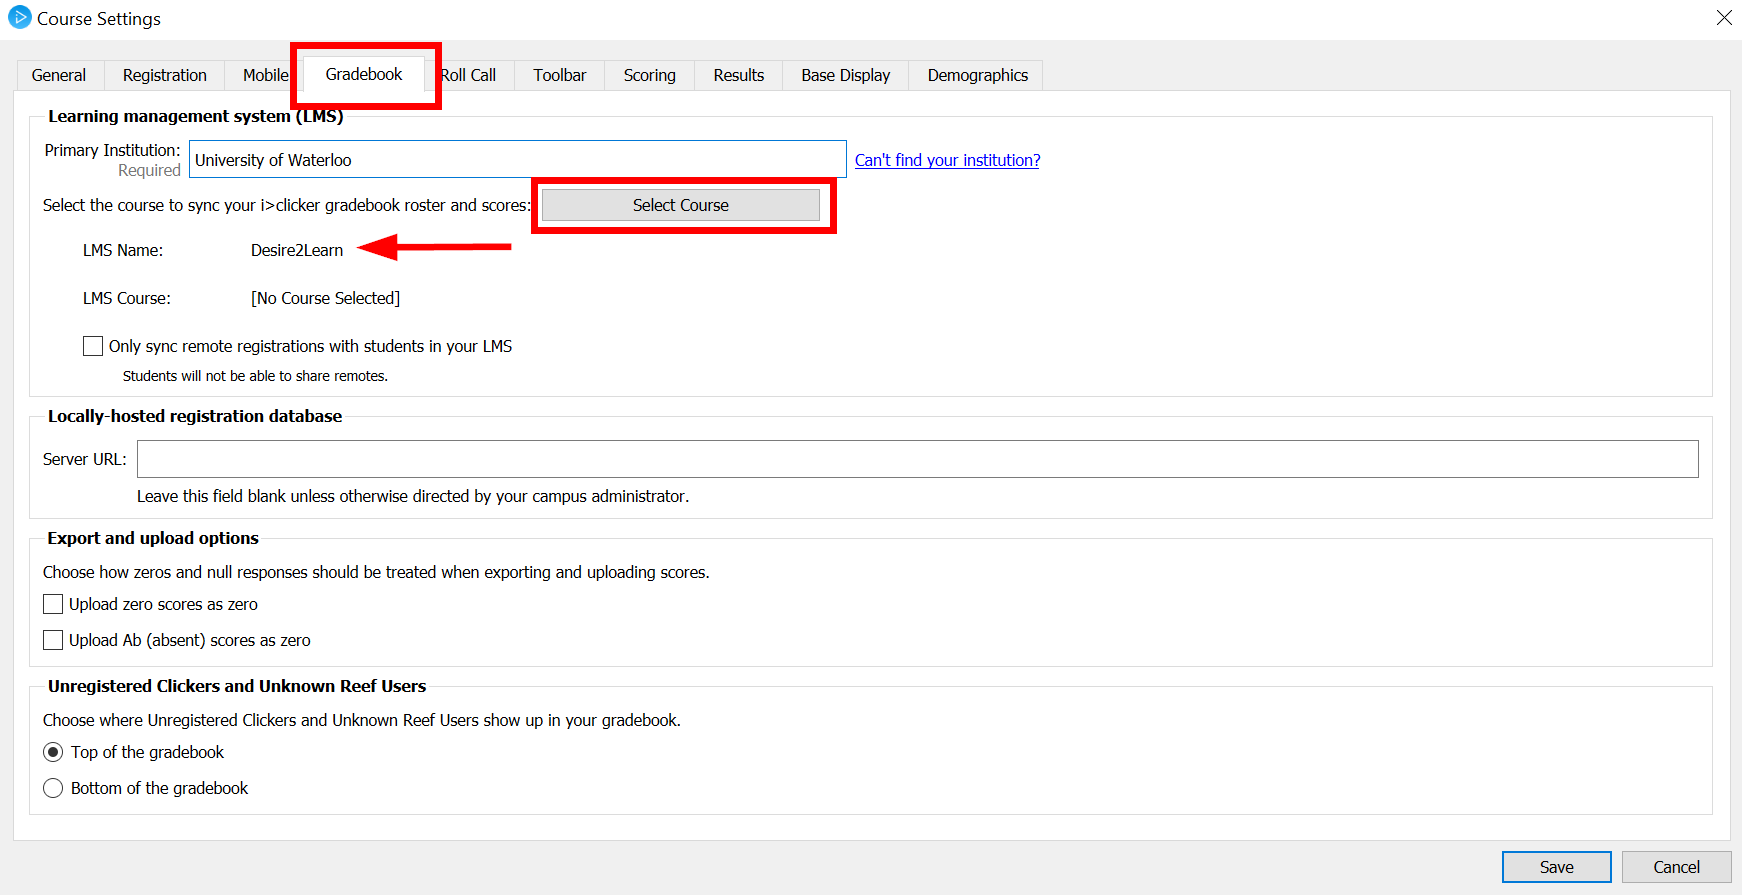
Return to the iClicker Classic software and select the Gradebook tab. In the Learning Management System (LMS) section, the LMS name should already be Desire2Learn.
If asked for the Primary Institution, enter University of Waterloo and select it from the list of options.
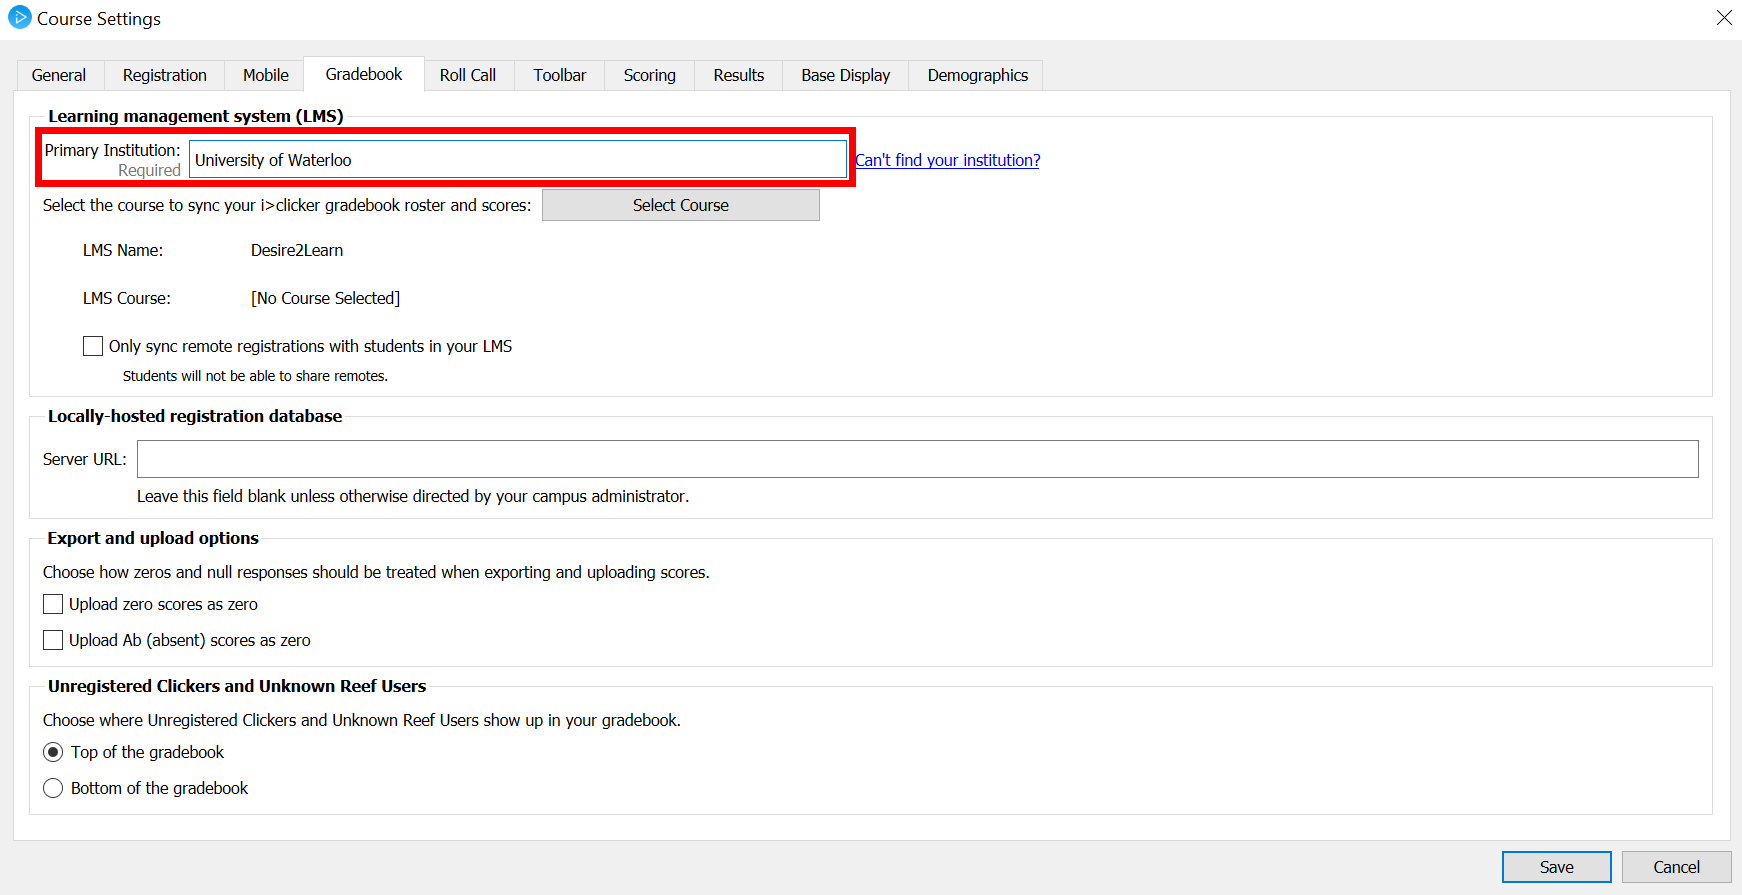
Click the Select Course button to find your course in LEARN.
A new window will open, click the Login button.
Log in to LEARN and an iClicker window will open that will allow you to select your course.
Select the course name that you want to associate this iClicker Classic course with and click the Select button.
The LEARN course should now be listed beside LMS Course, click Save.
iClicker registration in your LEARN course
Students can use an iClicker in your course without registering it first, but it will need to be registered for them to receive any grades associated with the iClicker. Students enrolled in the same LEARN course shell cannot share an iClicker, as only one of the students will get credit for the iClicker grades.
Setup the iClicker registration page
Log in to LEARN.
Click on the course title for which you would like to use iClicker.
Select Content from the course navbar.
Within a Module, click Existing Activities and select External Learning Tools from the drop-down menu.
Select iClicker Registration from the list of LTI links. You can use the search bar in the right-hand corner.
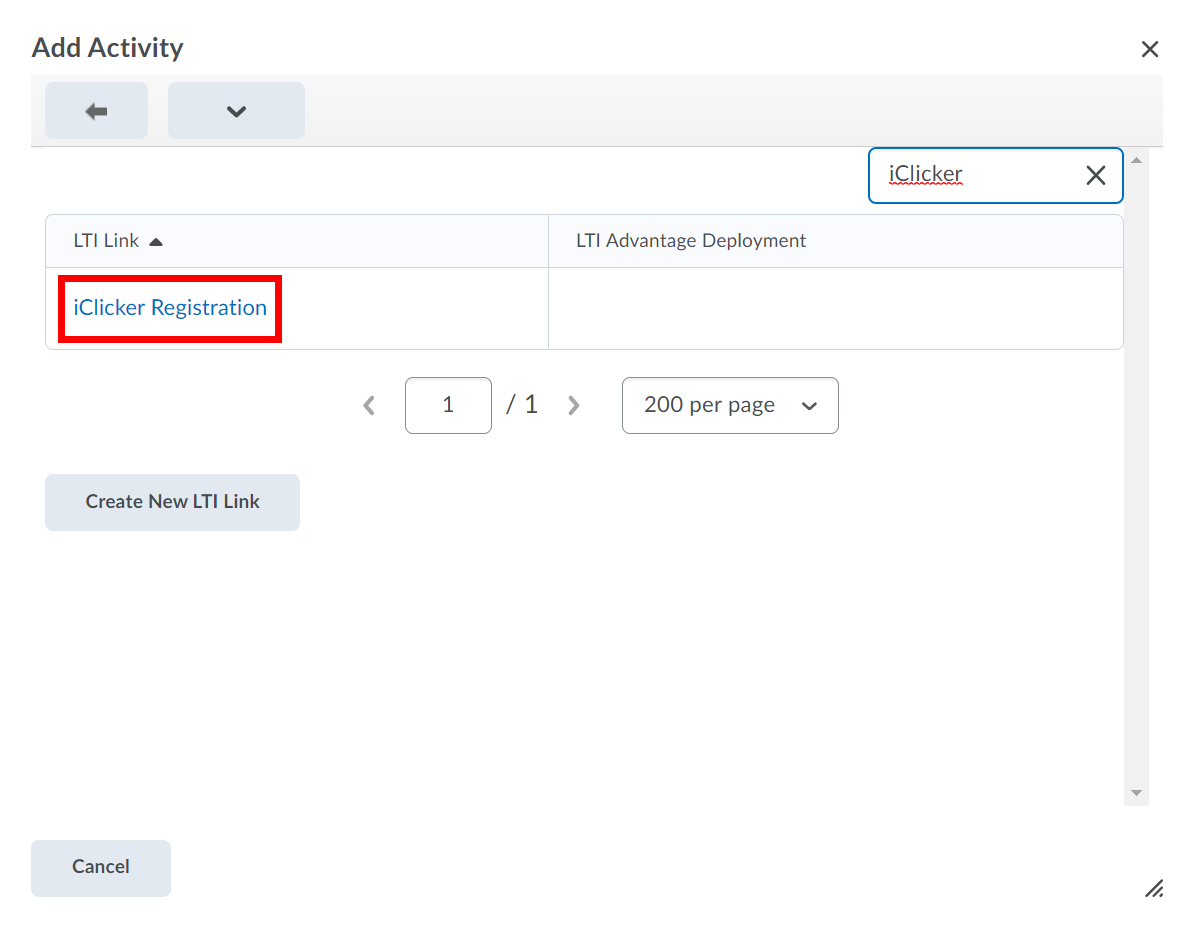
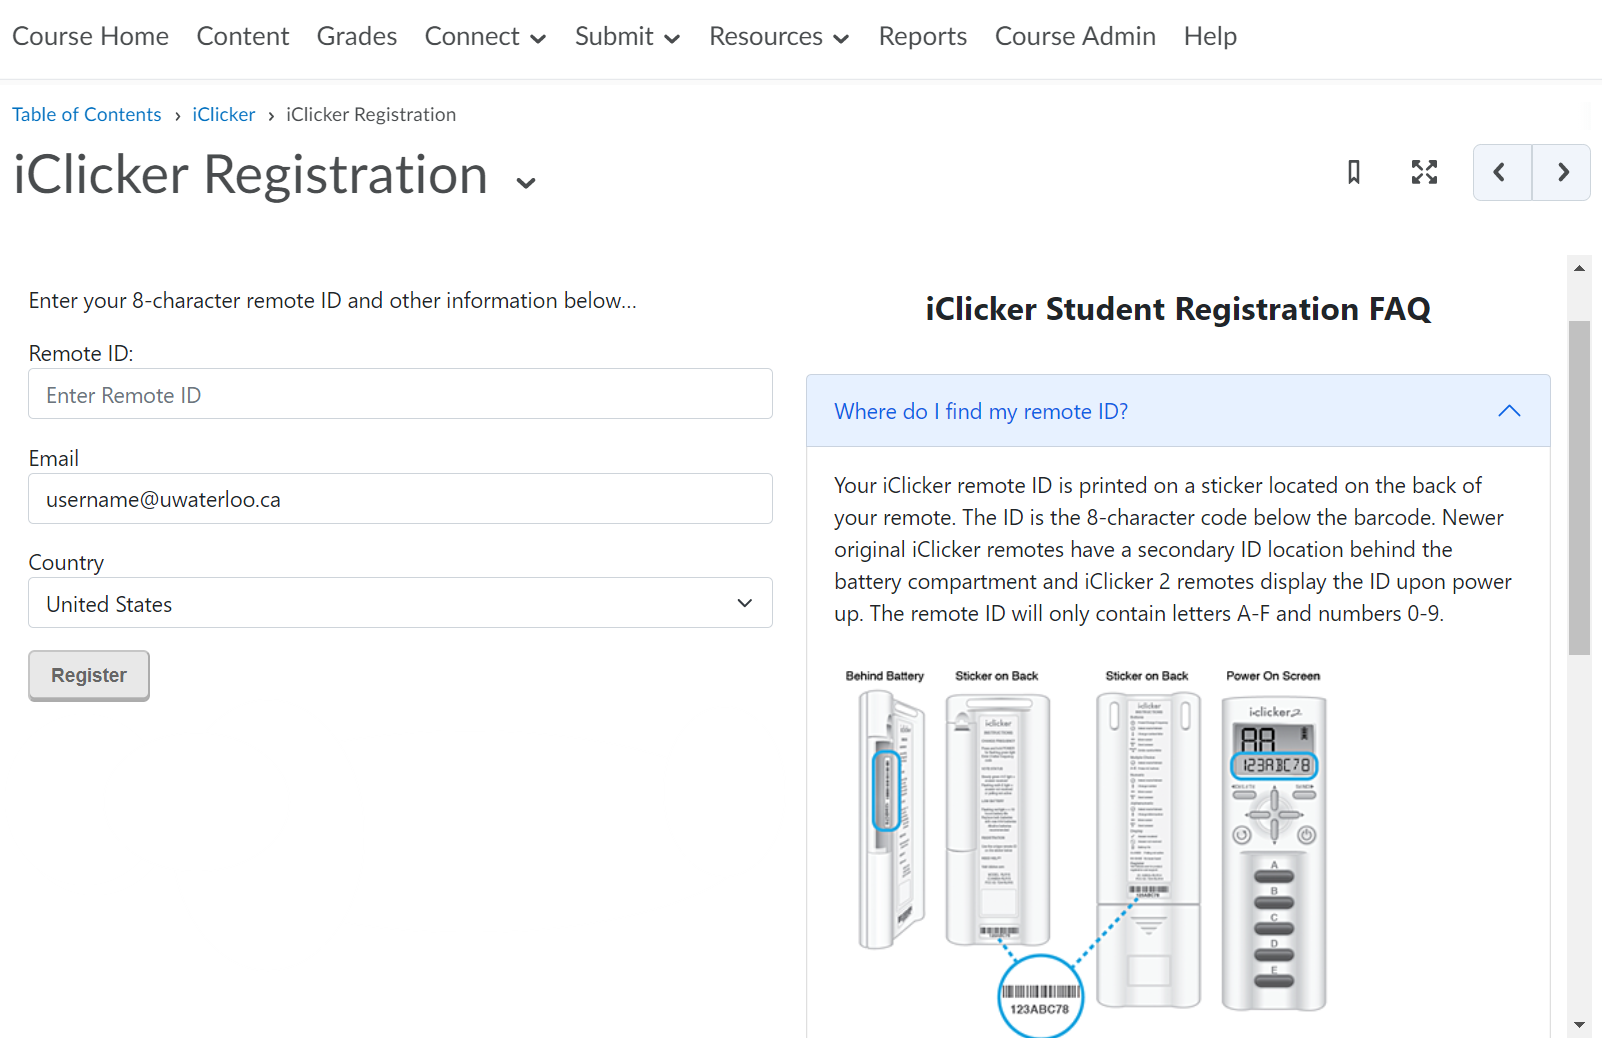
This will add a link in the module where students can register or update their iClicker information.
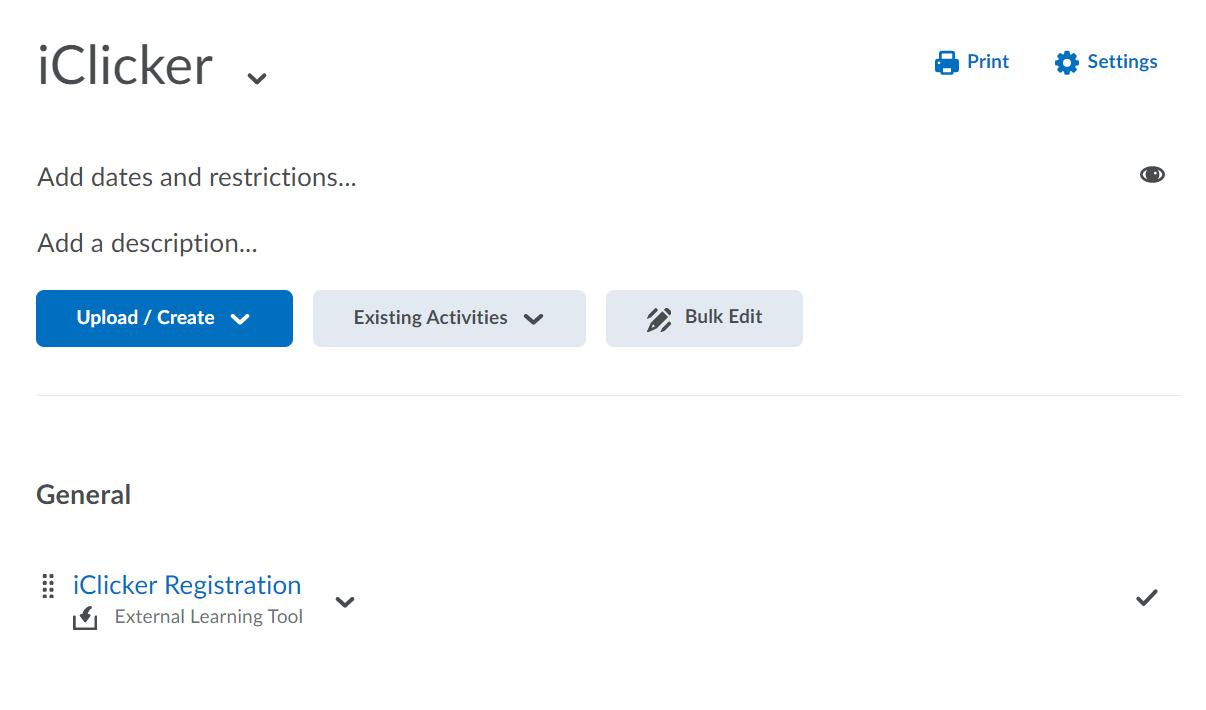
This is the page that students will see and is where they can enter their iClicker Remote ID to register.
iClickers in the Classroom
From the iClicker Class Software (Windows), see Chapter 2, Use i>clicker in Class found in the iClicker User Guide provided with the iClicker software for instructions on how to poll students in the classroom.
...
Syncing your Class Roster with LEARN
Open a web browser and log into LEARN.
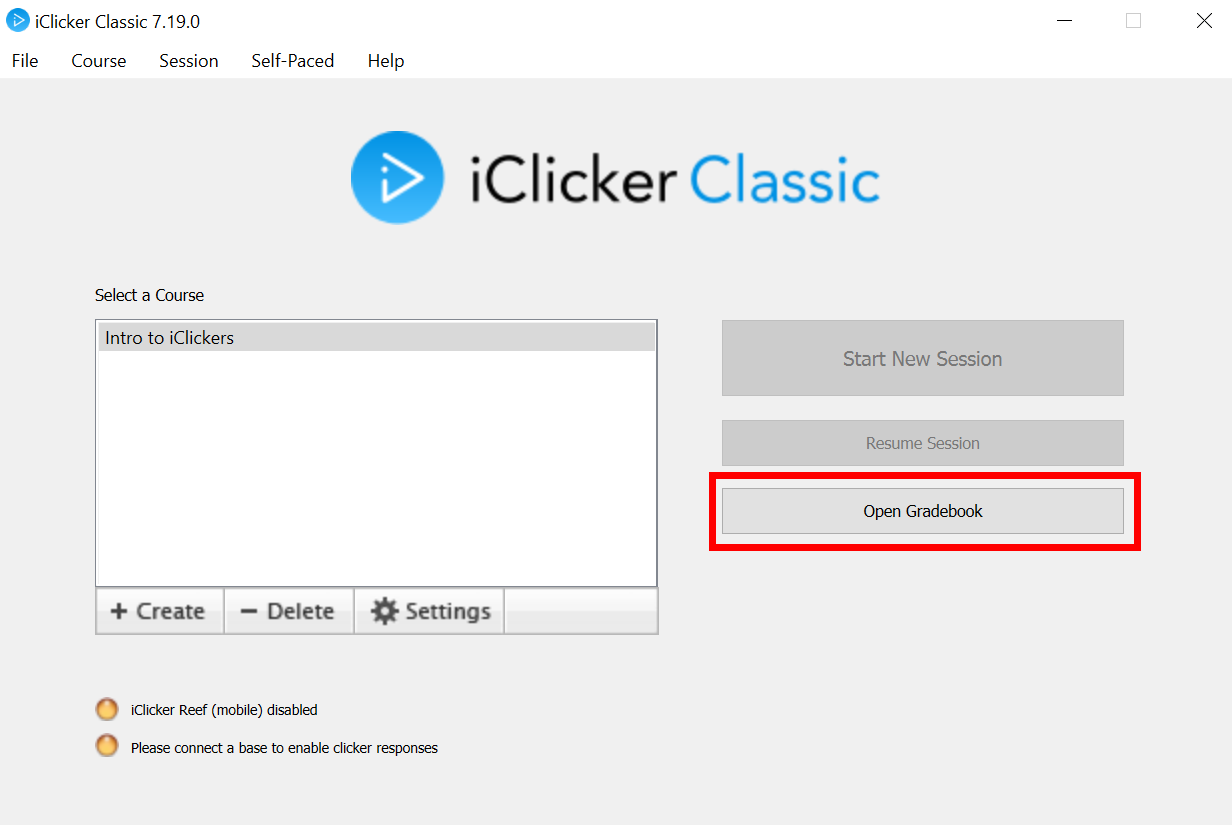
Open iClicker Classic, select your course and click the Open Gradebook button.
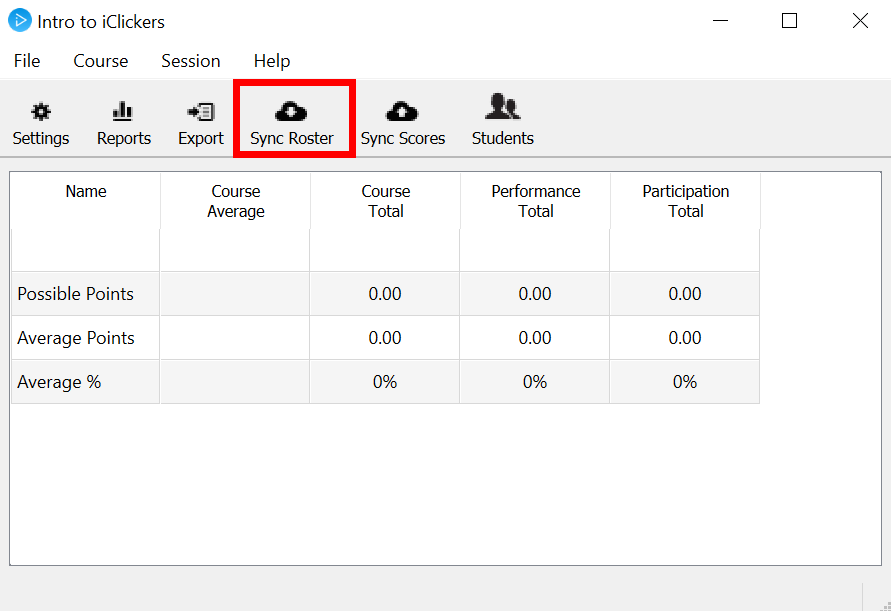
Click the Sync Roster button. Log in to LEARN as prompted.
Registered iClickers will NOT sync with students until at least one polling session has been completed. Once you have completed a polling session, you can run the Sync process again to sync the students with their iClicker remotes.
Upload your Grades to LEARN
Open a web browser and log into LEARN.
Open iClicker Classic, select your course and click the Open Gradebook button.
Click the Sync Scores button.

If prompted, log into LEARN.
Select the sessions that you wish to upload, or click the Select All button to upload all sessions. Click the Next button.

Select your options for how you want the grades to appear in your LEARN Gradeboook and click the Upload button.

If you have chosen that each session will be a separate entry, they will appear in your LEARN Gradebook as sessions:


If you have chosen an aggregate total, the Grade Item in LEARN will be labelled as 'Aggregate Total'.
Related Articles
| Filter by label (Content by label) | ||||||||
|---|---|---|---|---|---|---|---|---|
|
| Info |
|---|
Need help?Contact LEARNhelp at learnhelp@uwaterloo.ca or 519-888-4567 ext. 41744 for assistance. |
| Tip |
|---|
Article FeedbackIf you’d like to share any feedback about this article, contact LEARNhelp at learnhelp@uwaterloo.ca. |
...