Important reminders for generic accounts, retirees and alumni
You must enrol in the University’s two-factor authentication (2FA) service powered by Duo Security to gain access to your Microsoft 365 (M365) email account.
You must upgrade to a recent version of your email client (e.g., if using Outlook, update to at least Outlook 2016) or start using the Web client, accessible via https://portal.office.com.
Ensure your web browser is up to date. See a list of browsers that work with Office for the Web.
Outlook 2019/Microsoft 365 users should close and restart the Outlook mail client.


On this page
| Info |
|---|
Reminders regarding email security and privacy
|
Step 1A: Check to see if your migration is complete
On your migration day, if you want to check to see if you have been migrated to Microsoft 365, log in to :
Try to log in, via a web browser:
Personal accounts: Log into https://connect.uwaterloo.ca
Step 1B: Reconfigure Outlook account settings
I've been migrated to Microsoft 365. What do I need to do before I log in?
| Note |
|---|
Ensure you are using a recent version of Outlook (e.g., Outlook 2016, 2019, or M365) and it is up to date. If you cannot update to a recent version, you can access your Microsoft 365 mailbox via https://portal.office.com . |
Before you log in, you may need to reconfigure Outlook settings depending on which application you're using.
| Info |
|---|
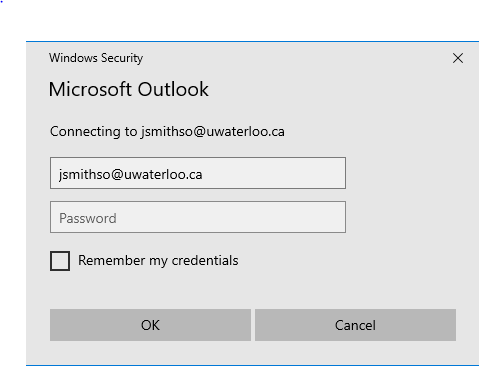
Log in using your 8-character username@uwaterloo.ca and password (e.g. jsmithso@uwaterloo.ca) (instead of nexus\username)
|
| Info |
|---|
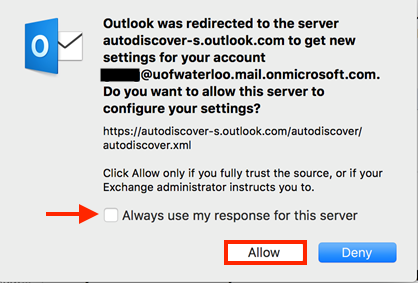
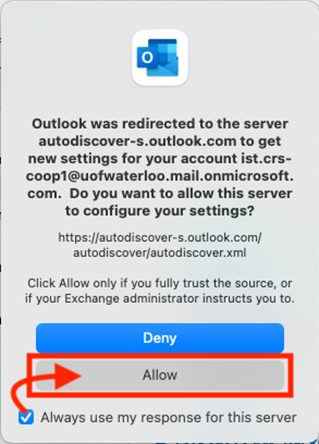
If you receive the pop-up below asking you to allow the server to configure your settings, check the Always use my response for this server box, then click Allow.
|
Microsoft 365 email in a browser
Log in to portal.office.com.
Select the Outlook app.
Outlook for Windows
Shut down Outlook and restart it again. Send a test message to ensure that you can send and receive email.
You should be prompted to log in once Outlook restarts.
If Outlook does not prompt you for a password, you receive an error, or if you can't send email, you may need to re-create your profile and/or remove credentials from the Credential Manager; please go to: Managing Outlook Profiles on Windows 10 for more information on these topics.
Outlook for Mac
Launch your Microsoft 365 for Mac Outlook client.
After Outlook is launched, click on Tools > Accounts.
Delete the current account (highlight your account, then press the minus button (-) in the bottom left corner, confirm your deletion by clicking on Delete).
Once removed, you’ll be brought back to the Accounts window, click on the button for Exchange or Microsoft 365.
Enter your primary email address in the E-mail address field.
Enter your 8-character username @uwaterloo.ca (username@uwaterloo.ca) and your password.
Make sure Configure automatically is checked, then click Add Account.
Check the Always use my response for this server option and click the Allow button.
If necessary, see Teams Meeting button is missing in Outlook for Mac support article.
Outlook for Android / iOS
Microsoft recommends removing and re-adding the account associated with Outlook on your phone.
To delete the account
Start the Outlook app.
At the top left, select the menu icon, tap Settings.
Tap the account you would like to remove/delete.
A new window will appear. Tap Delete Account.
A small menu will appear, tap Delete.
Fully quit the application.
To re-add the account
On the Welcome Screen, click Get Started.
On the Get Notified screen, you have the option to turn on or off app notifications. This is up to your preference.
On the Add Account screen, enter the email address of the account you are configuring.
Enter your account name in the following format: Enter your 8-character username @uwaterloo.ca (username@uwaterloo.ca).
Click Add Account.
Enter your UWaterloo password on the Microsoft 365 sign in page and select Sign In.
If you use 2FA, click through the prompts to authenticate.
Your account will be added to the Outlook app.
You will be prompted to add another account if you wish to do so.
What if I'm using a mail app that isn't Outlook?
| Note |
|---|
Ensure you are using the most recent version of your email client (e.g., Mac OS/iOS/Windows Mail, Thunderbird). If you cannot update to a recent version, you can access your Microsoft 365 mailbox via https://portal.office.com. Please also ensure your web browser is up to date. See a list of browsers that work with Office for the Web. |
We are not able to provide instructions for all apps that are on the market. If asked for manual information, use the following:
Username: Enter your 8-character username @uwaterloo.ca (username@uwaterloo.ca)
Server: outlook.office365.com
Domain: uwaterloo.ca
Apple Mail for iOS
Go to your iPhone or iPad's Settings> scroll down and tap Accounts & Passwords > tap Add Account.
Note: For iOS 14.X- Go to your iPhone or iPad’s Settings > scroll down and tap Mail > tap Accounts > tap Add AccountSelect Microsoft Exchange.
A popup should appear saying to sign in using your "uwaterloo.ca" Exchange account using Microsoft" & to click Sign In & you will be brought to the UWaterloo sign in page to enter your UWaterloo credentials again
Enter your 8-character username @uwaterloo.ca (username@uwaterloo.ca) and a description of your account. Tap Next.
Enter the password associated with your email account. Tap Sign in or Next.
The Mail app may request certain permissions. Tap Accept.
Choose the services you want to sync with your iOS device and tap Save.
Apple Mail for MacOS
Go to Mail > Accounts.
Select your UW email account and click the minus button at the bottom of the window to delete the account. Click OK. Quit and close the Apple Mail app.
Re-open Apple Mail. In the 'Choose a mail account provider' pop-up, select Microsoft Exchange and click Continue.
Enter the name and email address for your Exchange account and click Sign In. Note that your email address should be entered as your 8-character username @uwaterloo.ca (username@uwaterloo.ca).
At the prompt 'Sign into your Exchange account using Microsoft?', click Sign in.
Enter your password and click Sign in. Follow the 2FA prompts.
Choose the Mac apps you want to use with this account. Available choices are Mail, Contacts, Calendar, Reminders, and Notes. Select the apps you want to use with this account.
Click Done.
Android Gmail app
Note: To configure your UWaterloo email in accordance with modern authentication, you must use your 8-character username @uwaterloo.ca for both the username and email alias.
Open the Settings app
Open the Accounts and backup section
Select Accounts
Select Add Account
Select Exchange
Enter your 8-character username @uwaterloo.ca (username@uwaterloo.ca)
Select Set up manually link
Enter the password associated with your email account.
Enter Server as outlook.office365.com
Click Next
Open the Gmail app and select All Inboxes from the menu to see the new account.
with your personal username@uwaterloo.ca and password
Generic accounts: Log into https://connect.uwaterloo.ca/owa/username@uwaterloo.ca, where username is the 8-character username of your generic account and log in as follows:
Some generic accounts are configured to allow you to log in with your personal username@uwaterloo.ca and password
Some generic accounts require you to log in with the generic account username and password (e.g. generic1@uwaterloo.ca)
If you are unsure, contact the IST Service Desk for assistance.
If you see your mail, then you have not yet been migrated. If you see a forwarding link, then your migration to Microsoft 365 email is complete.
Note for generic accounts: If, your migration is complete, and you click the forwarding link, you may see your personal email, instead of the email for the generic account. If this happens:
Log out (or open a different web browser)
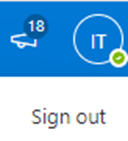
Click on the profile icon at the top right and click ‘Sign out’.
Log into https://outlook.office.com/mail/username@uwaterloo.ca/ (where username is the 8-character generic account userid)
Generic account login information:
Some generic accounts are configured to allow you to log in with your personal username@uwaterloo.ca.
Some generic accounts require you to log in with the generic account username and password (e.g. generic1@uwaterloo.ca).
If you are not sure, contact the IST Service Desk for assistance.
Step 1B: Restart Outlook and re-login (if prompted)
If you are not using Outlook, see 'What if I'm using a mail app that isn't Outlook?' below.
I've been migrated to Microsoft 365. What do I need to do before I log in?
| Note |
|---|
Ensure you are using a recent version of Outlook (e.g., Outlook 2016, 2019, or M365) and it is up to date. If you cannot update to a recent version, you can access your Microsoft 365 mailbox via https://portal.office.com . |
Once your account has been migrated, you will likely see an Outlook prompt, to indicate something has changed. Follow the prompts and restart Outlook:
Outlook - Windows:
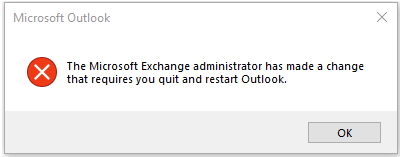
If prompted with the following, click OK and restart Outlook (File/Exit, then re-open Outlook):
Outlook - Mac OS
If prompted with the following, check the box for “Always use my response for this server”, click the Allow button and restart Outlook (Outlook/Quit, then re-open Outlook).
After you restart Outlook, you may need to reconfigure Outlook settings (see screenshots below), and may be prompted for two-factor authentication (2FA)/Duo:
| Info |
|---|
Log in using the 8-character username@uwaterloo.ca and password (e.g. jsmithso@uwaterloo.ca or generic1@uwaterloo.ca) (instead of nexus\username)
|
| Info |
|---|
If you receive the pop-up below asking you to allow the server to configure your settings, check the Always use my response for this server box, then click Allow.
|
Step 2: Confirm you can access and send/receive email
Once you have completed steps 1A and 1B:
Confirm you can access and send/receive email by sending yourself or your colleague a test email.
If you can access and send/receive email, your migration is complete, and you can skip to Steps 3 and 4 below.
If you cannot access or cannot send/receive email, you may need to re-configure your email client, using the information below (reminder that you also may be prompted for two-factor authentication (2FA)/Duo):
Microsoft 365 email in a browser |
|---|
|
Outlook for Windows |
|
Outlook for Mac |
|
Outlook for Android / iOS |
|
What if I'm using a mail app that isn't Outlook?
| Note |
|---|
Ensure you are using the most recent version of your email client (e.g., Mac OS/iOS/Windows Mail, Thunderbird). If you cannot update to a recent version, you can access your Microsoft 365 mailbox via https://portal.office.com or, for generic accounts, via https://outlook.office.com/mail/userid@uwaterloo.ca/ (where userid is the 8-character generic account userid). Please also ensure your web browser is up to date. See a list of browsers that work with Office for the Web. |
We are not able to provide instructions for all apps that are on the market. If asked for manual information, use the following:
Username: Enter your 8-character username @uwaterloo.ca (username@uwaterloo.ca)
Server: outlook.office365.com
Domain: uwaterloo.ca
Apple Mail for iOS | ||||
| ||||
Apple Mail for MacOS | ||||
| ||||
Android Gmail app | ||||
Note: To configure your UWaterloo email in accordance with modern authentication, you must use your 8-character username @uwaterloo.ca for both the username and email alias.
| ||||
BlackBerry Hub | ||||
| ||||
IMAP clients | ||||
IMAP users will require an email client that supports the OAuth 2.0 protocol as Basic Authentication will be unavailable.
|
Basic Authentication will be unavailable.
|
Step 3: Update interface settings if needed
What do I need to do after I log in?
Shared accounts and generic accounts (where access is via personal credentials) may need to be re-configured
Shared and generic accounts, that are still on-premises, can be accessed through a web browser with a URL similar to: https://connect.uwaterloo.ca/owa/username@uwaterloo.ca (replace 'username' with the shared account username)
Signatures may need to be re-created or re-configured
See Microsoft's documentation on how to Create and add a signature
Mailbox favourites may need to be re-added
See Microsoft's documentation on how to Add or remove folders in Favourites
Drafts folder may not appear until a new draft message is created
You may need to re-add others’ calendars in Outlook. If you need to re-add, you will receive prompts to configure other email server settings:
Remove the existing calendar by right-clicking on the calendar > Delete Calendar.
Quit and re-open Outlook.
Re-add the calendar by right-clicking on 'My Calendars' > Add Calendar > from Address Book.
| Info |
|---|
Note: You can add only one calendar at a time. Repeat the instructions for each calendar you want to add. |
Step
34: Edit new features if necessary
New features available in Microsoft 365
Focused inbox: separates your inbox into two tabs: ‘Focused’ and ‘Other’
To turn off Focused inbox, please see Microsoft's documentation: Focused Inbox for Outlook
MyAnalytics: a tool to help you improve focus, wellbeing, network, and collaboration
Please submit a request via RT to enable MyAnalytics
Additional resources
Voicemail and editing voice greetings
Voicemail is now hosted in the cloud for Skype for Business phone users
Voicemails will be sent to your email inbox; you can also access voicemail in Microsoft Teams by going to Calls > Voicemail
Learn more about how you can configure your voicemail settings and greetings
Changes to Exchange distribution groups
Owners of 'on-premises’ distribution groups/lists can still use them, however, group owners who have their email in Microsoft 365 will need to log into http://connect.uwaterloo.ca/ecp to edit them, at this time. Another option is to ask your IST Account rep (Academic Support Departments) or IST Account Rep (Faculties) to edit your groups for you.
Related articles
| Filter by label (Content by label) | ||||||||||||||||||
|---|---|---|---|---|---|---|---|---|---|---|---|---|---|---|---|---|---|---|
|
| Info |
|---|
Need help?Contact the IST Service Desk online or 519-888-4567 ext. 44357. |
| Tip |
|---|
Article feedbackIf you’d like to share any feedback about this article, please let us know. |