The Discussions tool is a collaboration area where you can post, read, and reply to messages.
Accessing the discussion tool
From the Connect menu on the course navigation bar, select Discussions from the drop-down menu.
Creating a new thread
Select Connect from the course navbar and select Discussions.
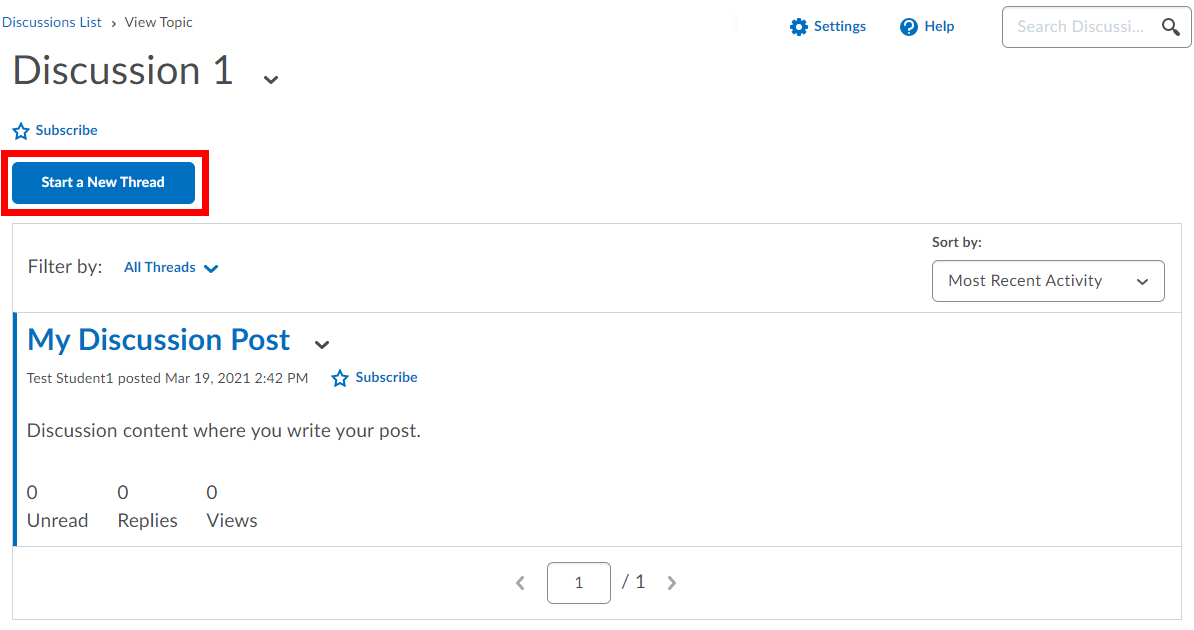
Select the discussion topic where you want to create a new thread.
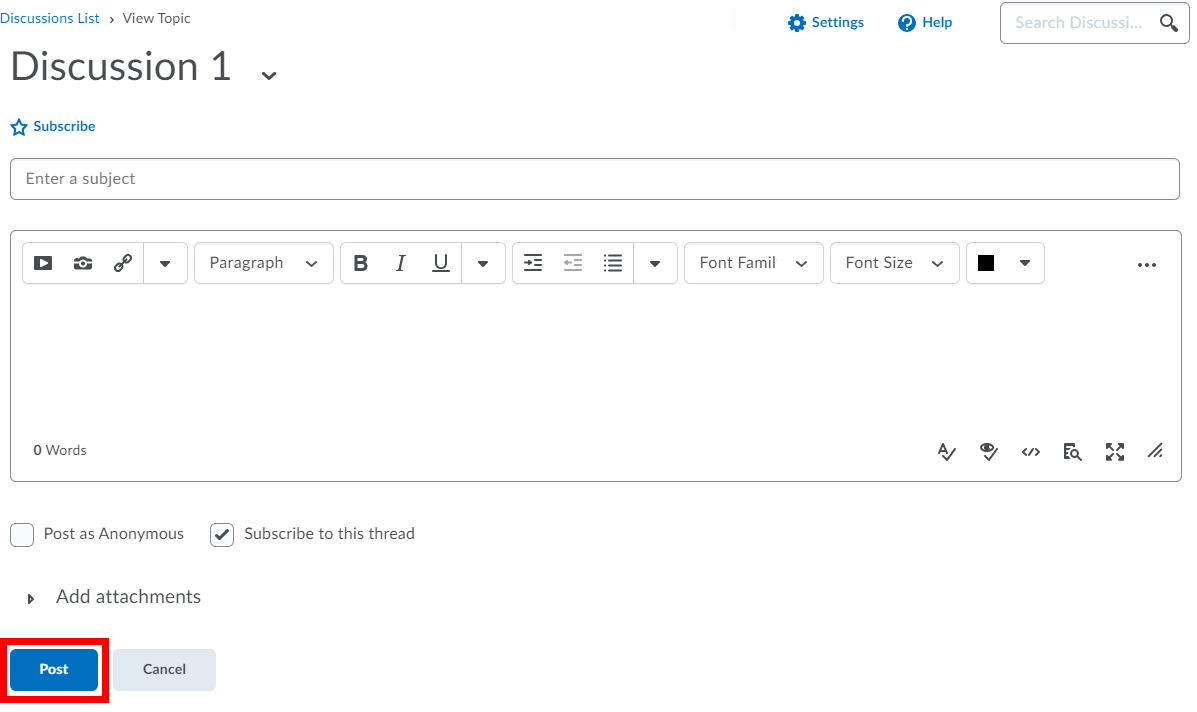
Click the Start a New Thread button.
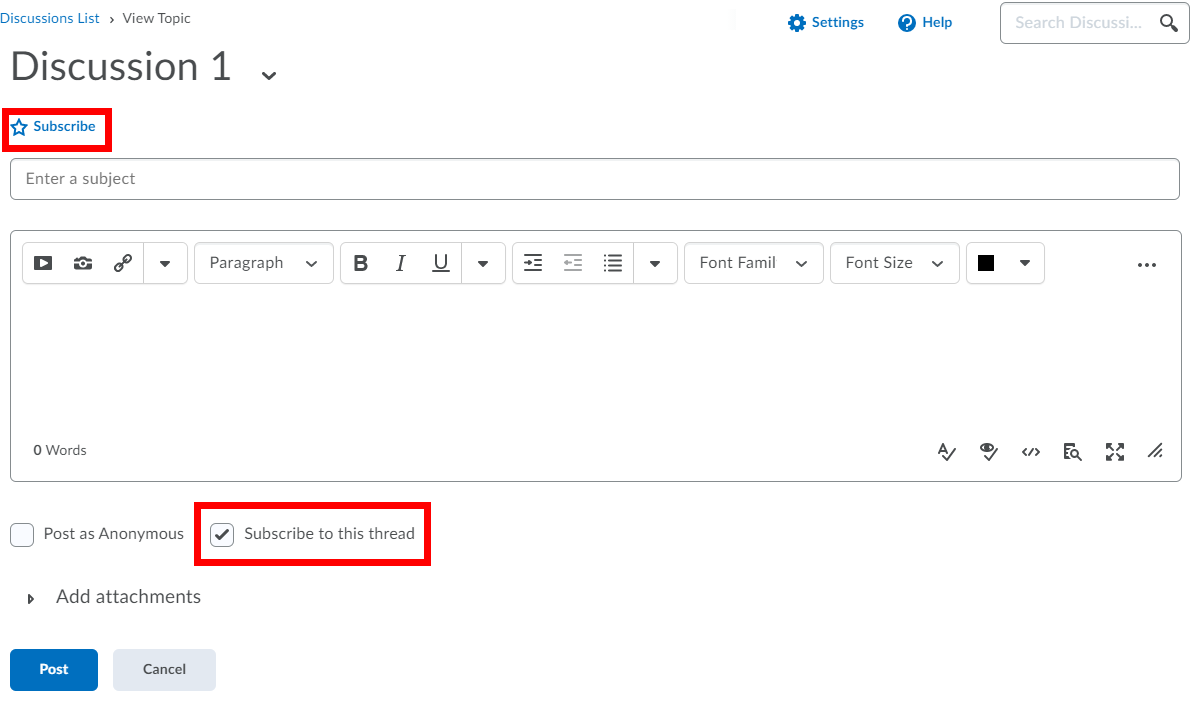
Enter a subject and compose the body message of the post.
Select whether or not you want to subscribe to the thread. You can subscribe by clicking the Subscribe option with the star icon at the top of the page or by selecting the check box beside Subscribe to this thread. When you subscribe to a thread you will see notifications when someone replies to it.
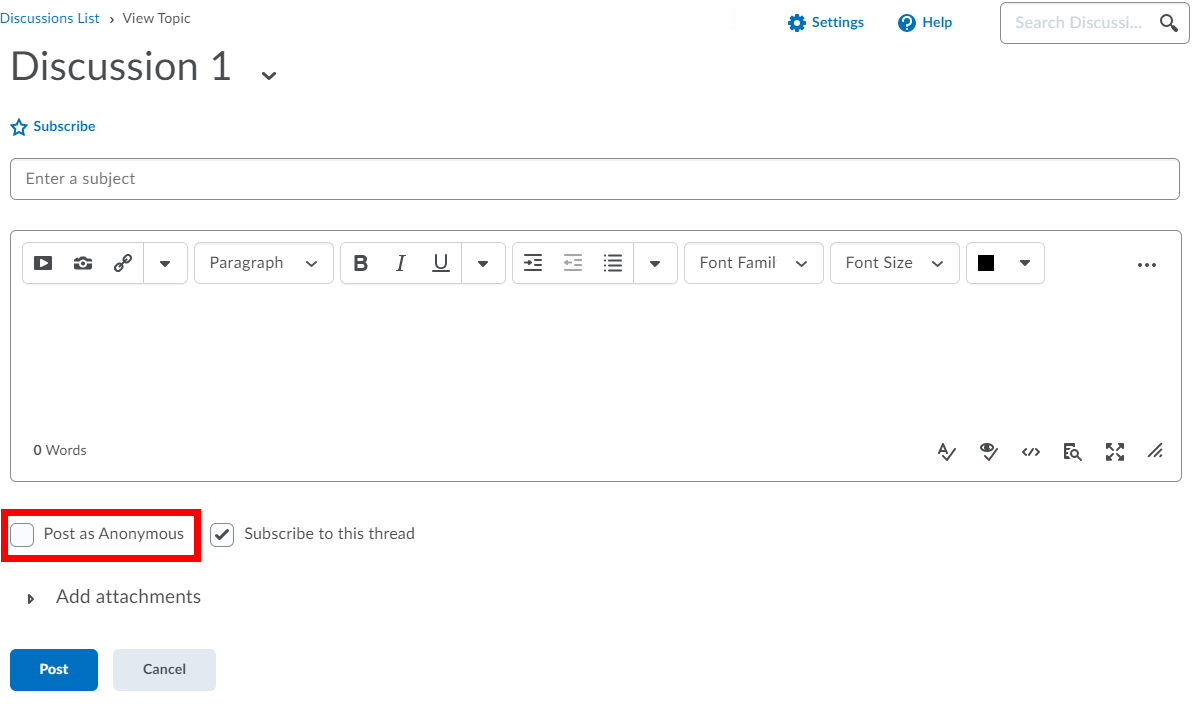
If enabled in the discussion topic, select whether or not you want your thread posted as anonymous.
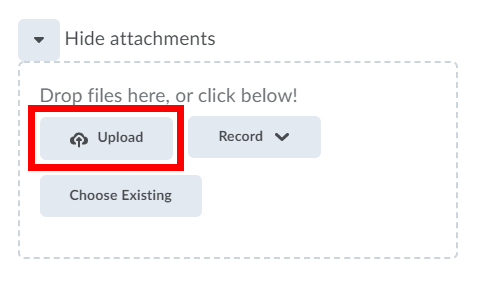
To attach a file, select the arrow beside Add attachments.
To attach a file from your computer, click the Upload button to browse for and select the file you would like to attach. Alternatively, drag and drop the file from your computer to the upload area. The drag and drop feature is not available in all browsers. Repeat to attach additional files.
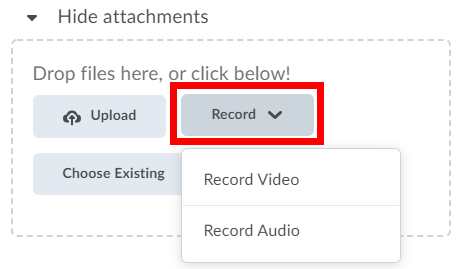
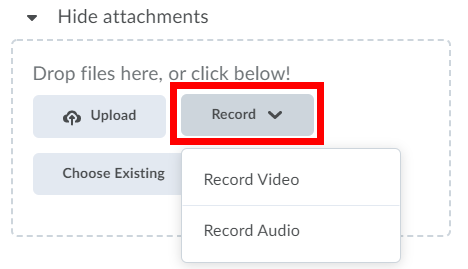
To attach a video or audio file, click the Record button and select Record Video or Record Audio.
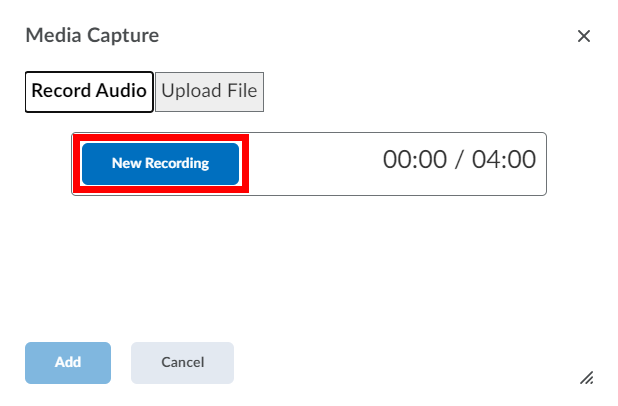
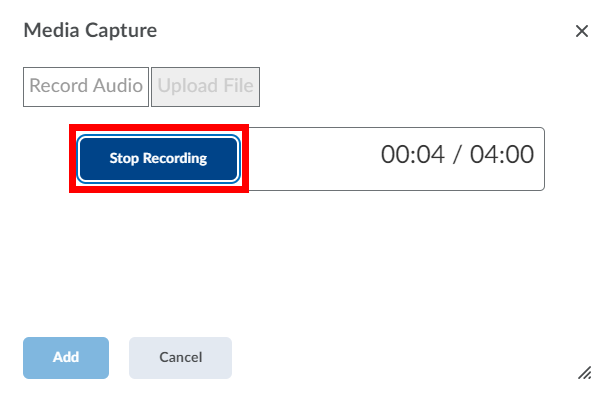
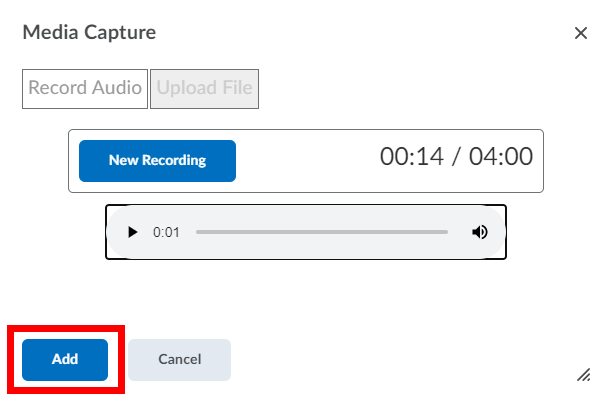
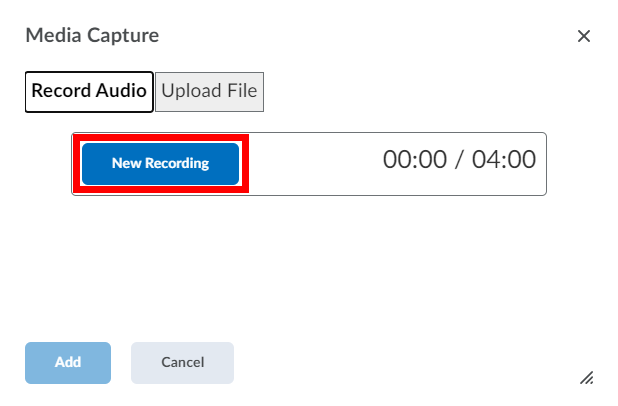
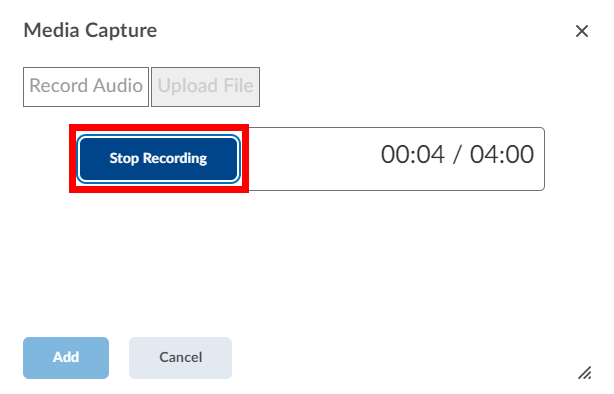
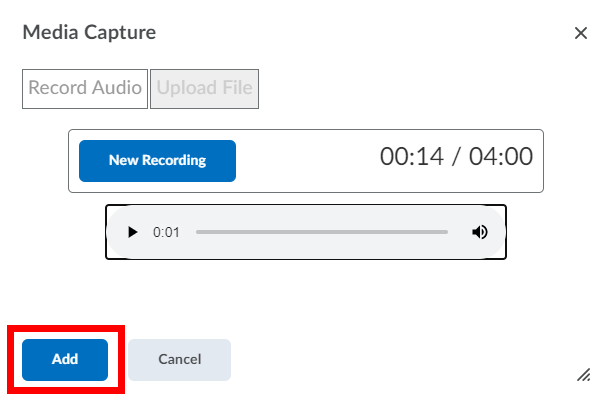
Ensure that your microphone and camera (if recording video) are setup correctly. Click the New Recording button to begin recording and click the Stop Recording to stop recording.
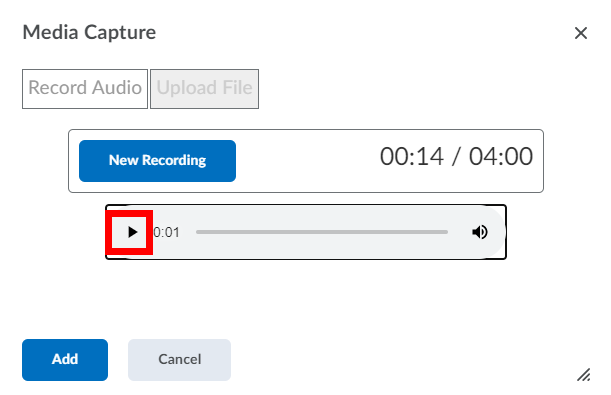
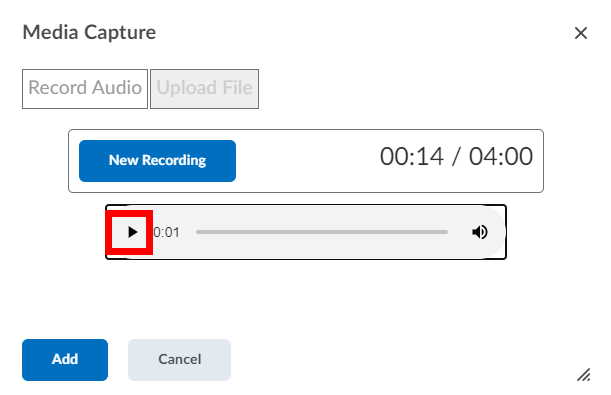
Click the Play button to review your recording. If you wish to re-record, click the New Recording button.
Once you are satisfied with your recording, click the Add button to add it to your thread.
Click the Post button to publish your thread.
To edit the thread, click the down arrow next to the thread name and select Edit Thread.
Moderated and must post first discussions
Moderated discussion topics
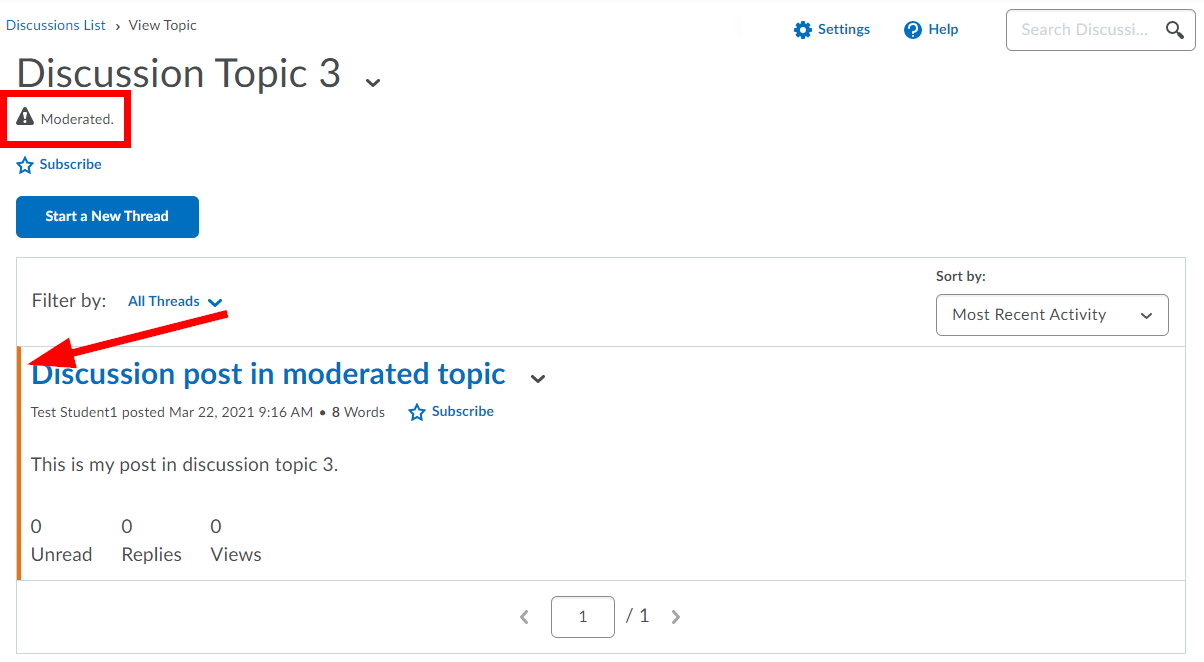
If the discussion topic is moderated, your thread or post will not appear to other students until it is approved by your instructor. Moderated discussion topics can be identified by the Moderated icon. If your thread or post has not yet been approved, the left-hand side will be identified by an orange bar. Below is an example of a new thread that has not been approved.
Must post first discussion topics
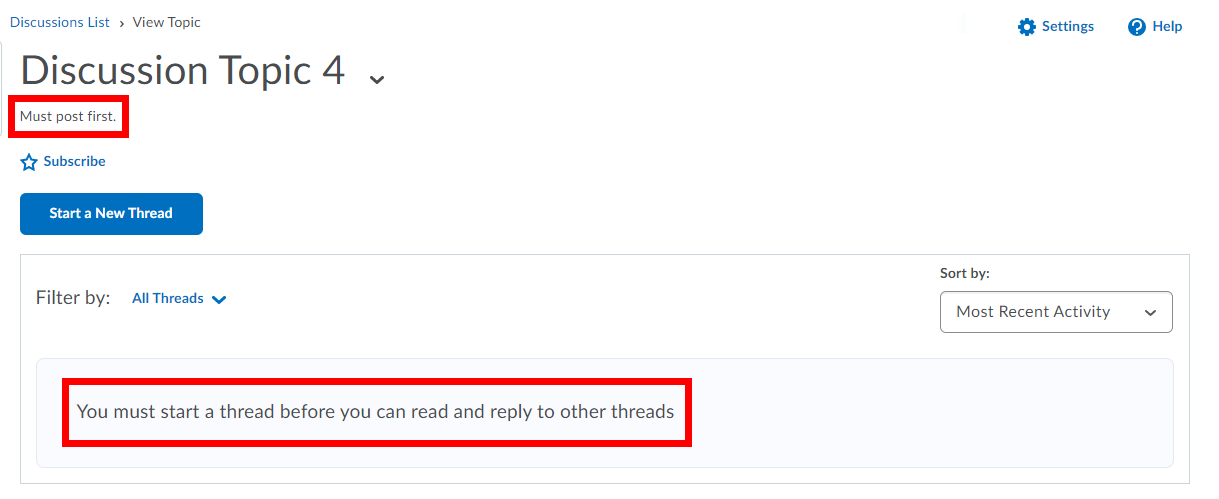
Some discussion topics may be set up so that you must start a thread before you can read and reply to other threads.
Replying to a thread
Select Connect from the course navbar and select Discussions.
Select the discussion topic and then the thread you want to reply to.
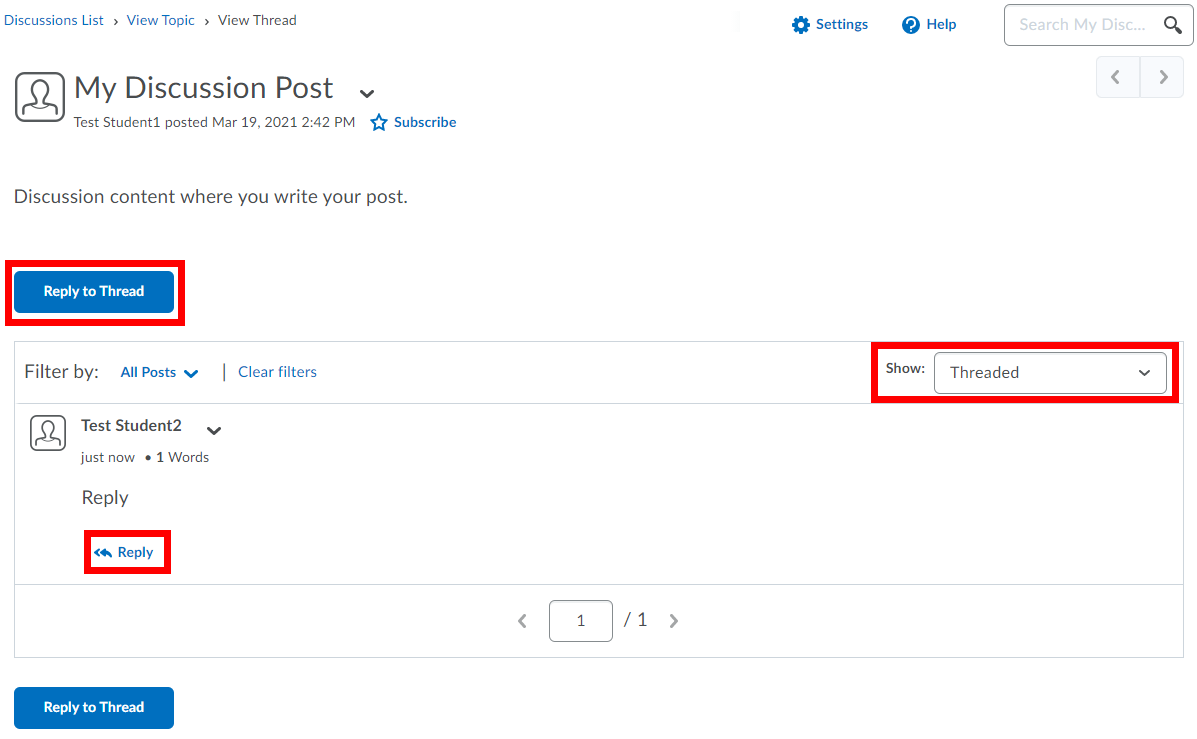
Click the Reply to Thread button to reply directly to the thread or, click on Reply to respond to a post within the thread. The example below shows the messages in the Threaded view. Other options are available from the Show: drop-down menu.
Compose the body message of your post.
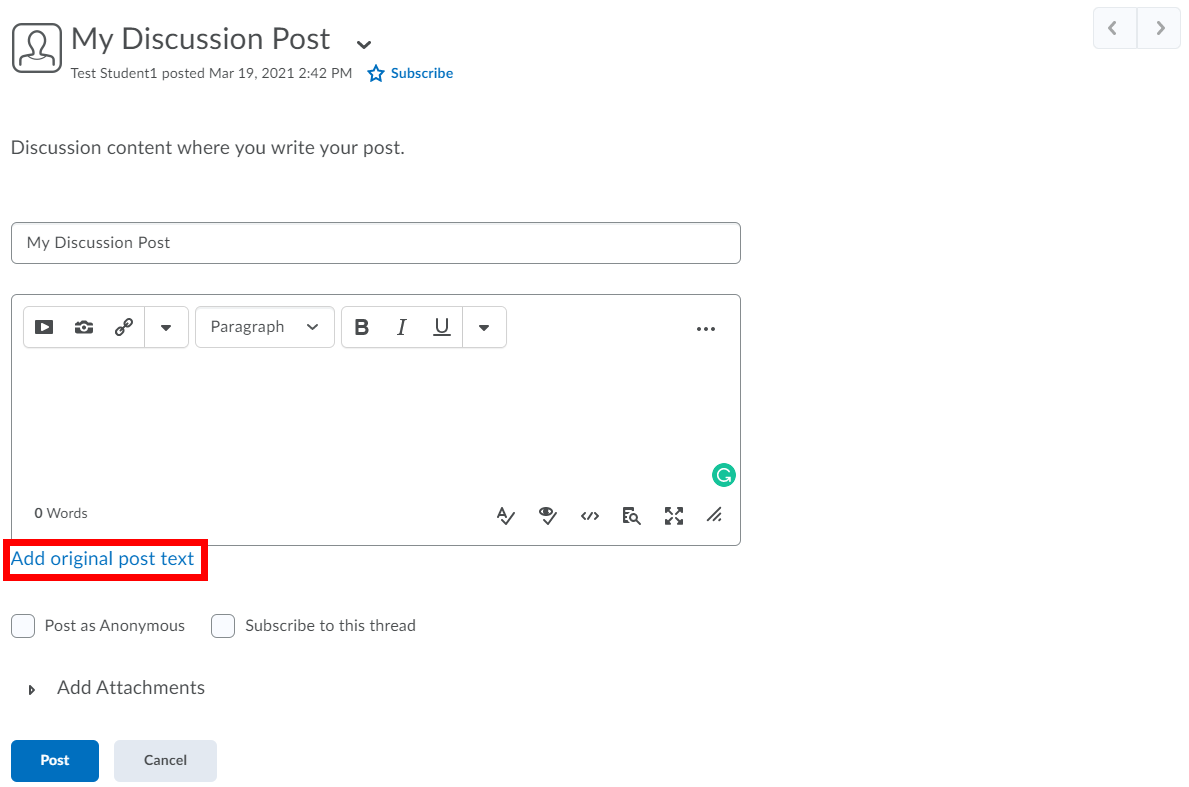
Click Add original post text if you would like the original post to be included in your reply.
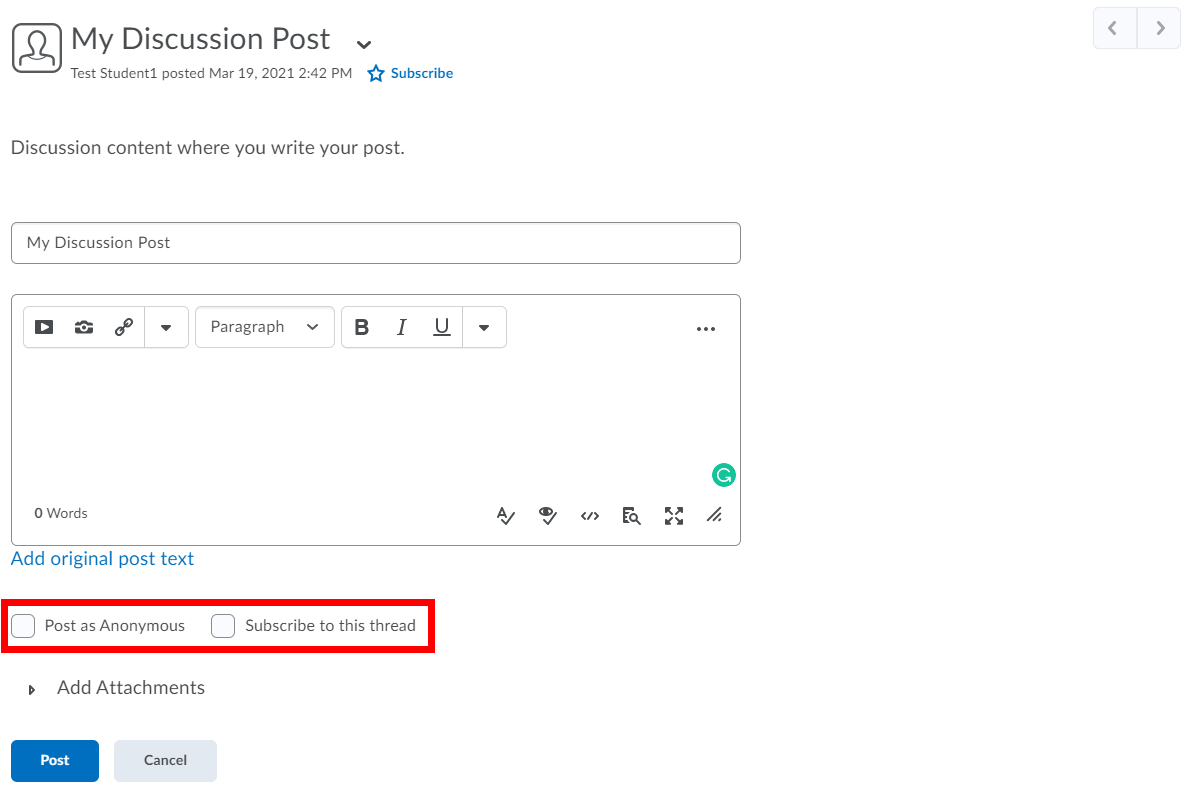
Select whether or not you want to subscribe to the thread. If enabled in the discussion topic, select whether or not you want your post to be anonymous.
To attach a file, select the arrow beside Add attachments.
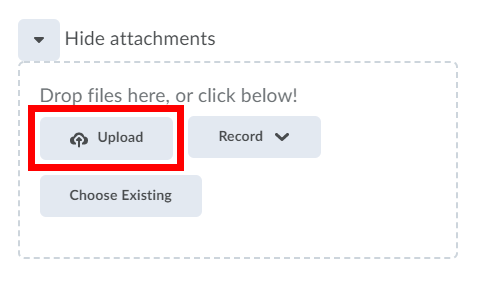
To attach a file from your computer, click the Upload button to browse for and select the file you would like to attach. Alternatively, drag and drop the file from your computer to the upload area. The drag and drop feature is not available in all browsers. Repeat to attach additional files.
To attach a video or audio file, click the Record button and select Record Video or Record Audio.
Ensure that your microphone and camera (if recording video) are setup correctly. Click the New Recording button to begin recording and click the Stop Recording to stop recording.
Click the Play button to review your recording. If you wish to re-record, click the New Recording button.
Once you are satisfied with your recording, click the Add button to add it to your reply.
Click the Post button to publish your reply.
To edit the reply, click the down arrow next to your reply and select Edit Post.
Finding unread posts
Once a discussion gets going, new threads and posts can come in very quickly. To help you keep on top of things, new messages are identified in a number of places.
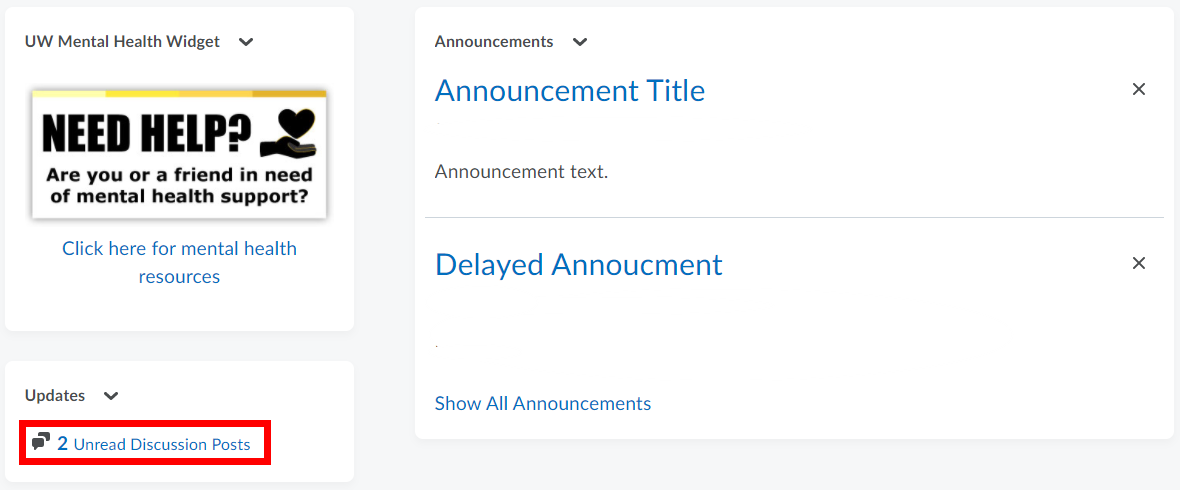
On the Course Home, you may see the Updates widget that lists the total number of unread discussion posts for all discussion topics in the course.
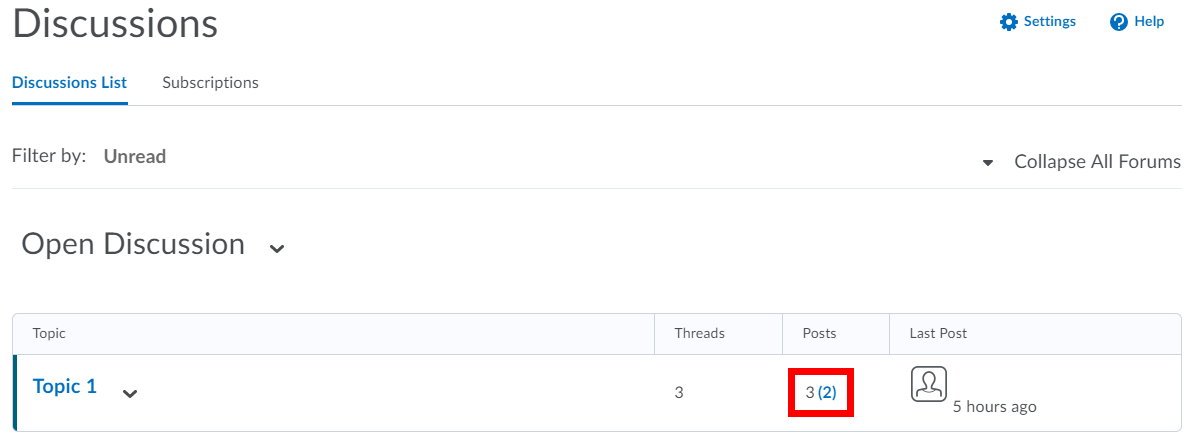
On the main Discussions List page, the total number of Posts is listed for each topic. The number of unread messages appears in brackets.
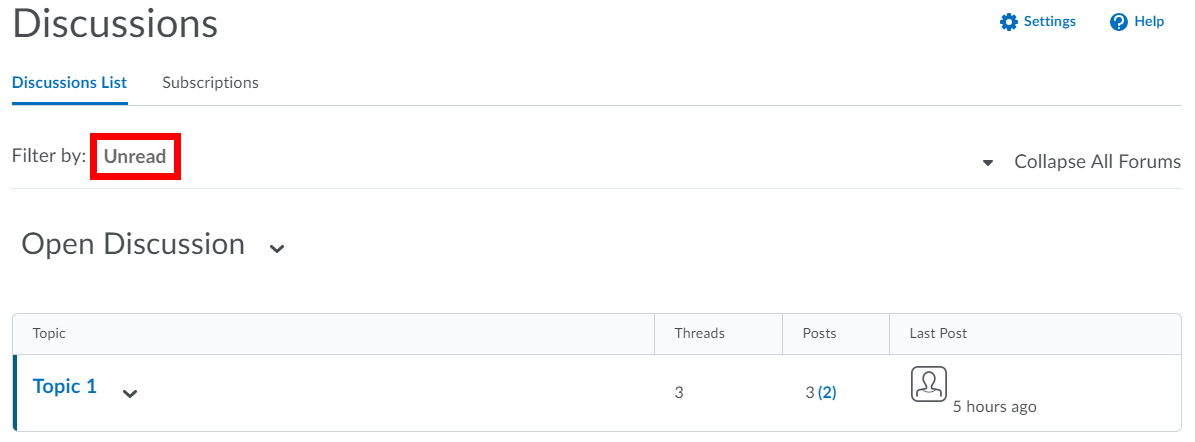
To view only those discussion topics with posts you have not yet read, click Unread next to Filter by: at the top of the Discussions List page. Click Unread again to remove the filter and see all discussion topics.
Within a specific discussion topic or thread, beside Filter by: click All Posts or All Threads and select Unread to view only threads and replies you have not yet read. Click Unread again to remove the filter.
Within a specific discussion topic, threads that contain unread posts will be identified by bold lettering and a blue bar on the left-hand side. This also applies to unread posts within a specific thread.
You can also choose to subscribe to specific discussion forums, topics, or threads and receive an email notification when there is a new post. For more information, see Subscribing to a forum, topic, or thread.
Marking a thread or post as read or unread
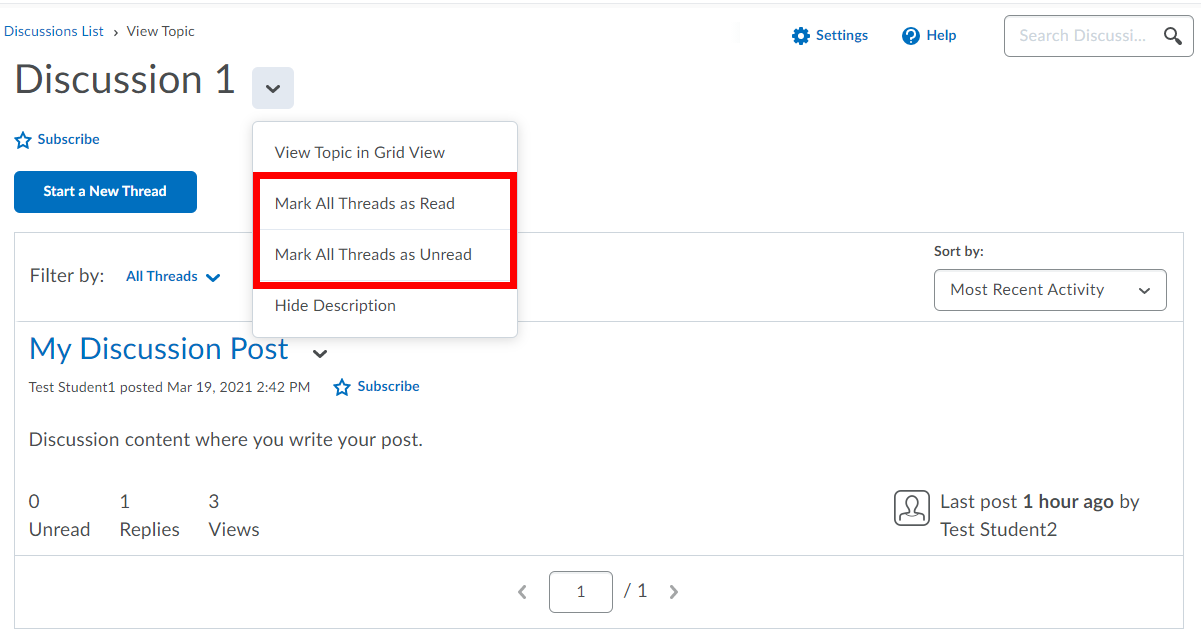
To mark all threads as read or unread within a specific discussion topic, click the down arrow next to the discussion topic name and select Mark all Threads as Read or Mark All Threads as Unread.
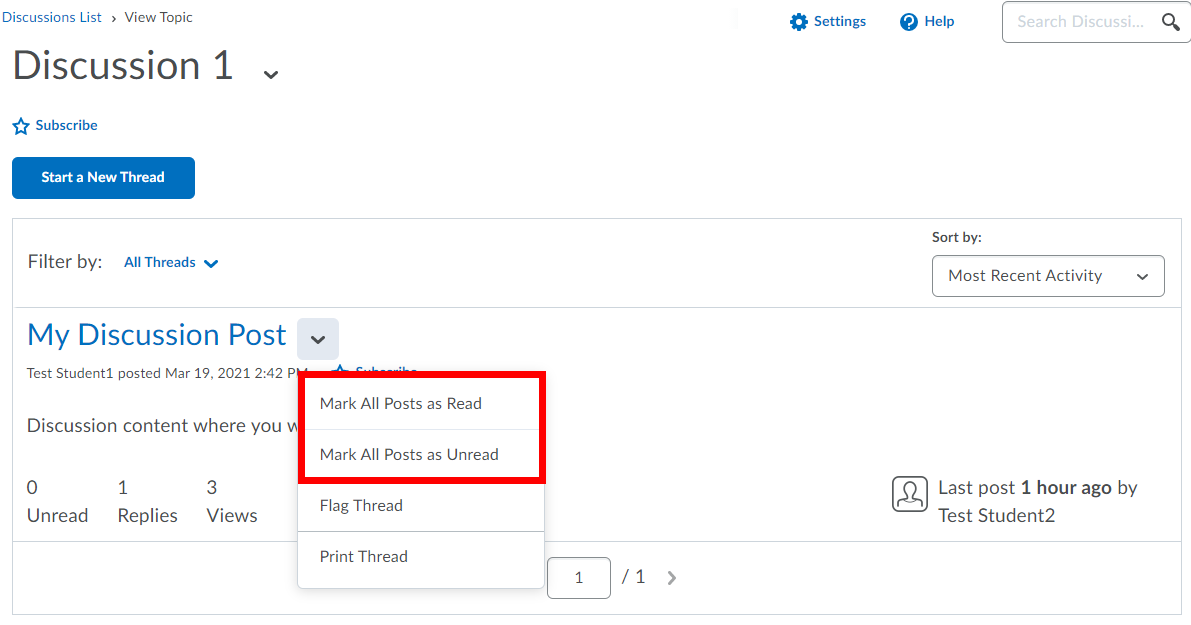
To mark all posts as read or unread within a specific thread, click the down arrow next to the thread name and select Mark all Posts as Read or Mark All Posts as Unread.
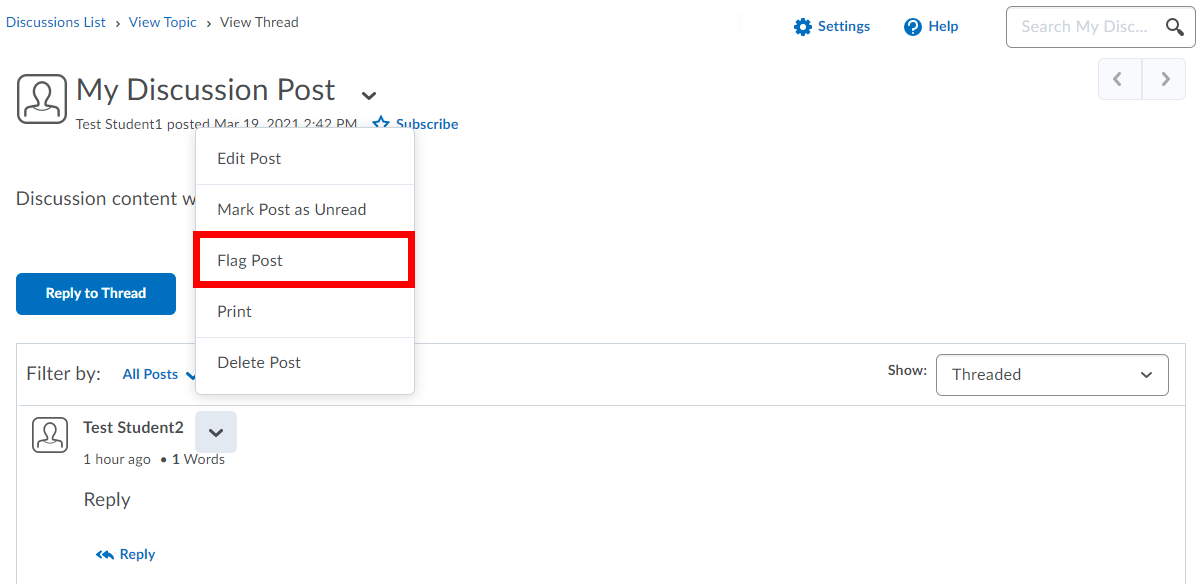
To mark a specific post as unread, click the down arrow next to the post name and select Mark Post as Unread.
Flagging a thread or post
Flagging is a good way to mark a thread or post that you want to return to again later.
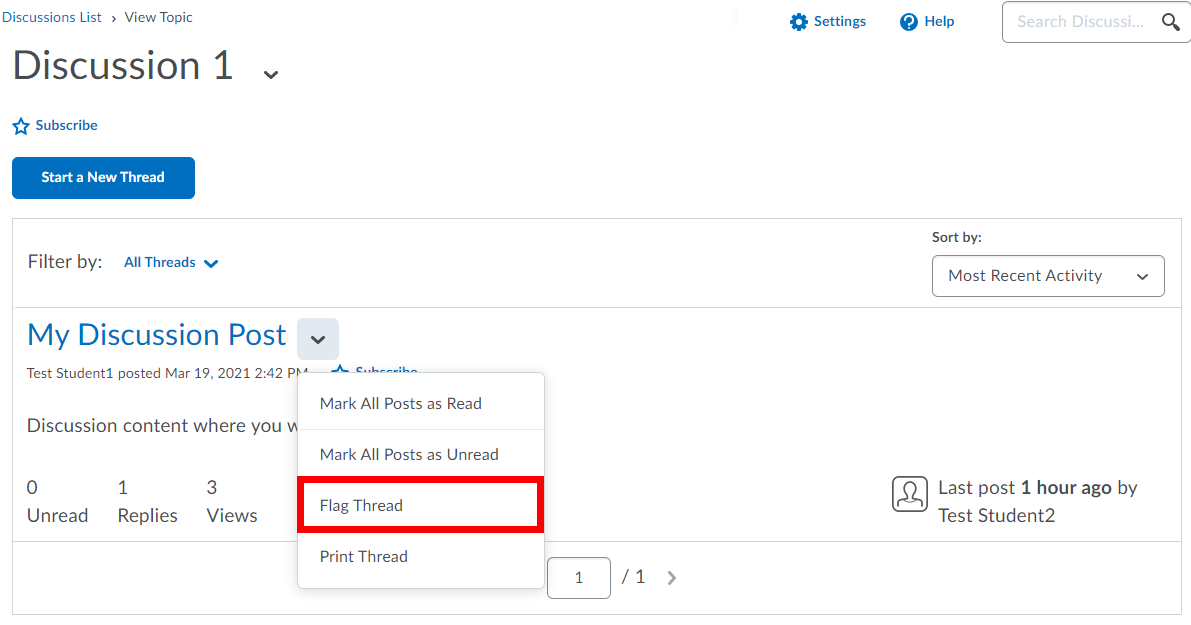
To flag a thread, click the down arrow next to the thread name and select Flag Thread. To remove the flag, select Remove Flag.
To flag a post, click the down arrow next to the post name and select Flag Post. To remove the flag, select Remove Flag.
Within a specific discussion topic or thread, beside Filter by: click All Threads and select Flagged to view only threads and replies you have flagged. Click Flagged again to remove the filter.
Searching for posts
Enter the discussion topic or thread you want to search.
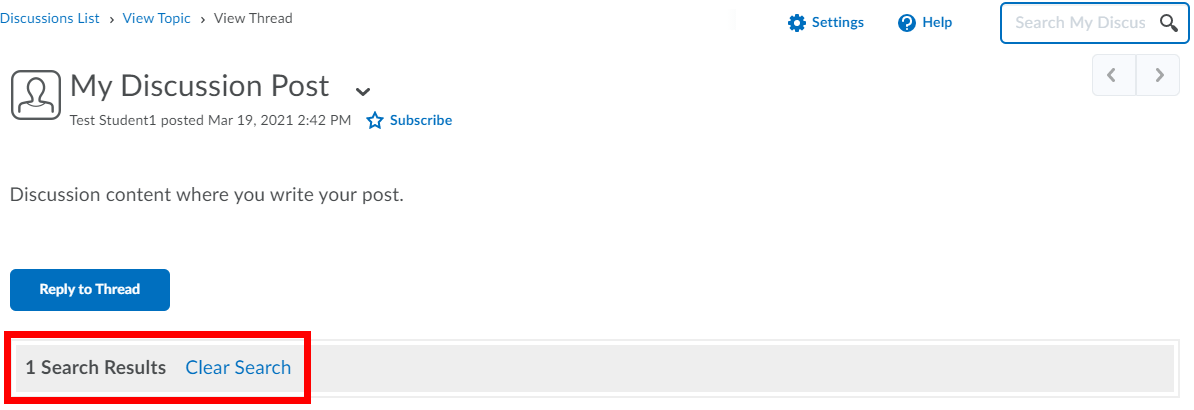
Enter the terms you want to find in the Search field and click the Search icon.
To see all posts again, click Clear Search.
Subscribing and unsubscribing to a forum, topic, or thread
You can subscribe to a discussion forum, topic, and/or thread in order to receive notifications when there are new posts.
See the Notifications documentation to ensure that you have properly set-up your notification settings.
Subscribing and unsubscribing to a forum
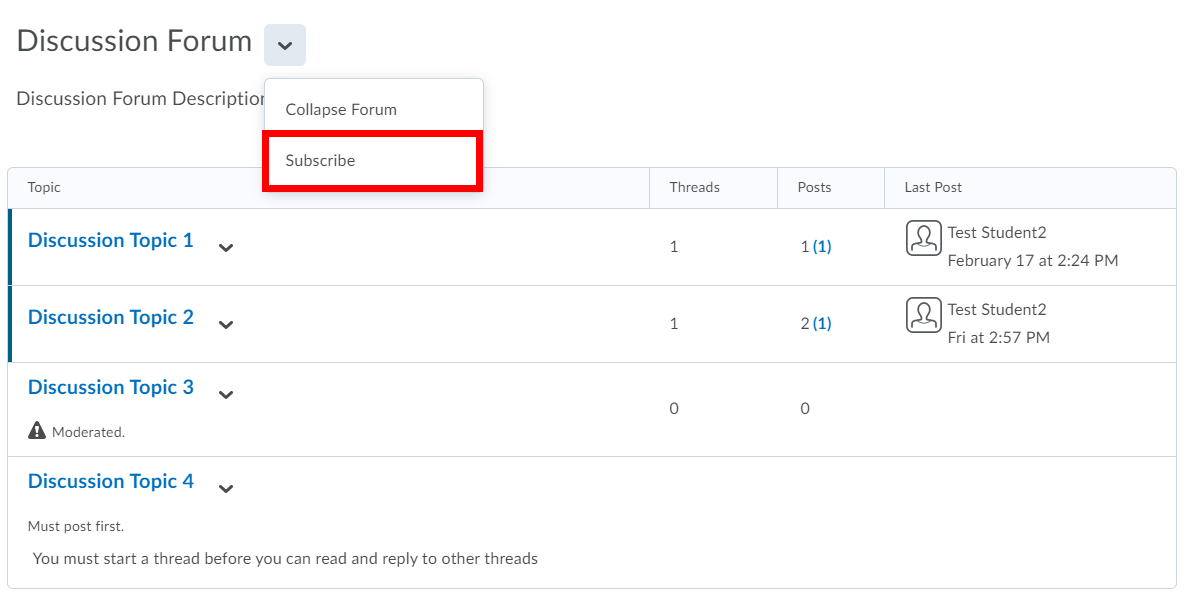
To subscribe to all topics in a forum, from the Discussions List page click the down arrow next to the forum name and select Subscribe.
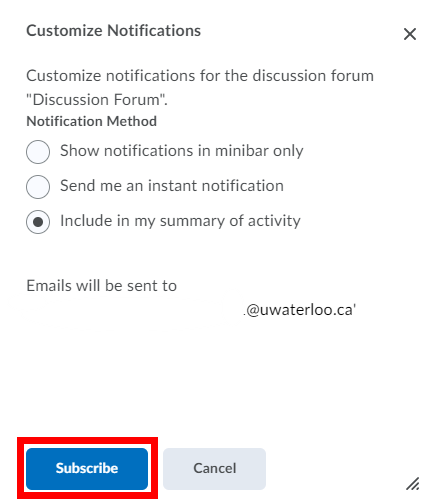
The Customize Notifications pop-up dialogue box will appear. Select your preferred notification method and click the Subscribe button.
To unsubscribe at a later time, return to the menu and click Unsubscribe. You can also unsubscribe from the Subscriptions page. Refer to Managing subscriptions and settings.
Subscribing and unsubscribing to a topic
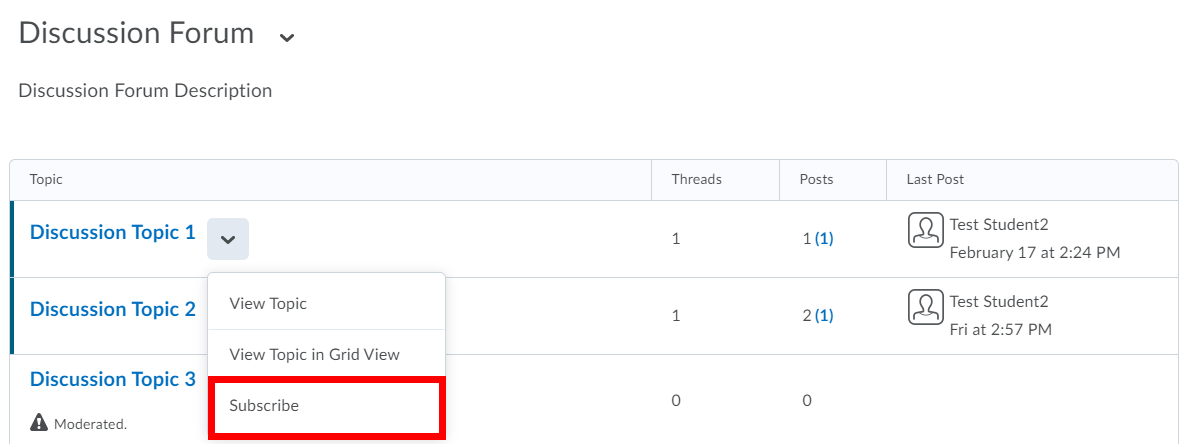
To subscribe to a specific discussion topic, from the Discussions List page click the down arrow next to the discussion topic name and select Subscribe. The Customize Notifications window will appear. Select your preferred notification method.
To unsubscribe at a later time, return to the menu and click Unsubscribe. You can also unsubscribe from the Subscriptions page. Refer to Managing subscriptions and settings.
Subscribing to a thread
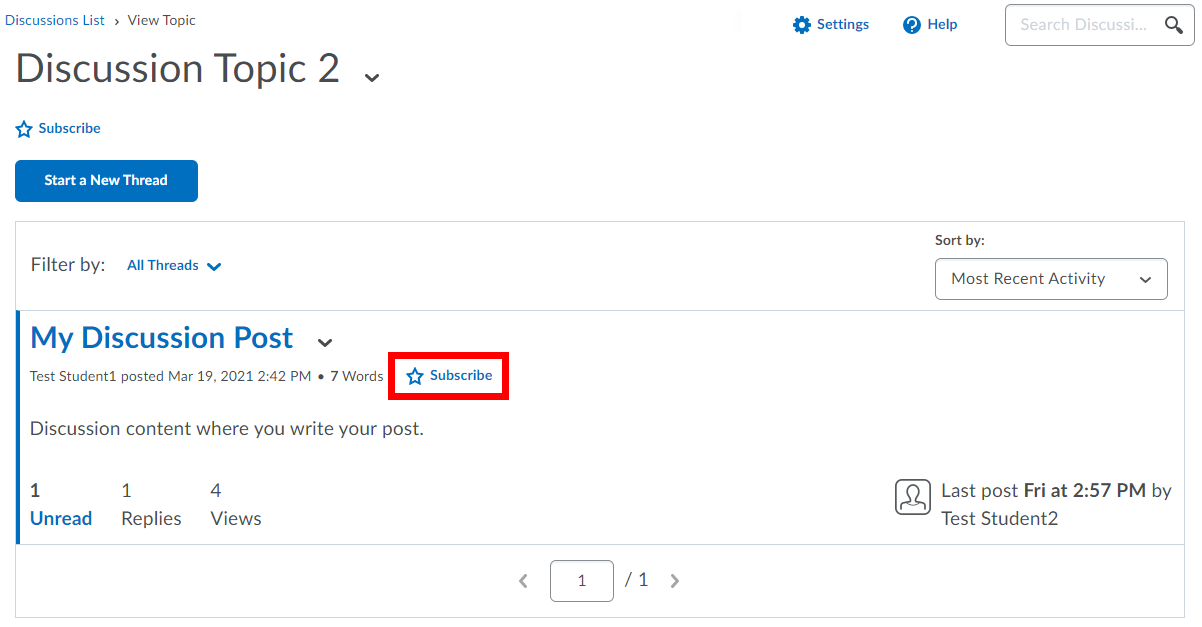
To subscribe to a specific thread in a discussion topic, click Subscribe next to the thread. The Customize Notifications window will appear. Select your preferred notification method.
To unsubscribe at a later time, return to the thread and click Subscribe. You can also unsubscribe from the Subscriptions page. Refer to Managing subscriptions and settings.
Managing subscriptions and settings
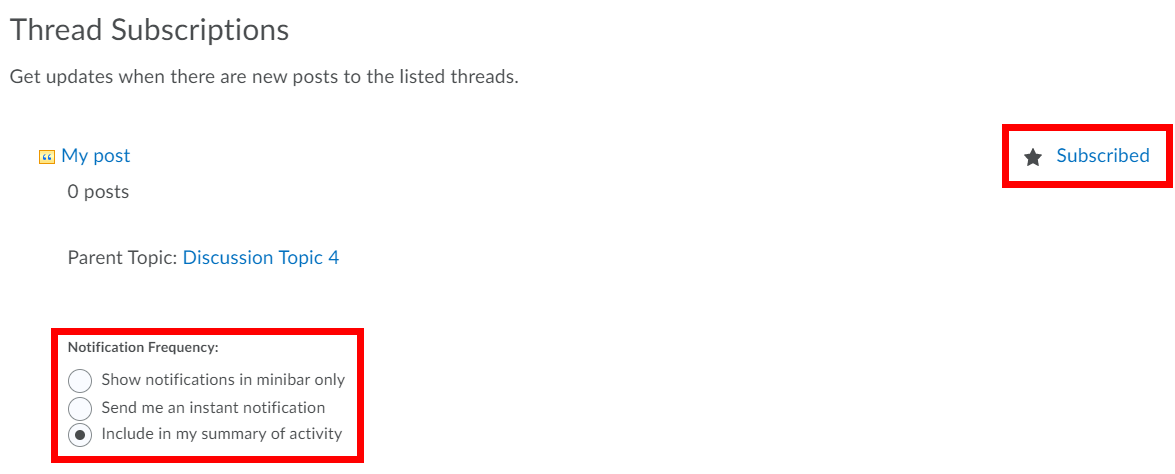
To view all of your subscriptions and make any necessary changes, click Subscriptions at the top of the Discussions area. You can also select the Default Notification Method.
For each type of subscription (Forum Level, Topic Level, or Thread), you can do the following:
Change the Notification Frequency
Unsubscribe by clicking Subscribed
Printing messages
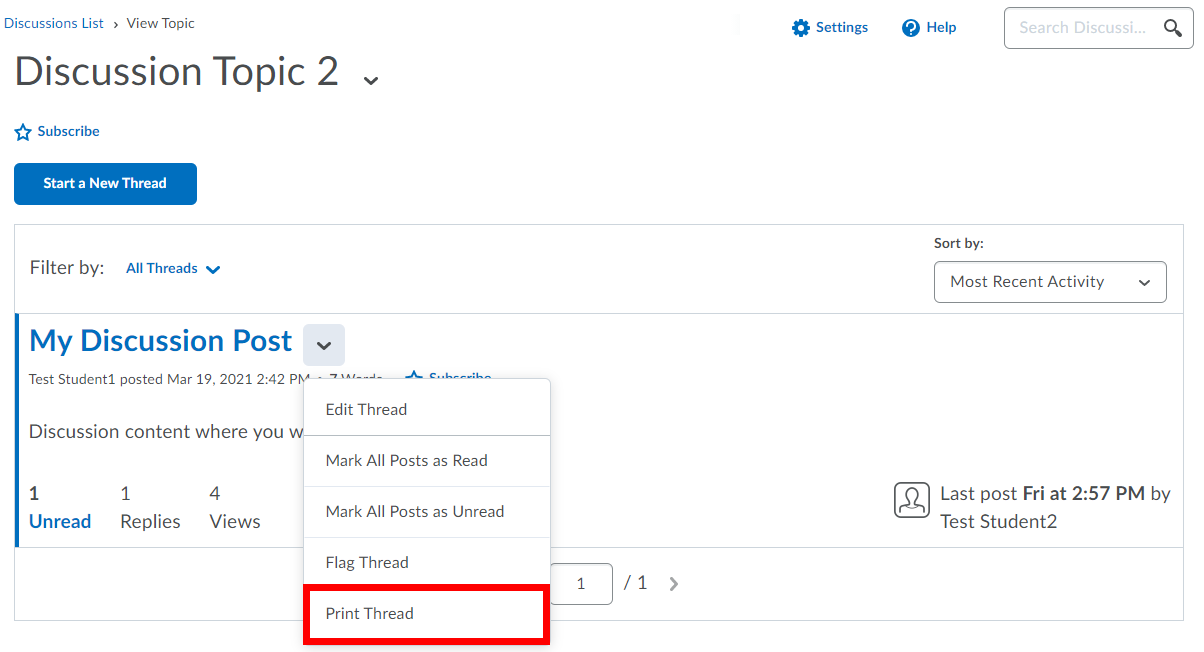
Printing a thread
To print a thread, click the down arrow next to the thread name and select Print.
In the window that opens, click Print.
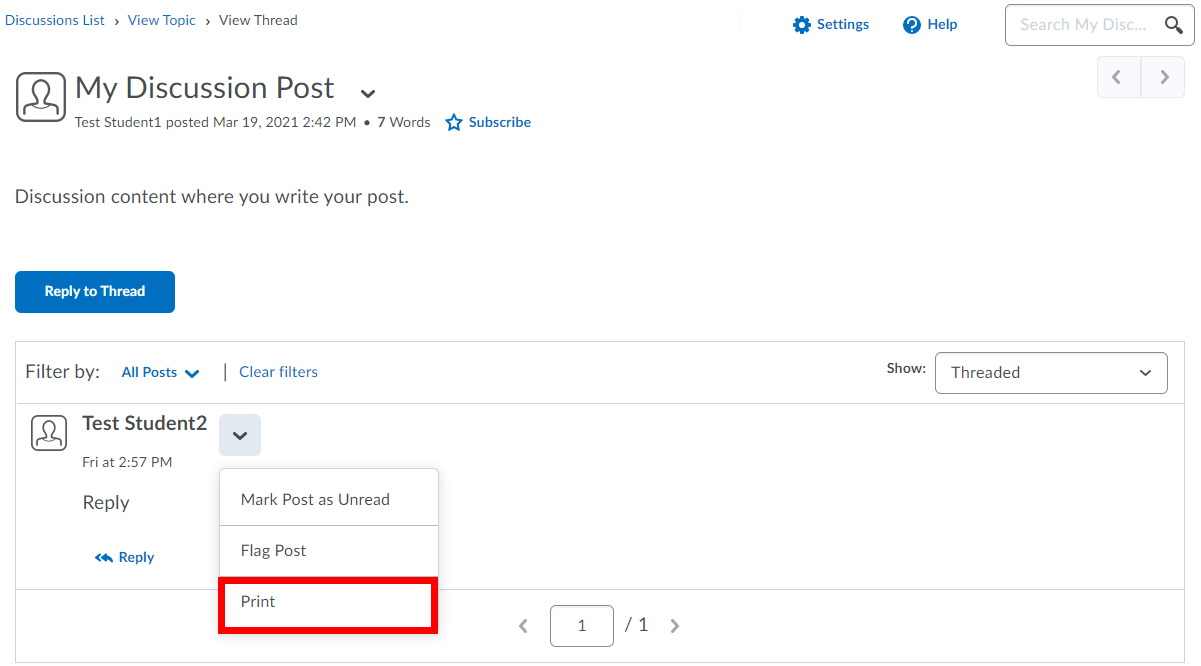
Printing a post
To print a post, click the down arrow next to the post and select Print.
In the window that opens, click Print.
Discussion settings
The personal settings selected will apply to all discussions in all your courses.
The personal discussion settings can be accessed two ways:
The first way is to click the Settings link at the top of the discussions area.
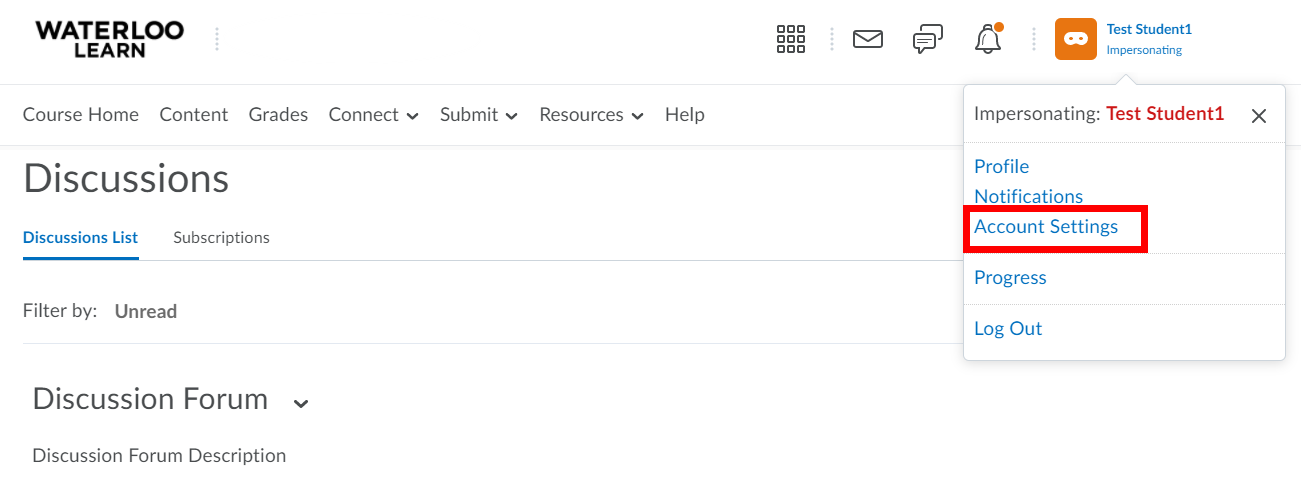
The second way is to click your name in the top right corner of LEARN and select Account Settings.
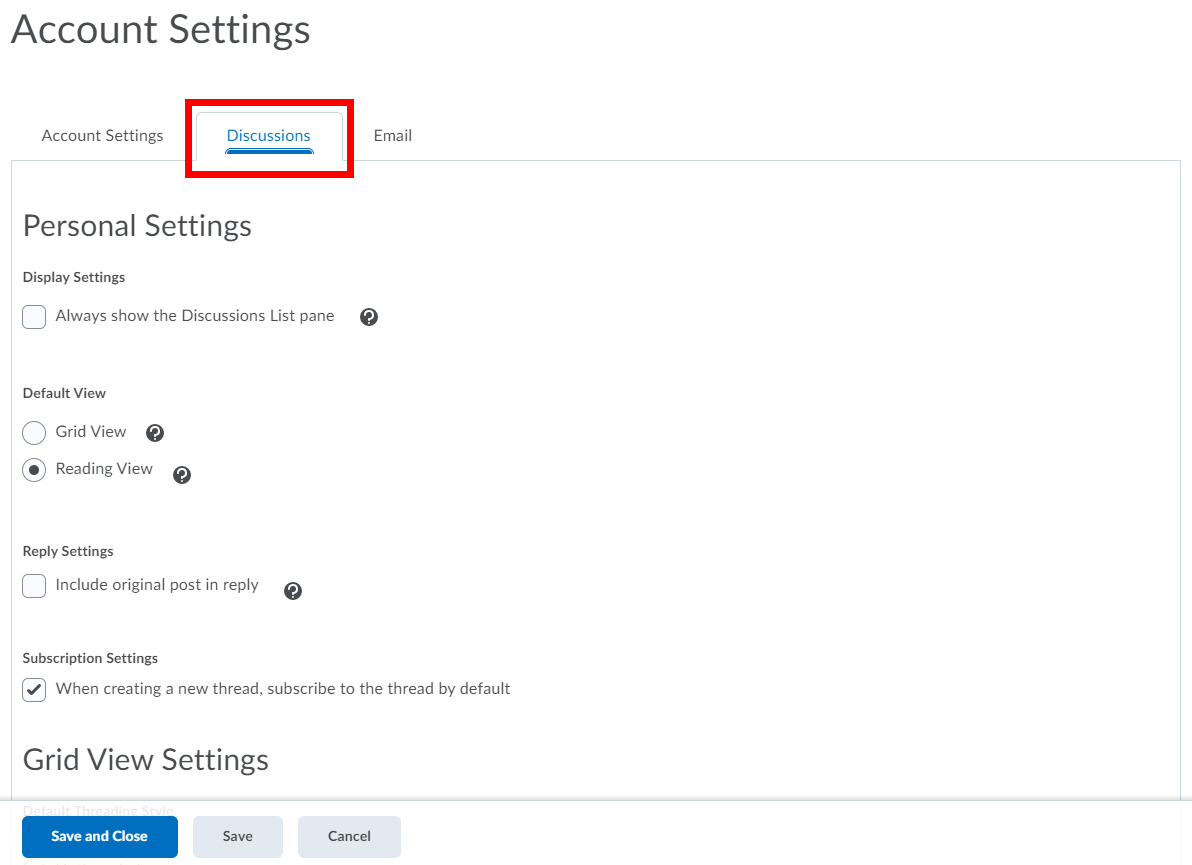
Next, select the Discussions tab.
Below is a description of some of the Personal Settings options.
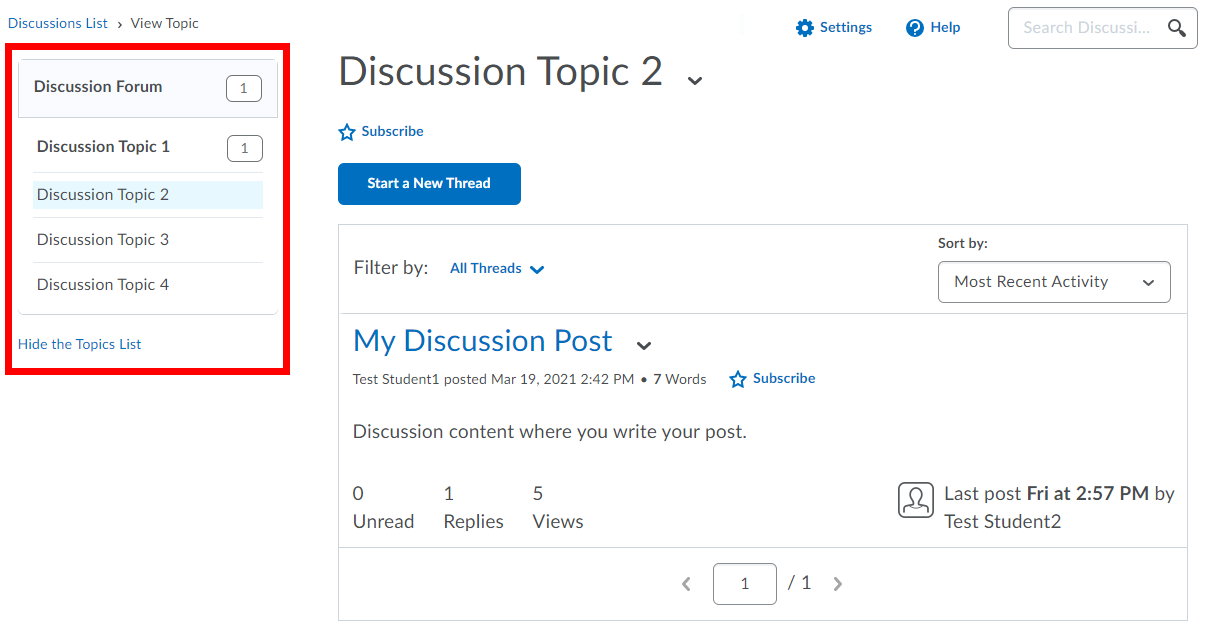
Always show the Discussions List pane: Selecting this option will pin the Discussions List pane in the View Topic and View Thread pages and will allow you to navigate quickly between topics. Clicking Hide the Topics List will undo this setting.
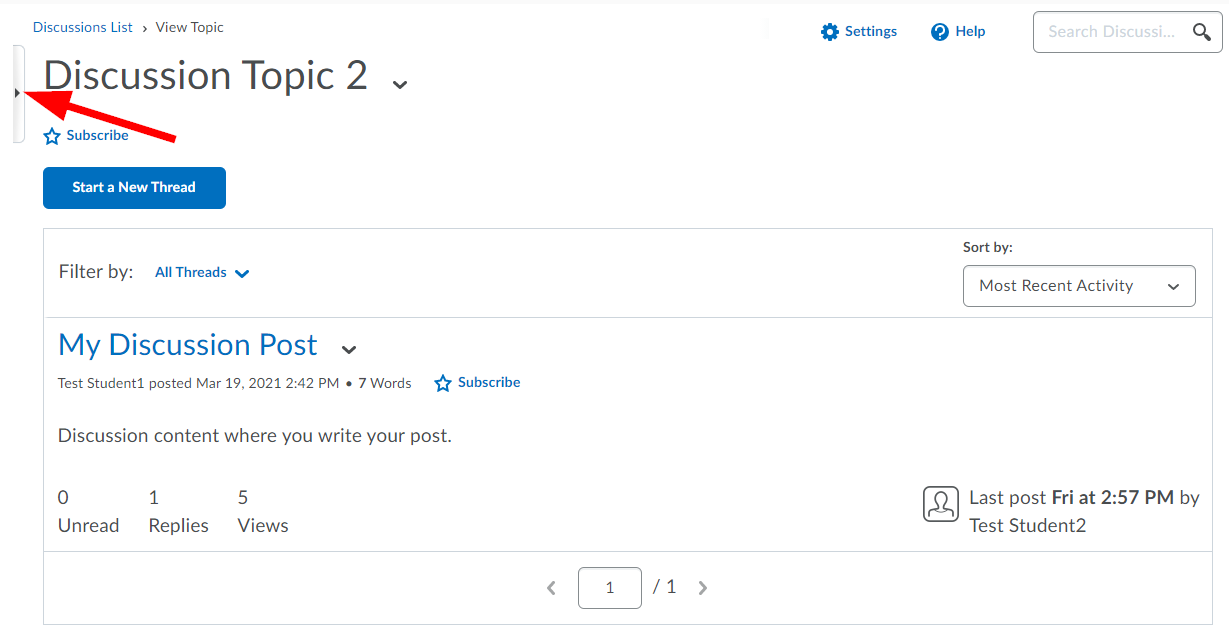
Click the Expand side panel button on the left-hand side of the discussions area within a topic or thread to unhide the Discussions List pane.
Include original post in reply: Selecting this option includes the original post by default when composing a reply.
Need help?
Contact LEARNhelp at learnhelp@uwaterloo.ca or 519-888-4567 ext. 41744 for assistance.
Article Feedback
If you’d like to share any feedback about this article, contact LEARNhelp at learnhelp@uwaterloo.ca.

