...
References to username within this article refer to your 8-character UWaterloo username (e.g. j25rober).
Re-opening a ticket
Click on Basics (from the top of the ticket display screen OR in the Basics section of the screen)
Beside Status, choose open
Click on the Save Changes button at the bottom of the screen
...
When the ticket has been reopened the requestor will not be notified via email.
Changing ticket status
While displaying the ticket, click on the Actions menu and choose:
...
The status of a new ticket will change to open when the ticket owner submits a reply (correspondence) on the ticket , unless the ticket owner is also the requestor.
Searching
There are several different ways to search for ticket information.
Use the Search... box in the top right of your screen:
When you know the ticket number, or
To quickly search for a string in the subject line of tickets
Use the Simple Search to quickly search subject lines, queues, etc. (see below for details)
Use the New Search (a.k.a. Query Builder) to build your own query (see below for details)
Search notes
Full 'content' searches will take a few seconds to produce results
Attachments will not be searched
Number of tickets found and tickets actually displayed may not match
The number of tickets found (displayed at the top as Found 104 tickets) may not match the number of tickets displayed on the screen. You will only see the tickets you have privileges to see, but the system will tell you the total number of tickets found in the database that match your criteria. If you need access to a ticket you cannot see, email helpdesk@uwaterloo.ca for assistance
Simple Search AND 'Search...' box at the top right of the screen
A Simple search Search will only show tickets with an active status (i.e. new, open, or stalled) , unless a status is specified in the search.
Click on the Search menu and choose Tickets/Simple Search; search by:
Ticket number: enter ticket number and click ‘Search’
Subject search: enter subject:"search criteria" and click ‘Search’
Queue search: enter queue name (e.g. rt-help) or or queue:"queue name" and click ‘Search’
Owner: type name of a privileged user and click ‘Search’ to see open/new/stalled tickets owned by that user
Content search: enter fulltext:word (e.g. fulltext:printer) and click ‘Search’
fulltext searches cannot be combined with subject search or other text searches
fulltext searches can be combined with a status, queues (e.g. fulltext:printer open)
Combo searches:
testing jsmith – will result in tickets with ‘testing’ in subject that are owned by jsmith
rt-help new – will result in tickets in the ‘rt-help’ queue that have a status of new
fulltext:network open – will result in open tickets that have ‘network’ in the ticket content somewhere
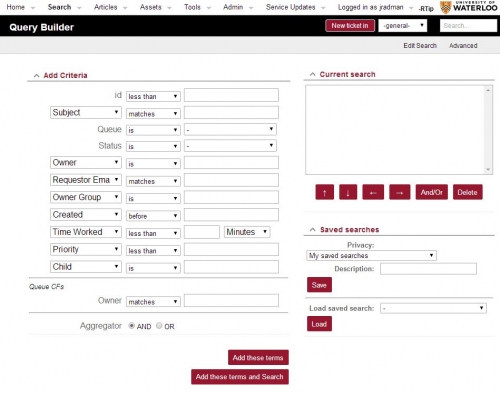
New Search (a.k.a. Query Builder)
To build your own query choose Search/Tickets/New Search
Choose the relevant criteria:
Note about searching on Status:
If you need to choose a Status, choose the status you are searching for in the default section of the drop-down list
If you choose the queue you want to search first (beside Queue - is - ) and click Add these terms, then only the default statuses will be listed beside the Status option
Click Add these terms and search to see the results of your search
Note The number of tickets found and tickets actually displayed, may not match. The number of tickets found (displayed at the top as Found “Found 104 ticketstickets”) may not match the number of tickets displayed on the screen. You will only see the tickets you have privileges to see, but the system will tell you the total number of tickets found in the database that match your criteria.
If you need access to a ticket you cannot see, email helpdesk@uwaterloo.ca for assistance.
Tips to simplify searching
From your Home screen (a.k.a RT at a glance), click on the queue you want to search first (in the Quick Search section on the right side of your screen)
Then click the Edit Search link at the top of the page
You will then be in the Query Builder, and the search will be started for you:
Queue A queue will be chosen
Statuses will be set to new or open or stalled
You can then add additional criteria and click Add these terms to see the complete set of search criteria in the Current Search section of the page
Finally, click Add these terms and search, to see the results of your search
...
Advanced searches and searching custom fields
Click on Search/Tickets/New Search. Below is the default search screen. Without a queue specified, only default criteria fields are shown:
Select a queue, and click Add these terms. The additional custom fields for that specific queue are added to the form:
...
Click Add these terms and view the search criteria on the top right under Current search
You can click the Advanced link at the top right and directly edit the code for your search
Once you are happy with your search criteria, click Add these terms and search to view the results of your search
Search Results: Sort Order and Columns (fields)
The results of the search can be adjusted by modifying the options at the bottom of the search builder page.
...
Saving a search
Once you have created a search, you can save it for future use.
...
Search/Tickets/New Search
Under Saved searches, beside Load saved search:, choose the search from the drop-down list
Click Load
Click Add these terms and Search
...
Saved article searches can be added to the RT home ('RT at a glance') or a custom dashboard
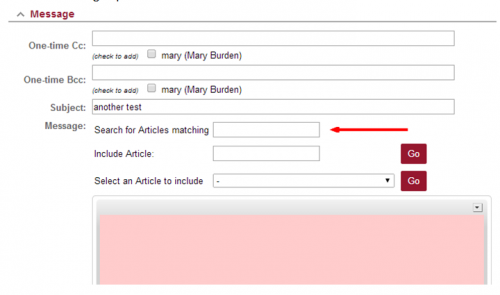
How to search for an article while responding to a Ticket
To search for an article when replying or commenting on a ticket, enter the search times in the Search for Articles matching input box shown below and hit enter. Matching articles will be displayed above the content area (in pink)
Click on Go beside the article title to add the content of the article to the response window.
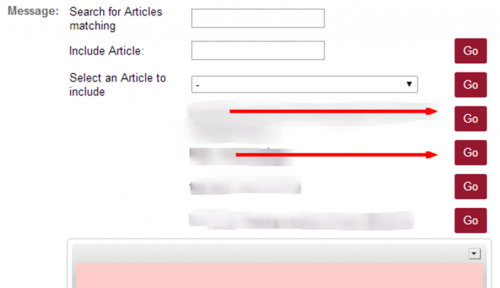
If you know the article number, you can type in the number into the field labeled labelled Include Article. You can also select an article from the drop-down list of articles. The contents of the article will be added to the Reply or Content area: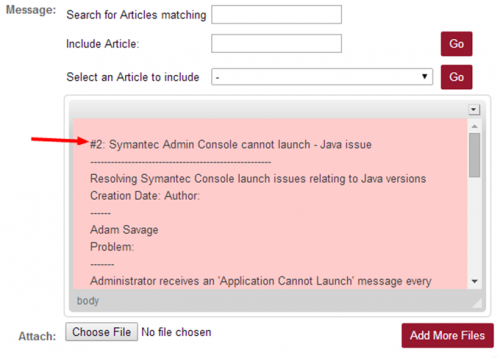
Edit the Reply or Content area as needed
Attaching files
To attach a file, click the Browse button beside the Attach: text box in the top section and navigate to the desired file. To attach an additional file, click Add More Files and click Browse again.
...
Click on the Update Ticket button (you may have to scroll down to see this button).
Linking a ticket
If there is a dependency between tickets they can be linked. You can define dependencies between tickets by making a ticket (e.g. ticket #100111) dependent on another ticket (e.g. ticket #100112):
...
Note This could also be done in reverse using the Depended on by field under Links
Merging a ticket
| Note |
|---|
Once tickets are merged the action cannot be undone |
Click on the Links button
Under the Merge tab type in the ticket number that you wish to merge into
Click Save Changes
...
Recurring tickets
To create a repeating ticket, use the 'Recurrence' option available when using the 'New ticket in' form for Issue Solvers. The recurrence option is not available through the forms in the Self Service area.
...
New tickets are created when you initially save the recurrence
The new tickets are populated with the subject and initial content of the original ticket
...
Concurrent active tickets
The Concurrent active tickets number determines how many tickets can be in an active status for a recurrence at any time. A value of 1 means one ticket at a time can be active. New tickets will not be created until the current active ticket is resolved or set to some other inactive status.
...
Ticket lead time (days)
The ticket lead time determines how far in advance of a ticket's Due date you want the ticket to be created. For example, if you create a weekly recurrence scheduled on Mondays and set the lead time to 7 days, each Monday a ticket will be created with the Starts date set to that Monday and a Due date of the following Monday.
Change recurrence
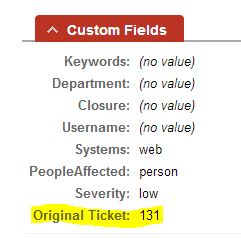
If you need to change the recurrence, make the changes on the original ticket. To help you find this initial ticket, which may have been resolved long ago, a custom field is created on each ticket in the recurrence with a link called 'Original Ticket'.
Find the original ticket that created the recurrence
It will be in the 'Original Ticket' custom field
Or type the original ticket number, if known, in the search box at the top right of the window
Scroll down in the original ticket and click on the Recurrence tab directly as it is a link to the edit recurrence form:

Make the changes to the Recurrence:
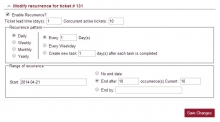
Click Save Changes
Range of recurrence – start date
You can set a Start date for a new recurrence. If you don't, it defaults to the day you create the recurrence.
Canceling recurrences
Find the original ticket:
Find the original ticket that created the recurrence (it will be in the 'Original Ticket' custom field)
Go to the original ticket in the recurrence and type the original ticket number in the search box at the top right of the window
Scroll down in the original ticket and click on the Recurrence tab:
...
Uncheck the Enable Recurrence check box, or
Set ending conditions on the recurrence with either a set number of recurrences or an end date
...
Dashboards
Dashboards allow you to compile multiple custom saved searches that you have created.
...
Choose Home then Update This Menu to see the new dashboards in the Home menu
Click on the dashboard in the left box and click on the arrow to move it to your Home menu
You will then be able to view the contents of the dashboard by choosing it from your Home menu
Preferences/settings
Click Logged in as [username], Settings, then Preferences
In the General section, you can determine your Default queue by selecting it from the drop-down menu
In the Locale section, you can modify the Date format
In the Mail section: Email Delivery you can control how you get mail from RT (e.g. one email per transaction/reply/comment (Individual messages) or Daily digests, etc.)
In the Ticket Display section, you can set Notify me of unread messages (when you open a ticket)
Ticket history - display order
| Anchor | ||||
|---|---|---|---|---|
|
In the Ticket Display section you can set Show oldest history first -ticket history ordering (default is set to show the newest history)
Turn on WYSIWYG editor
| Anchor | ||||
|---|---|---|---|---|
|
From the menu choose Logged in as yourusername/Settings/Preferences
Under the Ticket composition section, beside WYSIWYG message composer select Yes
Click the Save Change button at the bottom of the screen
This tool is useful for formatting text when replying or commenting; click on the small arrow/triangle at the top of the edit window to display/hide the edit button
Watching a queue
A Watcher is someone who is interested in a ticket. You'll find this option under the People tab when looking at a ticket. A watcher of a ticket normally gets email copies of all the replies to the ticket.
...
See this Knowledge Base article for more information: Watching Request Tracker (RT) tickets that belong to someone else
Custom fields
Custom fields can be set up for individual queues. They will appear in each of your Tickets' Basics section and will allow you to categorize and classify tickets in your queue.
...
Open the ticket and click on the Custom Fields link
Beside Closure, choose Completed (you may have to scroll up to see this)
Click on the Save Changes button
Sending an email request directly into a queue
Send an email to rt-queuename@rt.uwaterloo.ca to put a request directly into a queue.
Using a mobile device to access RT
It is possible to access RT from your mobile device. What RT functions you will be able to use on your mobile device can vary depending on the device browser.
Using the mobile version of RT
Log in to Request Tracker on your mobile device
When you first access RT from your mobile device it will open the limited mobile version
Simply log in and search for the ticket you are interested in
Click on Home to go to the home screen
Within a ticket click on History to see all details
Using the full version of RT on your mobile device
Log in to Request Tracker on your mobile device
Scroll to the bottom of the screen and choose Not using a mobile browser?
Use RT as you normally would
Related articles
| Filter by label (Content by label) | ||||||||||||||||||
|---|---|---|---|---|---|---|---|---|---|---|---|---|---|---|---|---|---|---|
|
...