| Info |
|---|
Note: To add a shared mailbox it is necessary to have all of the following:
Contact IST Service Desk if your account does not meet the above requirements. IST Service Desk's contact information can be found at the bottom of this page. |
Thunderbird is not the most suitable email program for Exchange. We do recommend using Microsoft Outlook.
Step-by-step guide:
Go to Tools - Account Settings - Account Actions - Add Mail Account.
Enter the following in the screen that follows :
Your name: Use exact name of the shared mailbox (e.g. Firstname: Shared Lastname: Account)
Email address: email address of the shared mailbox Use the max 8-character username of the shared account and @uwaterloo.ca. (e.g. sharenam@uwaterloo.ca).
Password: Leave PASSWORD field blank
uncheck ‘Remember Password’
Click Configure Manually.
In the Set Up Your Existing Email Address window, enter or select the following settings in the Incoming and Outgoing columns as shown, then click Re-set.
4. This will check the server and add the OAUTH2 option under Authentication. Change the entry to be OAUTH2. Note that some of the settings changed as a result of the last step.
5. Your settings will now look as below:
6. Click Done
This will create the basic connection – and now we have to EDIT our settings.
7. In Thunderbird right click on the Shared Email account and select Settings:
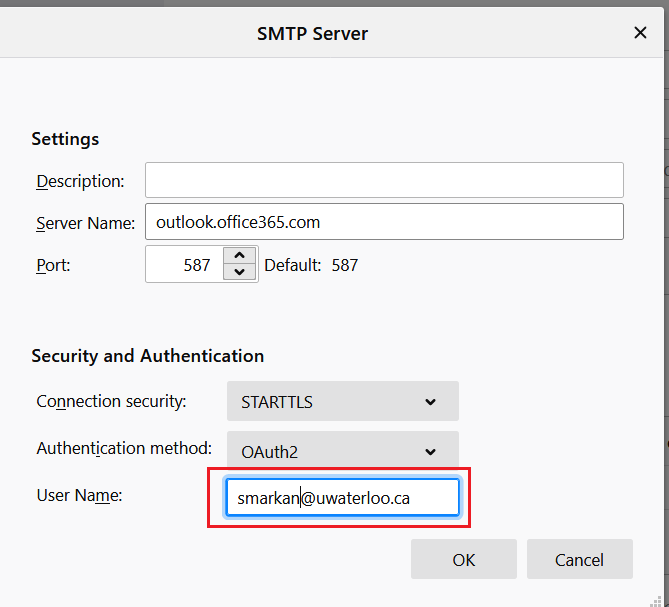
8. Towards the bottom of the screen for Outgoing Server (SMTP) Click on Edit SMTP server
(In this example, the Shared Mailbox is ist-swpu@uwaterloo.ca; and the primary user is smarkan@uwaterloo.ca. )
9. Change the User Name to be your own 8 character UWaterloo username – in this example: smarkan@uwaterloo.ca. Click OK
10. Close and reopen Thunderbird. You will be prompted for the password for the Shared account you added. In this example the account is ist-swpu@uwaterloo.ca. Enter an invalid Password and click Sign in
11. You will get a new login prompt that lets you change the username.
12. Enter your own username – in this example the username is smarkan@uwaterloo.ca. Click Next.
13. Complete the login process by entering your own password and responding to the 2FA prompt.
Related articles
| Filter by label (Content by label) | ||||||||||||||||||
|---|---|---|---|---|---|---|---|---|---|---|---|---|---|---|---|---|---|---|
|
| Info |
|---|
Need help?Contact the IST Service Desk online or 519-888-4567 ext. 44357. |
| Tip |
|---|
Article feedbackIf you’d like to share any feedback about this article, please let us know. |


