...
PersonalSign Installation - Step 1: Download Your Certificate
You will receive an email from “no_reply@globalsign.com” with a link to download your certificate.
You will need to enter the password you set during the application request to download the digital certificate. If you have lost or forgotten the password a request for a new S/MIME certificate needs to be submitted.
Save the certificate to a secure location (i.e. OneDrive or N-drive) that you can access again if needed. You normally only install the certificate once per device, but you will need to use it again if you purchase a new computer or if a repair of your machine requires a fresh install of the OS and software.
Install the certificate onto your Windows computer
PersonalSign Installation - Step 2: Locate & Install Your Certificate. Note: The Microsoft prompt windows may have a slightly different style (look & feel) depending on the Windows 10 display preferences set on your PC but each step and the text content will be the same.
Open Outlook for Windows and set up the new certificate
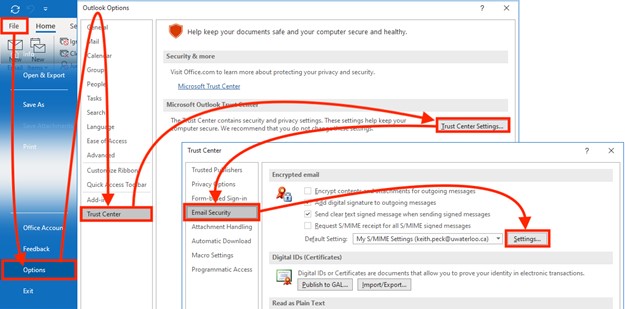
Click the File tab at top-left of the Outlook window, then click Options towards the bottom of the left navigation menu list.
Click Trust Center at the bottom of the left navigation list, then click the Trust Center Settings… button towards the upper-right of the MS-Outlook Trust Center settings page.
Click Email Security mid-way down the left navigation list of Trust Center Settings, then click the Encrypted Email Settings… button at mid/upper-right.
Set the Signing Certificate
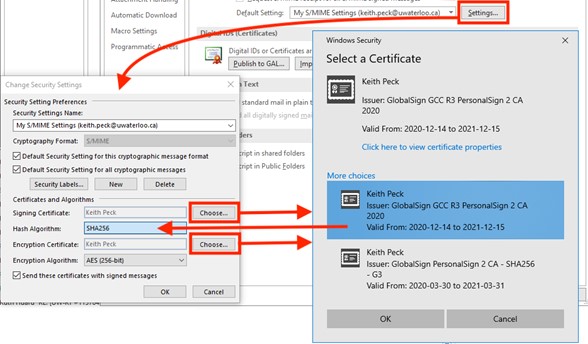
In the Change Security Settings window to the right of Signing Certificate click the Choose… button.
The Windows Security – Select a Certificate window should list a GlobalSign personal certificate valid from the new request date for one year, e.g. Valid from: 2020-12-14 to 2021-12-15.
If the valid date is older then click More choices at lower-left and select the more recent certificate.
Click OK to close the Windows Security - Select a Certificate window.
Under Signing Certificate set the Hash Algorithm to be SHA256 from the drop-down list.
Set the Encryption Certificate
To the right of Encryption Certificate click the Choose… button.
If the valid date is for an old certificate then click More choices at lower-left and select the more recent certificate.
Click OK to close the Windows Security - Select a Certificate window.
Under Encryption Certificate set the Encryption Algorithm to be AES256 from the drop-down list.
Click OK at lower-right to close the Change Security Settings window.
On the Trust Center Email Security page now visible again click the Publish to GAL… button.
It can take up to 24 hours for the certificate to fully sync as there are multiple email servers that manage UWaterloo email.
Click the OK button at lower-right to save the settings and close the Trust Center window.
Click the OK button at lower-right to save the settings and close the Outlook Options window.
Open a new message and try sending an email that is signed. You may need to wait 24 hours to send an encrypted email message.
Related articles
| Filter by label (Content by label) | ||||||||||||||||||||
|---|---|---|---|---|---|---|---|---|---|---|---|---|---|---|---|---|---|---|---|---|
|
| Info |
|---|
Need help?Contact the IST Service Desk online or 519-888-4567 ext. 44357. |
...


