The IST Security Operations Center has a self-serve webpage where you can request an S/MIME Personal Sign certificate to allow for digital signing and email encryption.
...
To request a GlobalSign S/MIME certificate, please refer to the article How to request and download a GlobalSign S/MIME certificate. It may take several business days for the certificate to be issued.
PersonalSign Installation - Step 1: Download Your Certificate
You will receive an email from “no_reply@globalsign.com” with a link to download your certificate.
You will need to enter the password you set during the application request to download the digital certificate. If you have lost or forgotten the password a request for a new S/MIME certificate needs to be submitted.
Save the certificate to a secure location (i.e. OneDrive or N-drive) that you can access again if needed. You normally only install the certificate once per device, but you will need to use it again if you purchase a new computer or if a repair of your machine requires a fresh install of the OS and software.
Mac OSX: removing a certificate. Complete these steps ONLY if you need to replace or repair an existing certificate.
-To remove an old certificate before installing a replacement certificate.
or
-To remove a certificate if an incorrect password was entered when trying to install it.Close Outlook for Mac.
Open the Keychain Access system utility on your Mac.
Click login at upper-left of the navigation menu, then click the My Certificates filter along the top of the window.
Multi-click the certificate with [Your Name] on it, then click Delete ‘[Your Name]' from the pop-up menu list.
Click the Delete button in the “Are you sure…?” prompt window.

When prompted for admin authorization type in your Mac account admin password or press the TouchID button on your Mac.
Quit the Keychain Access system utility application.
Mac OSX: install the new certificate
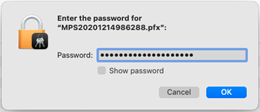
Switch to Finder and locate your certificate file “MPSYYYYMMDD######.pfx”
Double-click on the certificate file.
Type or copy & paste in the certificate password when prompted, then click OK or press [return] on your keyboard.
The Keychain Access system utility application will open.
[Control]+click (or right-click) on your globalsign certificate in the right side of the Keychain Access window, then click Get Info from the pop-up menu.

In the certificate Info window click the arrow at the left of Trust to show the list of Trust options.
Change the setting for When using this certificate to Always Trust (from “Use System Defaults.”)
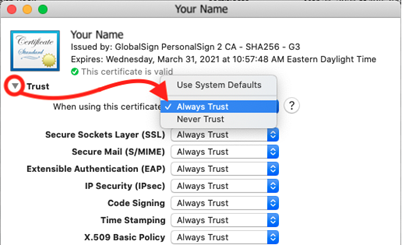
Close the Certificate Info window by clicking the red “X” dot at upper-left of the window.
Quit the Keychain Access system utility application.
Log out (or restart your computer) and then login to your Mac account once again. (Keychain Access login changes require a log out then login to become effective.)
Enable digital signing and encryption in Outlook for Mac.
Open Outlook for Mac.
Click Tools then click Accounts (either via the Outlook menu bar or on the Outlook toolbar ribbon.)
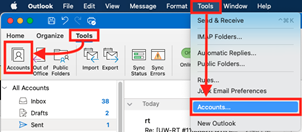
Your Exchange/Office 365 Account needs to be selected if you have multiple accounts set up.
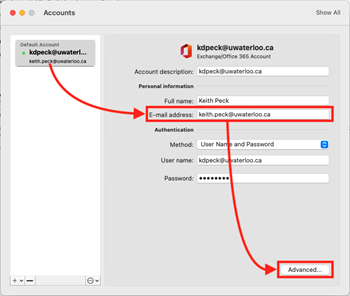
Confirm that your email address field matches the one listed in the certificate. Edit the field to make it match if necessary. E.g. username@uwaterloo.ca versus firstname.lastname@uwaterloo.ca
Click the “Advanced…” button at lower-right.
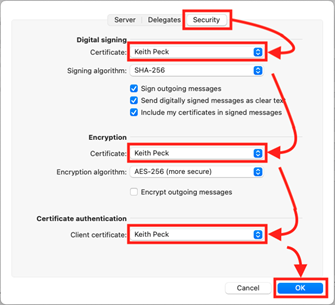
Click the “Security” tab at the upper-right of the Advanced window.
Digital signing:
Certificate: select [Your Name]
Signing algorithm: SHA-256
Sign outgoing messages: when checked all email you send defaults to include a digital signature. You can uncheck this option if you prefer to manually enable your digital signature only when needed via the Options tab of an email message composition window.
Encryption:
Certificate: select [Your Name]
Signing algorithm: AES-256
Certificate authentication:
Client authentication: [Your Name]
Click the OK button at lower-right to close the Advanced window.
Close the Accounts window by clicking the red “X” dot at upper-left. This will also save any changes.
Note: It is necessary to install the S/MIME email certificate on a Windows PC and using Outlook for O365 for Windows to synch the certificate to the Global Address List on the Microsoft hosted server.
...
| Filter by label (Content by label) | ||||||||||||||||||
|---|---|---|---|---|---|---|---|---|---|---|---|---|---|---|---|---|---|---|
|
| Info |
|---|
Need help?Contact the IST Service Desk online or 519-888-4567 ext. 44357. |
| Tip |
|---|
Article feedbackIf you’d like to share any feedback about this article, please let us know. |