...
Tip #1: Accessing your Webex Session
Webex Widget on LEARN
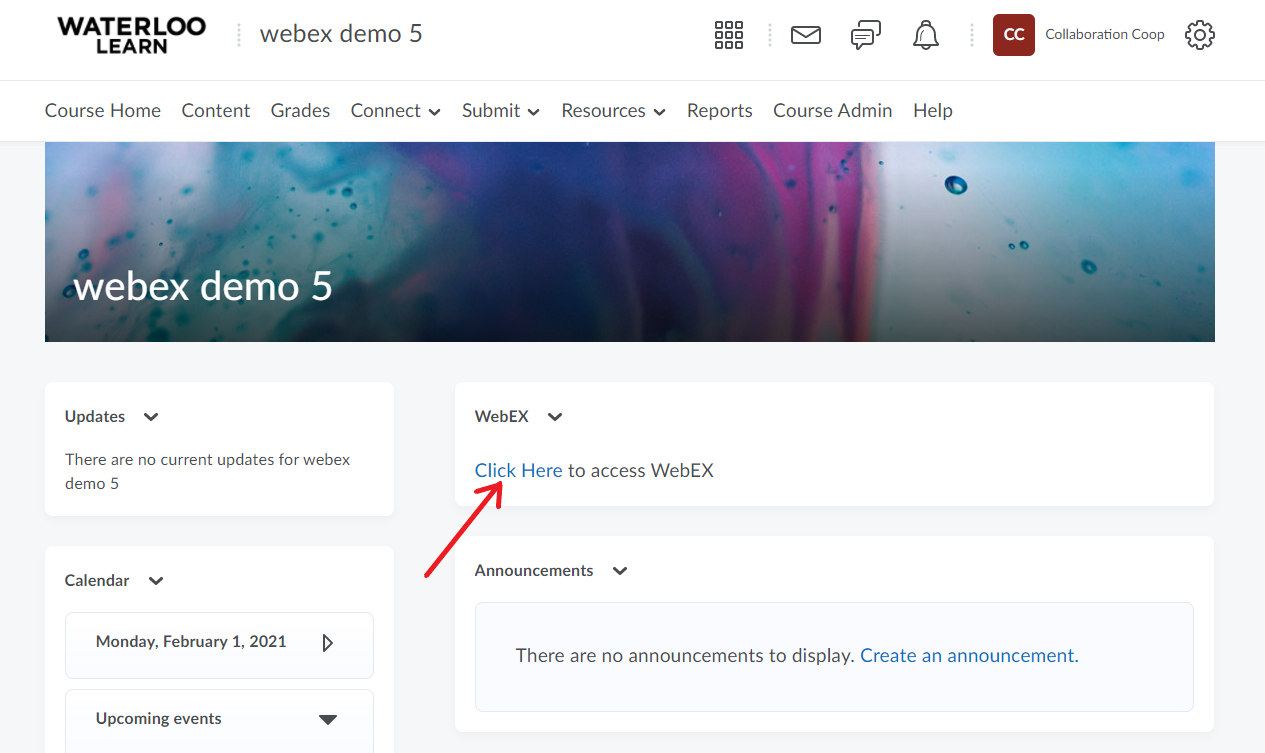
Login to LEARN. (For login instructions please refer to the LEARN Help page.)
Click on the desired course.
Scroll down to the Widget named webex and select Click Here. (Refer to How to add the Webex widget to a LEARN Course Homepage for steps on how to add the widget to a course homepage.)

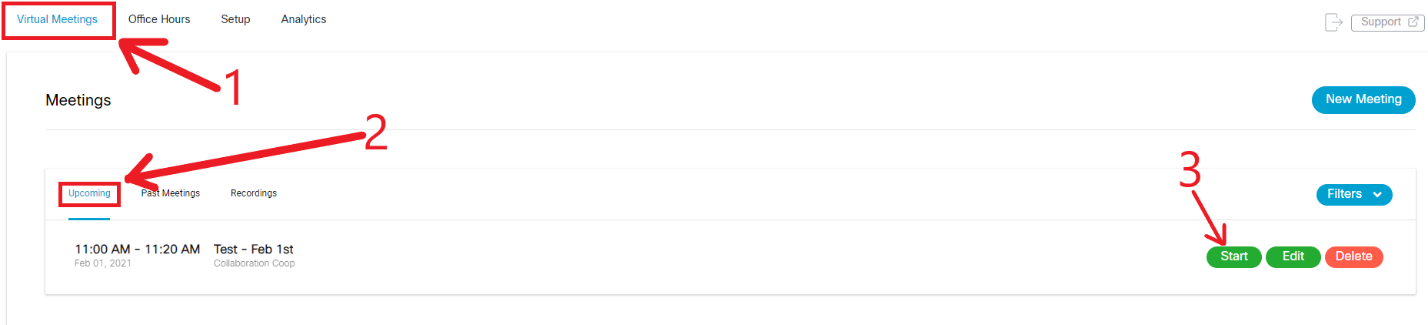
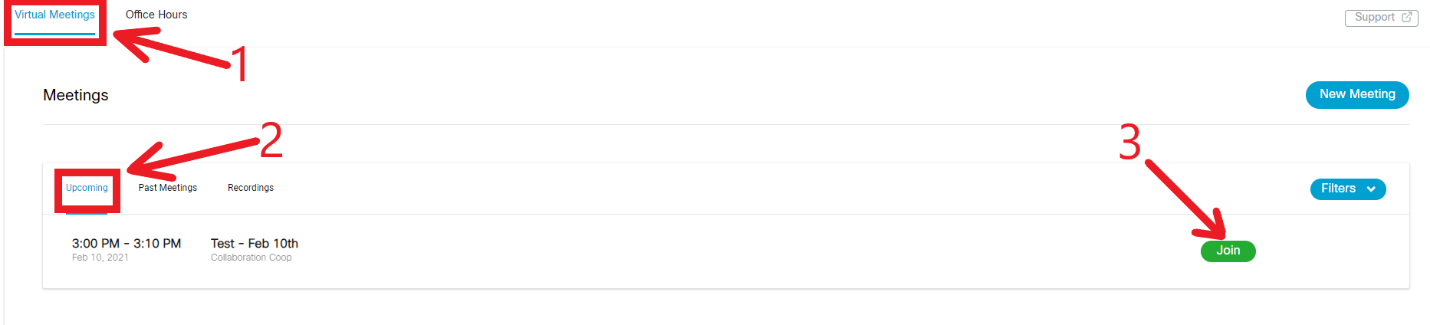
A new tab will open in the web browser. In top left of the screen, you will see “Virtual Meetings”, “Setup”, and “Analytics”. By default, you are on the Virtual Meetings page. To view all upcoming meetings, go to Virtual Meetings page > Upcoming.
To launch the meeting:
Hosts: | Attendees: |
|---|---|
 |
|
...
For courses with TAs or multiple instructors, you may wish to add them in as co-hosts to your webex sessions. This ensures that on the date and time of session, the TA/instructor can go in and start the session without having to go in yourself.
Login to LEARN. (For login instructions please refer to the LEARN Help page.)
Select Click Here to enter the webex widget.
Go to the Virtual Meetings tab > New Meeting and create your meeting (refer to documentation on Scheduling with Webex Widget for more information on how to create meetings in the webex widget on LEARN).

Next, go to uwaterloo.webex.com and click on the blue Sign In button located at the top right.
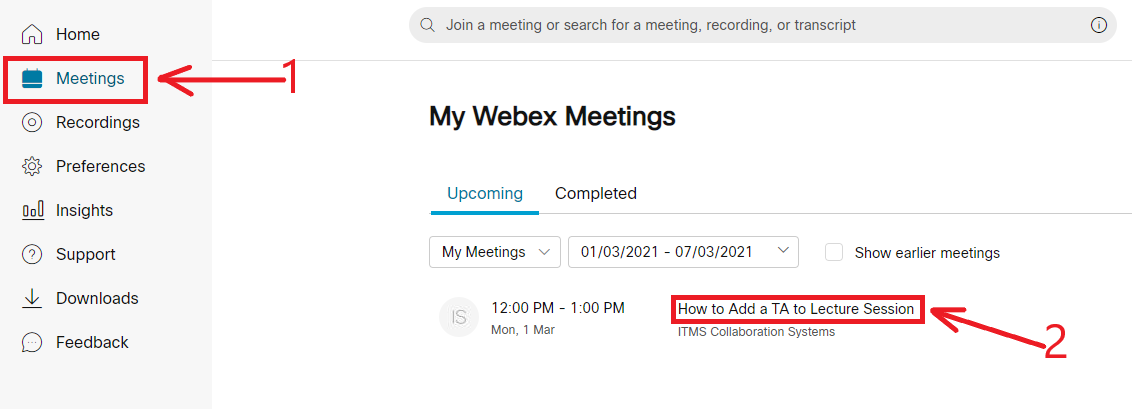
Select Meetings from the left menu.
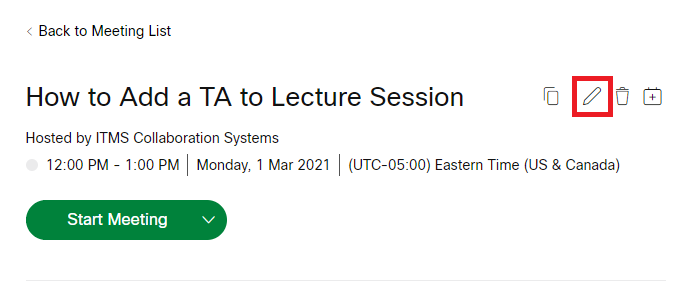
On the My Webex Meetings page, click on the title of the meeting session to which you wish to add your TA being sure to select the exact name and time of session as created in the widget on LEARN.
Select the pencilicon to edit.
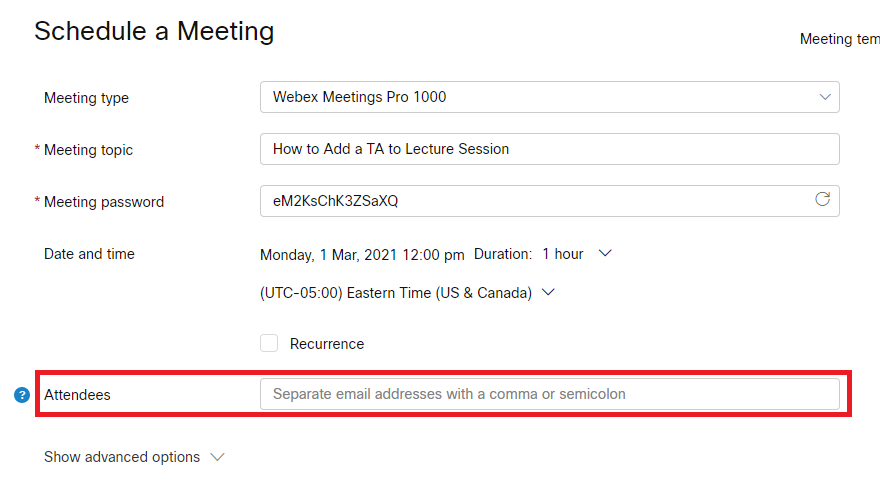
In the Schedule a Meeting section below, enter the email address of the TA/instructor in the textbox next to Attendees.
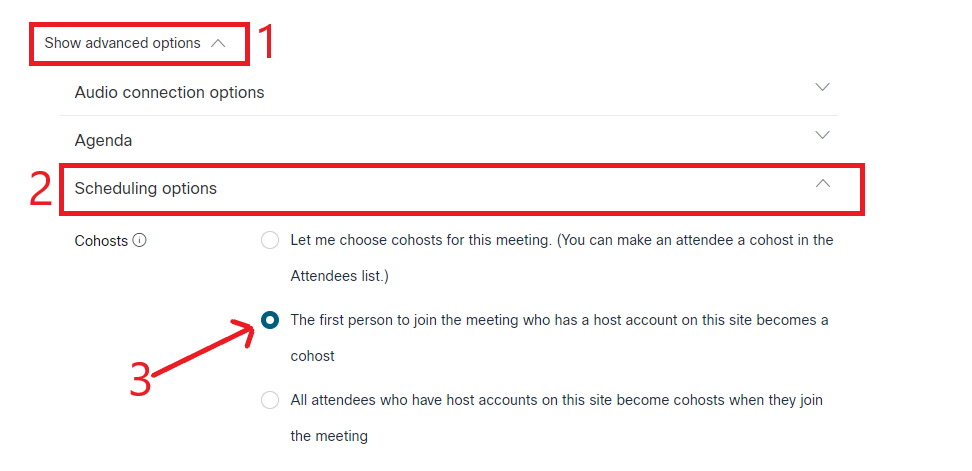
Select Show advanced options > Scheduling Options.
Select the second option next to Cohosts.
Select Save at the bottom of the page to keep the changes.
Tips to keep in mind:
The person you want to assign as cohost must have a webex account and have logged into their account at least once for you to be able to add them in as a cohost.
Always create, start, and delete meetings in the webex Widget on LEARN.
Edit the title, date, and time in the webex Widget on LEARN.
Further editing (such as adding TAs, selecting more advanced options, etc.) must be done on the webex account portal (at uwaterloo.webex.com).
...
All webex recordings that are saved to the cloud will have an automatic transcript generated for them.
Goto uwaterloo.webex.com and click on the blue Sign In button located at the top right.
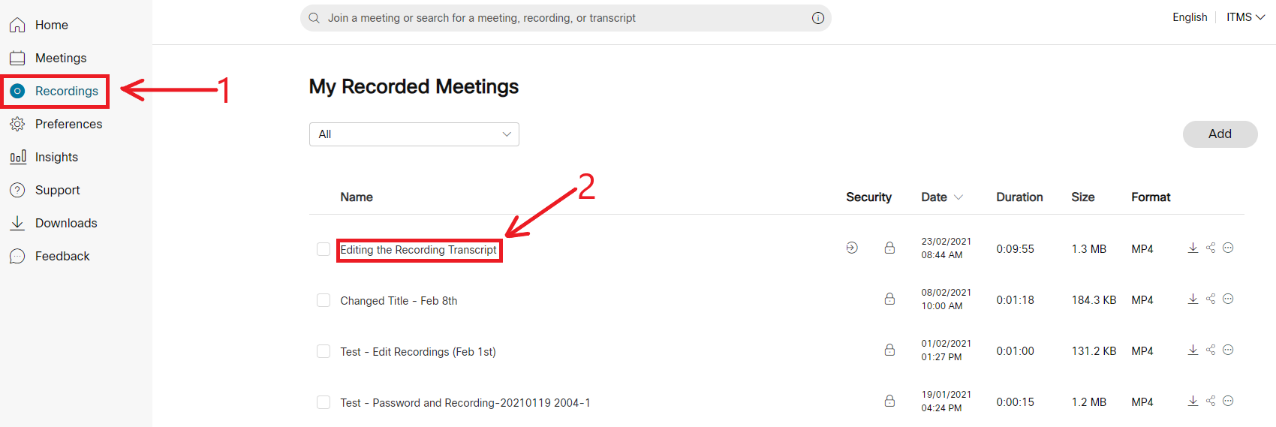
Select Recordings from the left menu.
From the list of recordings available on the My Recorded Meetings page, select the title of the recording you want to edit.
On the right side of the screen, you can view your transcript. To edit the text, select the pencil icon next to the line you want to edit and make the changes.
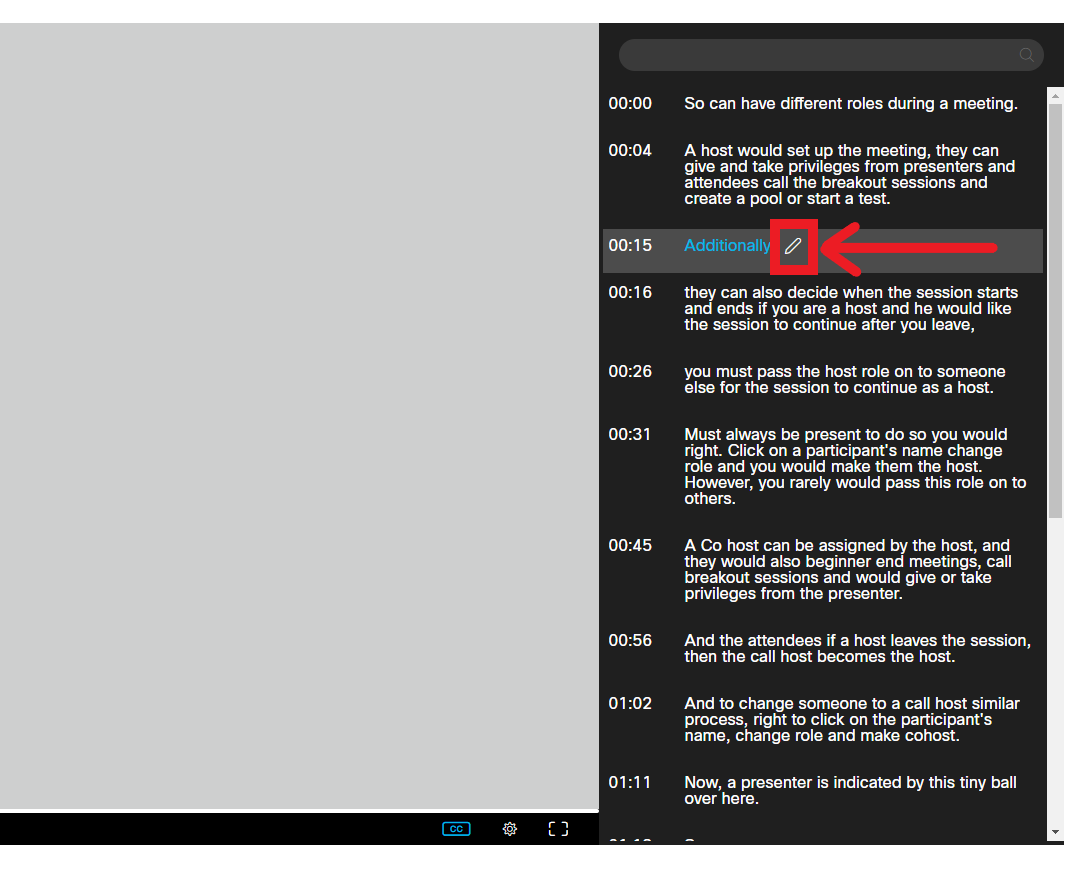
Select Save when finished.
Note: If you are unable to view the transcript, it is probably still generating. Webex processes the recordings once the meeting has ended. After the recording has finished processing then the transcription process beings. Generating both the recording and transcription can take anywhere from a few minutes to 24 hours depending on the file size and bandwidth.
...
The start and end times of a webex recording can be cut out. This is useful for cutting out unwanted conversation or noise at the beginning or end of a meeting. For more extensive editing, the recording can be downloaded as an MP4 file and edited in an external video editing software.
Select Recordings from the left menu.
From the list of recordings available on the My Recorded Meetings page, select the title of the recording you want to edit.

Below the video, select the gear icon and click on Edit playback range.
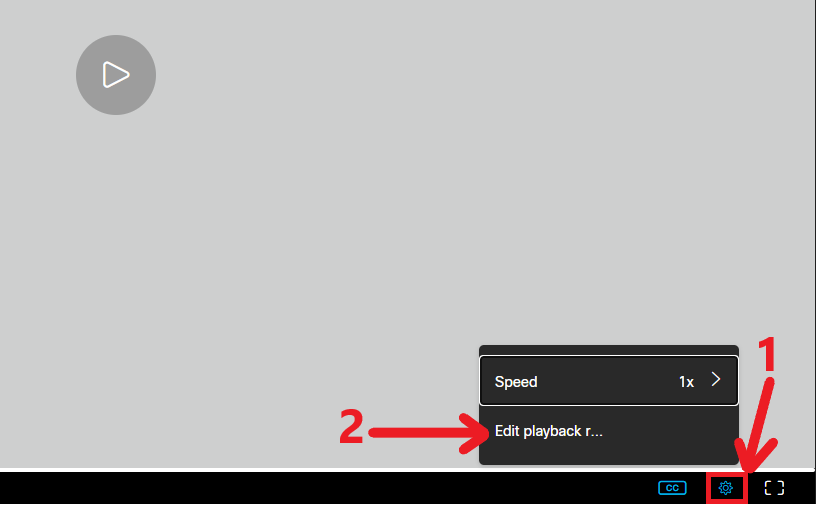
Editing features include:
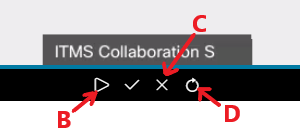
The playback start and end sliders to edit the video playback range.

The play icon to preview the playback range.
The X icon to cancel editing.
The restart icon to restore the original playback range.
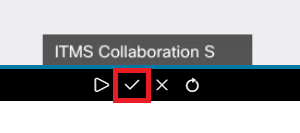
When finished, select the check icon to keep the changes.
Tip #5: Setting up your Recording Preferences and Other Common Issues
...
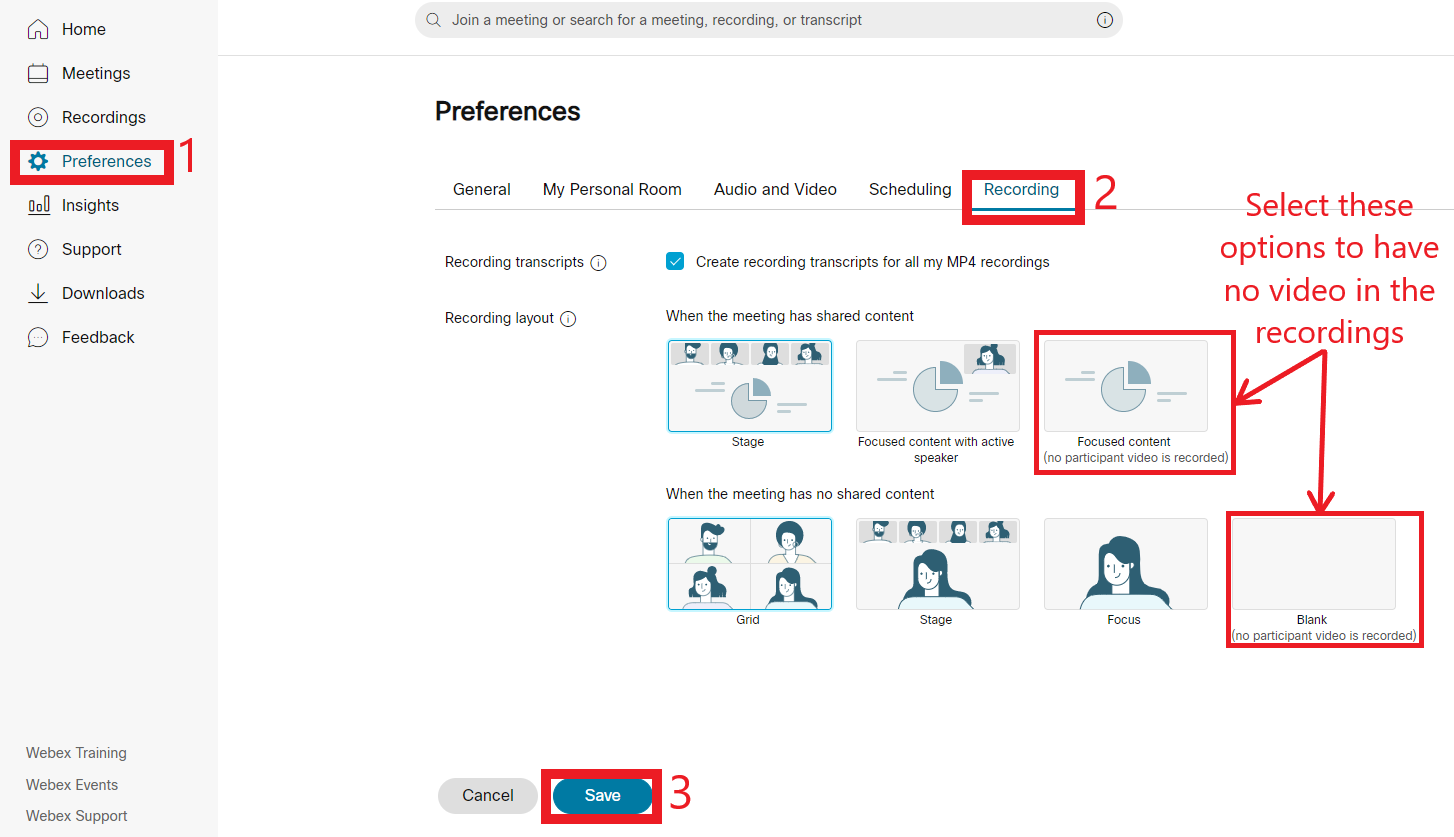
Note: You must change the layout before a meeting is recorded. Once you have finished recording and the recording has been processed, you cannot change the layout. The layout applies to all future recordings and does not change past ones.
Go to uwaterloo.webex.com and click on the blue Sign In button located at the top right.
Select Preferences from the left menu.
On the Preferences page, select the Recording tab.
Choose the desired layouts for when the meeting is sharing content and when the meeting has no shared content.
Select Save to keep the changes.
Screen Sharing and Recording – Common Issues and Tips
...
Setting up Webex Meetings Attendance Grading
Login to LEARN and select your desired LEARN course. (For login instructions please refer to the LEARN Help page.)
Select Click Here to enter the webex widget. (Refer to How to add the Webex widget to a LEARN Course Homepage for steps on how to add the widget to a course homepage.)

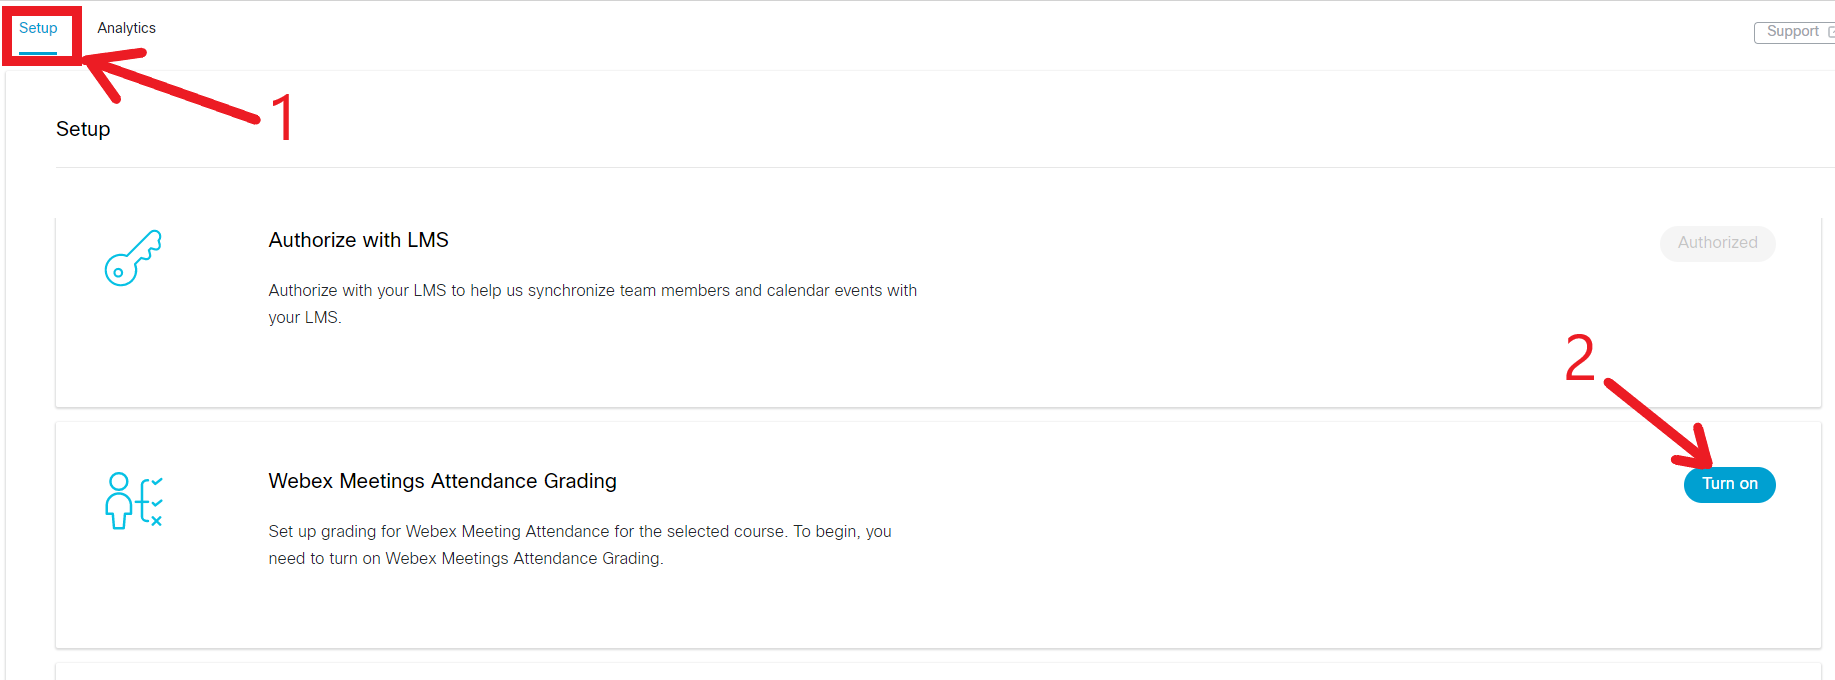
Go to the Setup page by selecting the Setup tab near the top of the screen.
Next, go to webex Meetings Attendance Grading and select the Turn on button.
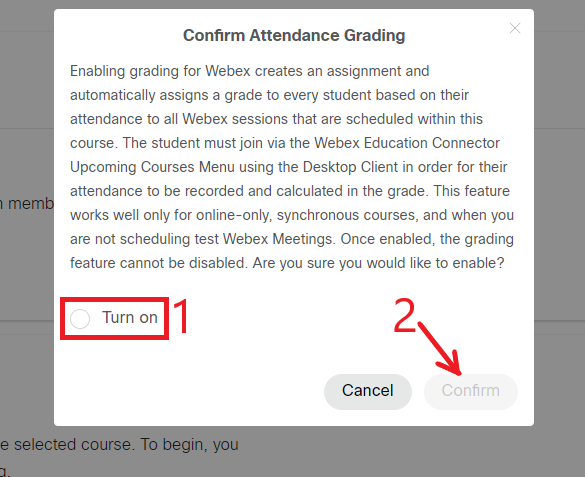
A confirmation window will appear. Select Turn on > Confirm to enable attendance grading. Once this feature is turned on, the grading feature cannot be disabled. Turning on this feature results in a new grade item called Webex Meetings Attendance Assignment to appear in the gradebook.
Once turned on, you can set values for attendance grading. Customize the scores for attendance grading, enter new values for present scores, absent scores, and/or the overall attendance grade. Once values are set, select the Recalculate Course Grade button. To use the default scores set by webex, you do not need to change anything.
Note on scores: webex uses the following formula to calculate the grade: (Present score) * (total number of times student was present) + (absent score) * (total number of times student was absent) / (total number of meetings * present score)
...
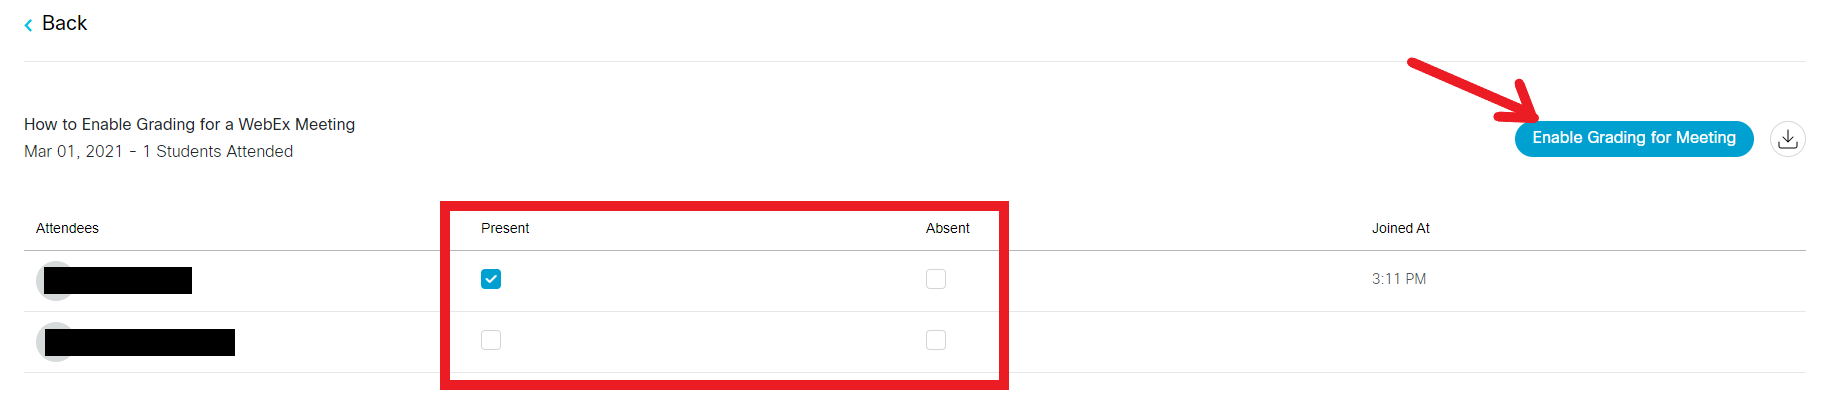
Enabling Grading for a Webex Meeting
On your LEARN course homepage, click on the link to access the webex widget.
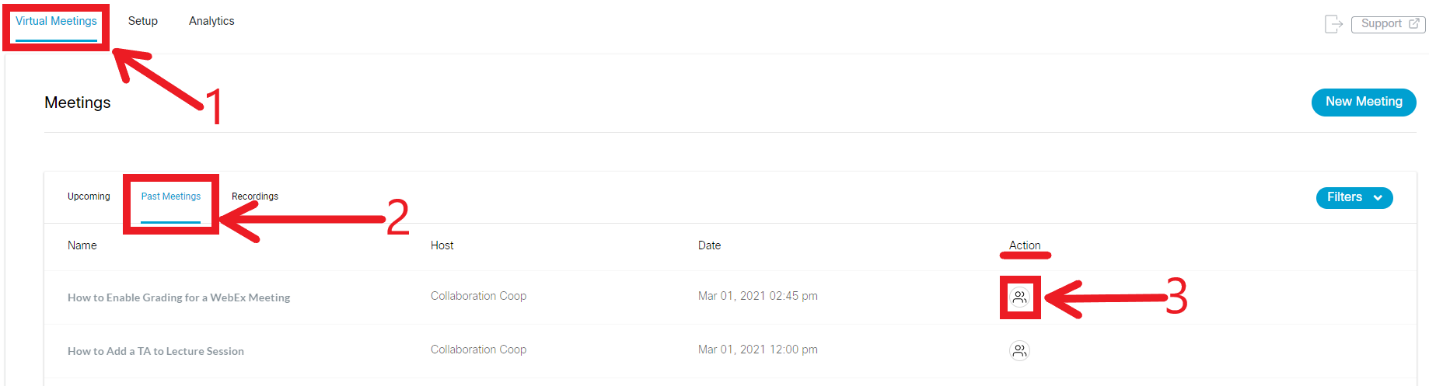
Go to the Virtual Meetings page (first page after clicking on widget) and select the Past Meetings tab.
From the list of past meetings, select the Action icon next to the meeting for which you want to record the attendance.
From the list of attendees, look below the Present columns to see which students were present for that session. Students who were not present will have no boxes checked off next to their name.
Select Enable Grading for Meeting. Enabling grading for the meeting will automatically result in any students not checked off as present as being marked as absent.
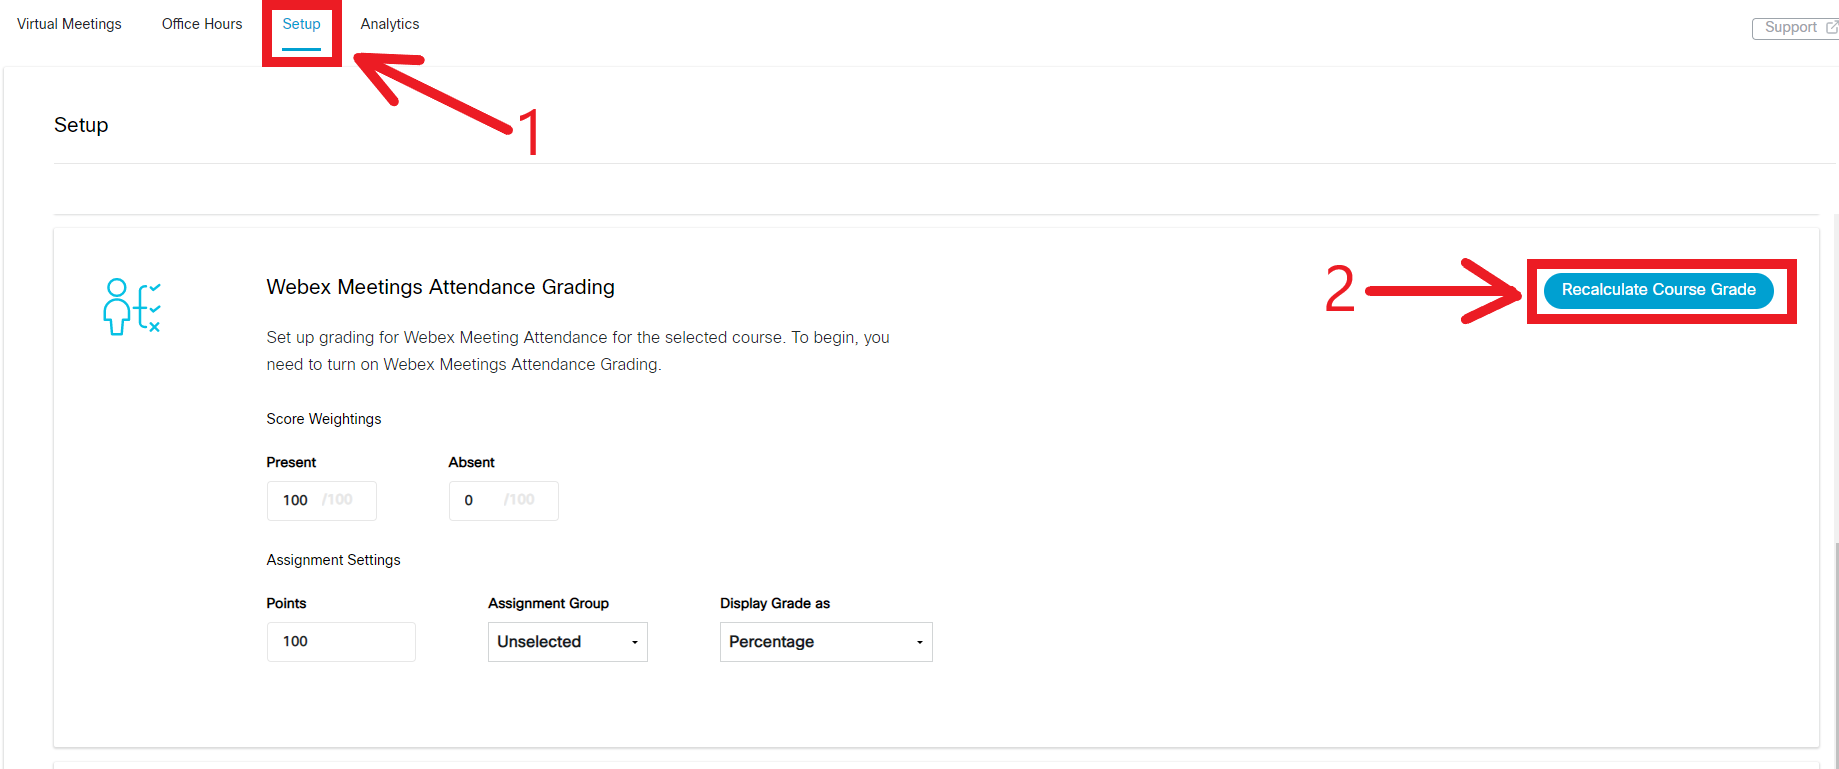
Go to the Setup page by selecting the Setup tab near the top of the screen.
Next to Webex Meetings Attendance Grading, select Recalculate Course Grade to update the student grades. If you skip this step you will not see the updated attendance marks in the gradebook on LEARN.
Exporting Attendance Data
...
| Tip |
|---|
Article feedbackIf you’d like to share any feedback about this article, please let us know. |