...
| Expand | ||
|---|---|---|
| ||
The JupyterHub server at jupyter.math.uwaterloo.ca is available to students for use in courses where they need to access a Jupyter Notebook environment. No extra software is needed beyond your web browser.
The tiles in the Launcher provide access to a variety of computing and programming environments. You can use any of these environments, but only for coursework. Refer to the University's policies on computer usage for more information about appropriate usage. |


...
| Expand | ||
|---|---|---|
| ||
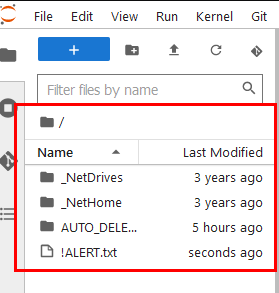
You can see a list of directories available to you in the file browser in the left-hand panel.
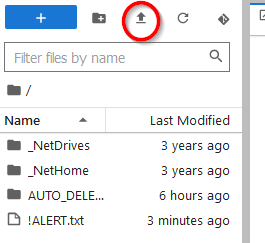
The directory shown in the screenshot above is your home directory on the server. Double-click the file that starts with !ALERT and a new tab will open with this text file. Please read this file. It explains that content in your home directory on the server could be deleted without notice and is not backed up. In your home directory is a folder called _NetHome. This folder refers to your N: drive and is where you should store your coursework. Double-click the _NetHome item in the file browser to see the contents of your N: drive. You should put your course files on your N: drive to be able to access them here. For Environment students, follow the instructions to map your N: drive. For students from other faculties, consult with your faculty's computing unit. It is up to you to ensure you make copies of the files you need on the server. You can add files to your home directory on the server by clicking the Upload button:
You can download files by right-clicking them and choosing Download. |

| Expand | ||
|---|---|---|
| ||
Using Anaconda Navigator The easiest way to set up JupyterLab to run on your own computer for this course is to use Anaconda.
Using Command Line and Miniconda
$ conda create -n environment name $ conda activate environment name |
| Expand | ||
|---|---|---|
| ||
Jupyter notebooks are divided into cells. Cells can contain code, or they can contain explanatory text/documentation. Code CellsCells that contain code can be edited by clicking in them. And when selected they can be run in a few different ways:
In all cases, after you run a cell, any output from the code within the cell will be shown below the cell. Documentation Cells
|


...