Microsoft 365 Group provides a way for teams to work together more efficiently and effectively, by bringing together various Microsoft tools and services into a single platform. Microsoft Groups allows people to collaborate on projects, files and schedule meetings and to communicate with each other using various Microsoft applications, such as Outlook, Teams, and SharePoint. Groups also provides the ability to manage permissions and access to resources, such as shared calendars and OneDrive for Business.
...
Open Outlook for Mac.
Select File > New > Group.
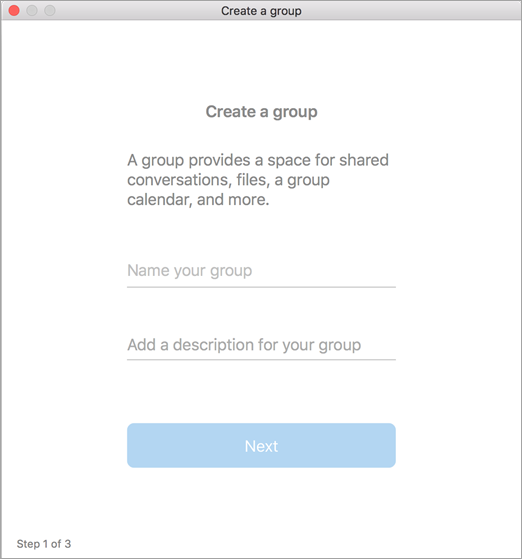
Fill out the group information:
Group name: Create a name that captures the spirit of the group.
Once you enter a name, a suggested email address is provided. "Not available" means the group name is already in use and you should try a different name. Note that once you choose a group name, it cannot be changed.
Description: Optionally, enter a description that will help others understand the group's purpose. This description will be included in the welcome email when others join the group. Click Next.
Type member email addresses or select members from the contact list to add to the group. You can add guests who are people outside your school or your organization to the group.
Privacy: By default, Groups are created as Private. This means only approved members in your organization can see what's inside the group. Anyone else in your organization who is not approved cannot see what's in the group.
Select Public to create a group where anyone within your organization can view its content and become a member.
Select Private to create a group where membership requires approval and only members can view group content.
Classification: Choose a classification. Options available depend on what your organization has set up.
Click Create. You'll see a welcome mail in your newly created group inbox.
...
What to do if you accidentally sent an email to your Outlook Group
If you realize you have accidentally sent an email to the wrong group or need to correct an error in the email, you can try to recall the message.
could we have a screenshot here:
To recall a message, open the message in your Sent Items folder,
...
To recall and replace a message
In the folder pane on the left of the Outlook window, choose the Sent Items folder.
Open the message that you want to recall. You must double-click to open the message. Selecting the message so it appears in the reading pane won't allow you to recall the message.
If you have the Classic Ribbon, from the Message tab, select Actions > Recall This Message.
If you have the Simplified Ribbon, select the Message tab and then select More commands (...). Point to Actions and select Recall This Message.
Notes:
If you don’t see the Recall This Message command, you probably don’t have an Exchange account or the feature isn’t available within your organization.
You can't recall a message that's protected by Azure Information Protection.
You can't recall a message in Outlook on the web.
Select Delete unread copies of this message or Delete unread copies and replace with a new message, and then select OK.
If you’re sending a replacement message, compose the message, and then select Send.
...
To check on the recall
After submitting a recall request, usually less than 30 seconds later, you will get an email notification with the subject "Message Recall Report for message [original message subject]".
Select the View Message Recall Report link to view the report in your browser. If you’re prompted, log in with your mailbox credentials to view the report.
Recall actions are usually quick, regardless of how many recipients are involved. But if the recall request can’t be executed right away for some reason (e.g., the recipient’s mailbox is temporarily unavailable) we'll continue to retry for up to 24 hours before marking the recall as failed.
Status updates are usually pretty quick as well but can sometimes take up to five minutes for a message with up to a few hundred recipients. For a large number of recipients (tens of thousands) the recall itself is still fast, but it can take up to thirty minutes to retrieve the recall status for all recipients.
Related articles
| Filter by label (Content by label) | ||||||||||||||||
|---|---|---|---|---|---|---|---|---|---|---|---|---|---|---|---|---|
|
| Info |
|---|
Need help?Contact the IST Service Desk online or 519-888-4567 ext. 44357. |
| Tip |
|---|
Article feedbackIf you’d like to share any feedback about this article, please let us know. |