This article is to explain how to build reports and export customer service data from Jira Service Management. Jira does not natively have this functionality, so we have done some work in the back end to enable this.
...
The first step is to build a filter. In Jira Service Management, at the top of the screen, select “Filters”, and then “View All Filters”Select “Create filter” . From the top menu, click on Filters, and select View all filters

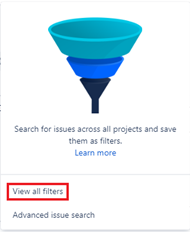
Click on the blue Create filter button in the top right of the screen.

Make sure the search box field is in “JQL” mode.
If the button option to the right of the button says “Switch to basic”, then you are ready to go. If it says “Switch to JQL”, then click that button.the button to toggle between the query types.
There are two standard options that we’ve written JQL queries for. The items in blue red text below can be customized for your use case:
Most recent 30 days, to Option 1 is a filter to view the most recent in the last 30 days. This option can be used with email subscriptions , for one, or a collection of projects.
Enter the following in the search box field exactly as shown and click Search:
(PROJECT = IST) AND "CSAT Score[Short text]" is not EMPTY AND assignee in membersOf("CRS Team") AND updated > -30d
Option 2 is a filter for all results for a group of users.
Enter the following in the search box field exactly as shown and click Search:
"CSAT Score[Short text]" is not EMPTY AND assignee in membersOf("SD Team")
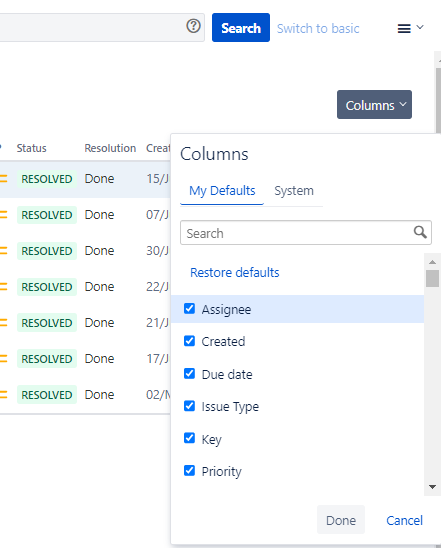
When you have written your query and confirm confirmed that it works, you can adjust the columns that are showing to include the score and the comment. In the top right of the screen, just above your results, click “Columns” Columns and then search for CSAT - make sure you select CSAT Comment and CSAT Score.

Add any other columns you want, and remove any you don’t.
In the top left of the search screen, click “Save as”. Provide the saved filter with a name.

You can view the reports any time by going to the saved filter in Jira (under Filters in the top menu), adding it to your Dashboard (available in top menu), or setting up an email subscription.

If you wish to receive emails with these results, you can set up an email subscription. If you do so, you may wish to use a variation of “option a.” in Step 4. above, and adjust the “-30d” portion to match the number of days. For example, if you want an email with the latest results from the past 7 days, you should have your saved filter include “updated > -7d” and have your subscription provide an update every 7 days. This will ensure you don’t receive the same results multiple times.

For more information on Advanced Searches using JQL, please refer to Atlassian’s article: Use advance search using JQL
Related articles
| Filter by label (Content by label) | ||||||||||||||||||
|---|---|---|---|---|---|---|---|---|---|---|---|---|---|---|---|---|---|---|
|
| Info |
|---|
Need help?Contact the IST Service Desk online or 519-888-4567 ext. 44357. |
| Tip |
|---|
Article feedbackIf you’d like to share any feedback about this article, please let us know. |
...