...
Release conditions can be applied to:
- Quizzes
Checklists
Announcements
| Info |
|---|
Once a user meets a release condition, the condition cannot be reset. |
Adding Release Conditions to
...
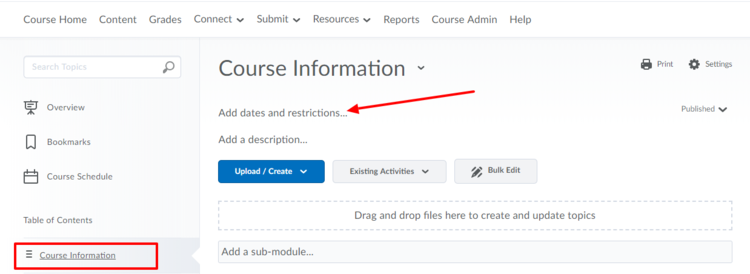
Click on Content from the course navbar.
...
Select the desired Module from the left-hand side panel to expand the release condition area.
...
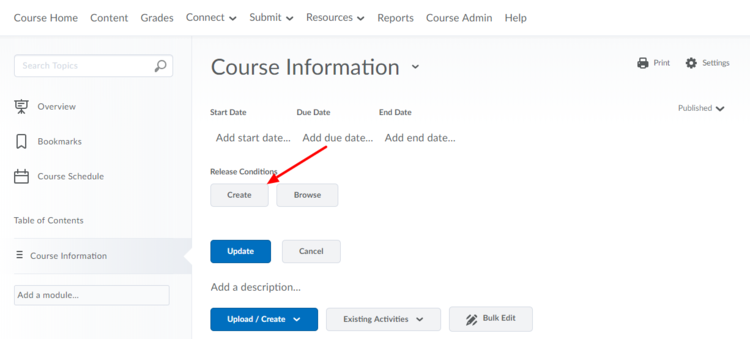
Click on Add dates and restrictions below the Module title.
...
...
an Announcement
On the Course Home, click Announcements in the widget title to access the Announcements tool.
Select the desired Announcement.
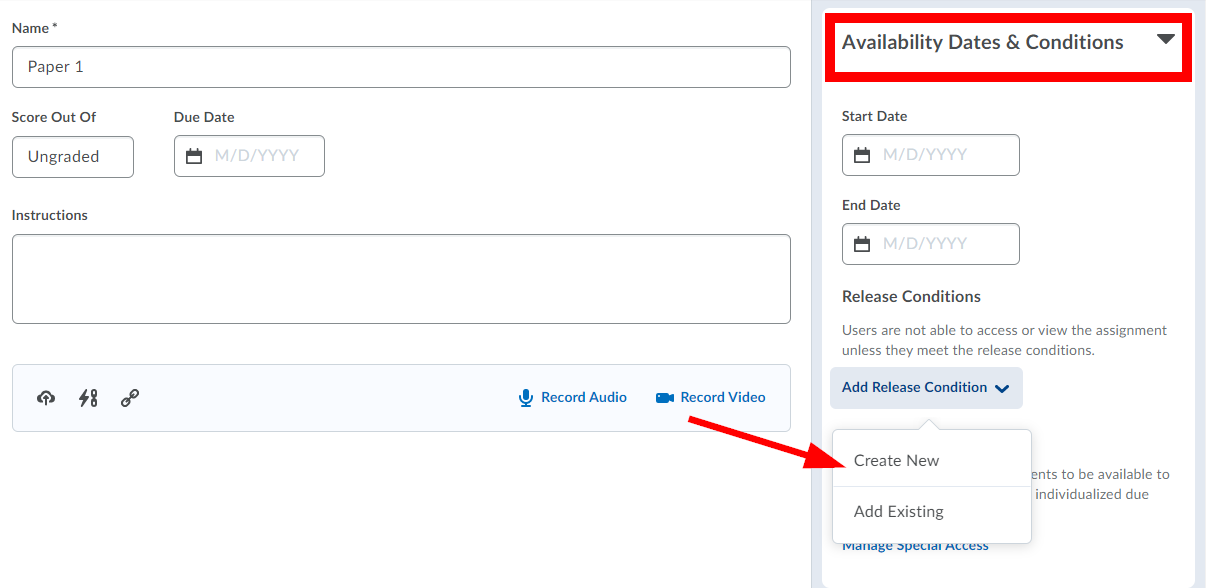
Under Additional Release Conditions, you will see a Create and Attach and an Attach Existing button. Attach Existing will only produce results if you have already created Release Conditions.
To create a Release condition, click Click the Create button. This will open a new window.
and Attach button.
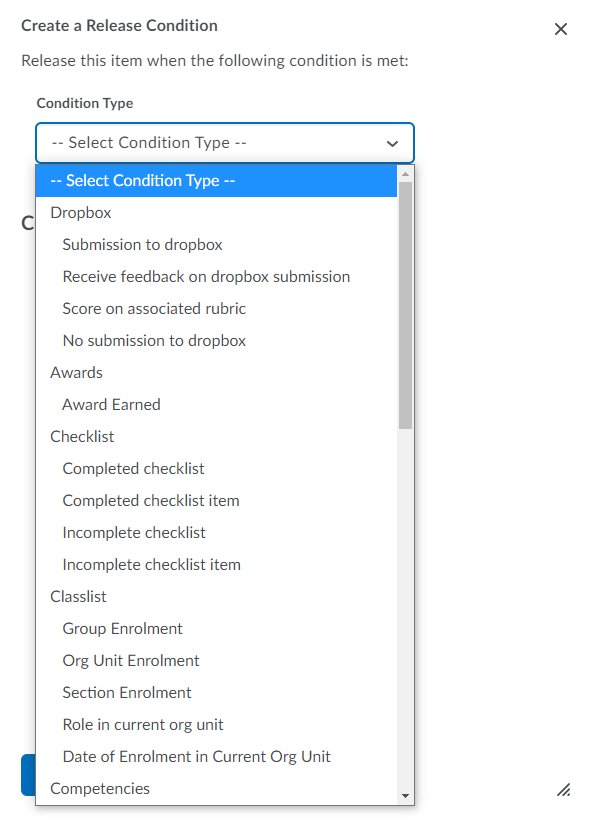
From the Condition Type drop-down menu, select the condition type relevant for the module. You must select an indented category option, not the category heading.
Select the Condition Detail that corresponds with the condition type you selected.
Click the Create button. Click the Update button to save the release conditionthe Create button.
If it is a new announcement, click Publish or, Save as Draft button. If you are editing an announcement, click the Update button.
Adding Release
...
Conditions to a
...
Checklist
Click on Content Resources from the course navbar.
Select the desired Module Checklists from the left-hand side panel.
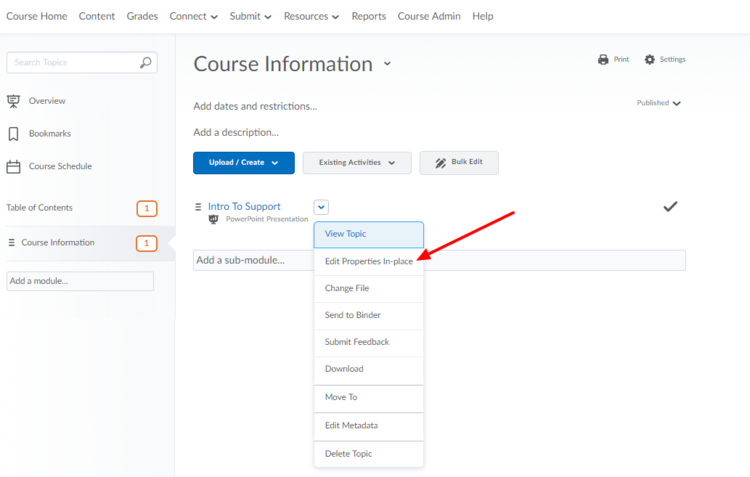
Click the down arrow next to the desired item and select Edit properties-in-place.
Click Add dates and restrictions.
You should now see a Create and a Browse button under the release conditions section of the page. Browse will only produce results if drop-down menu.
Select the desired Checklist.
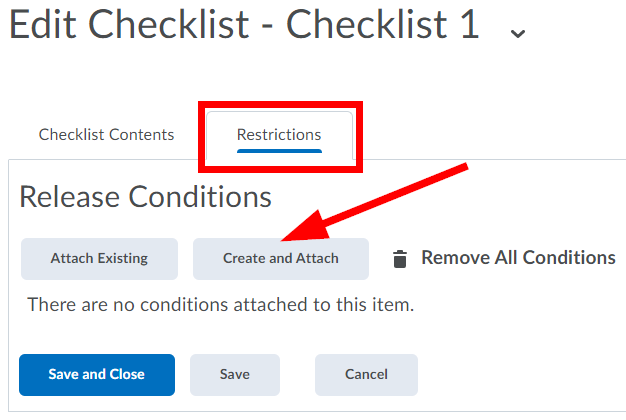
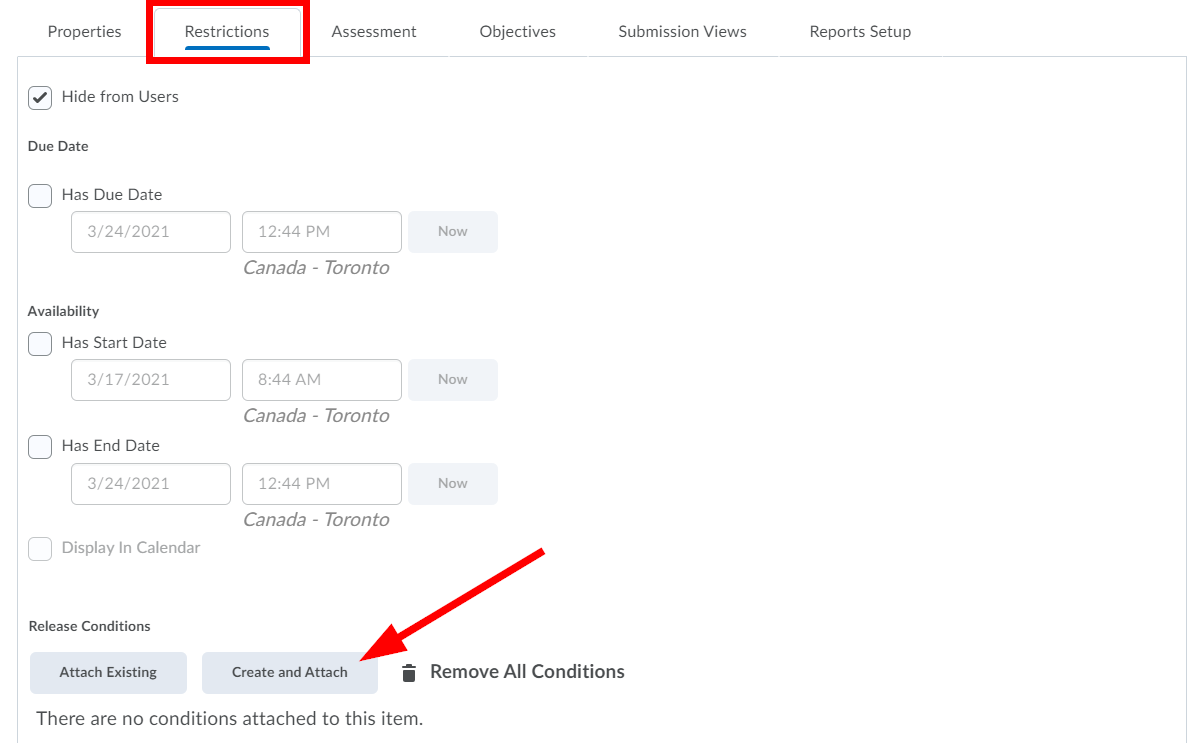
Select the Restrictions tab. You will see a Create and Attach and an Attach Existing button. Attach Existing will only produce results if you have already created Release Conditions.
To create a Release condition, click Click the Create and Attach button. This will open a new window.
From the Condition Type drop-down menu, select the condition type relevant for the module. You must select an indented category option, not the category heading.
Select the Condition Detail that corresponds with the condition type you selected.
Click the the Createbutton button.
Click the Update button to save the release condition Save and Close or Save.
Adding Release Conditions to a
...
Module
Click Submit on Content from the course navbar.
Select Dropbox from the menu.
Click the down arrow next to the desired Dropbox and select Edit folder.
Select Availability Dates & Conditions from the rightthe desired Module from the left-hand side panel to expand the release condition area.
Click Add Release Conditions. You will on Add dates and restrictions below the Module title.
You should now see a Create New and Add Existing button. Add Existing a Browse button under the release conditions section of the page. Browse will only produce results if you have already created release conditions.
Click Create New. Release Conditions.
To create a Release condition, click the Create button. This will open a new window.
From the Condition Type drop-down menu, select the condition type relevant for the module. You must select an indented category option, not the category heading.
Select the Condition Detail that corresponds with the condition type you selected.
Click the Create button.
Click the Save and Close Update button to save the release condition.
Adding Release
...
Condition to a Topic within a Module
Click Submit on Content from the course navbar.
Select Quizzes the desired Module from the menuleft-hand side panel.
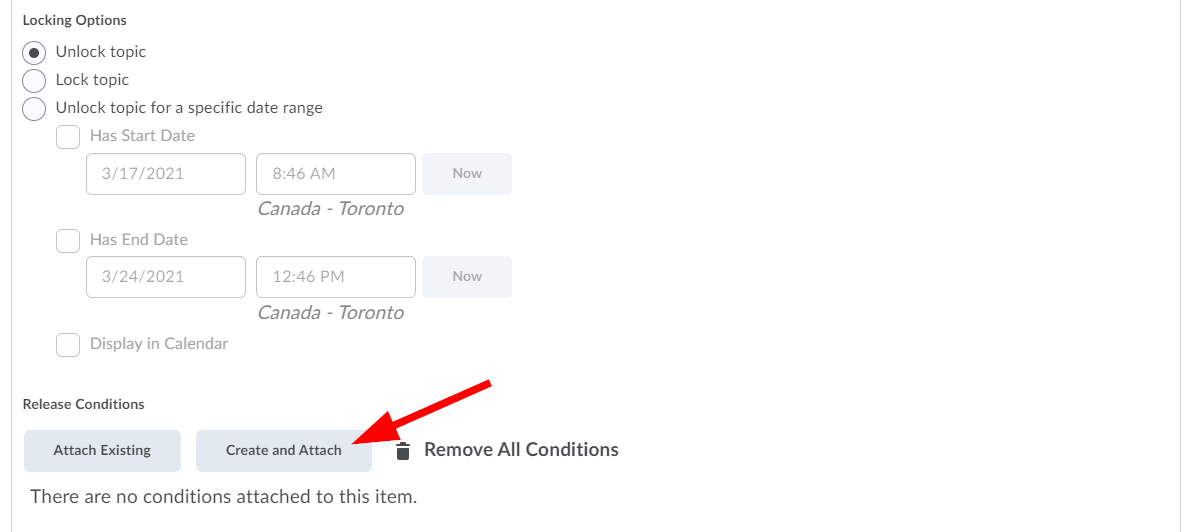
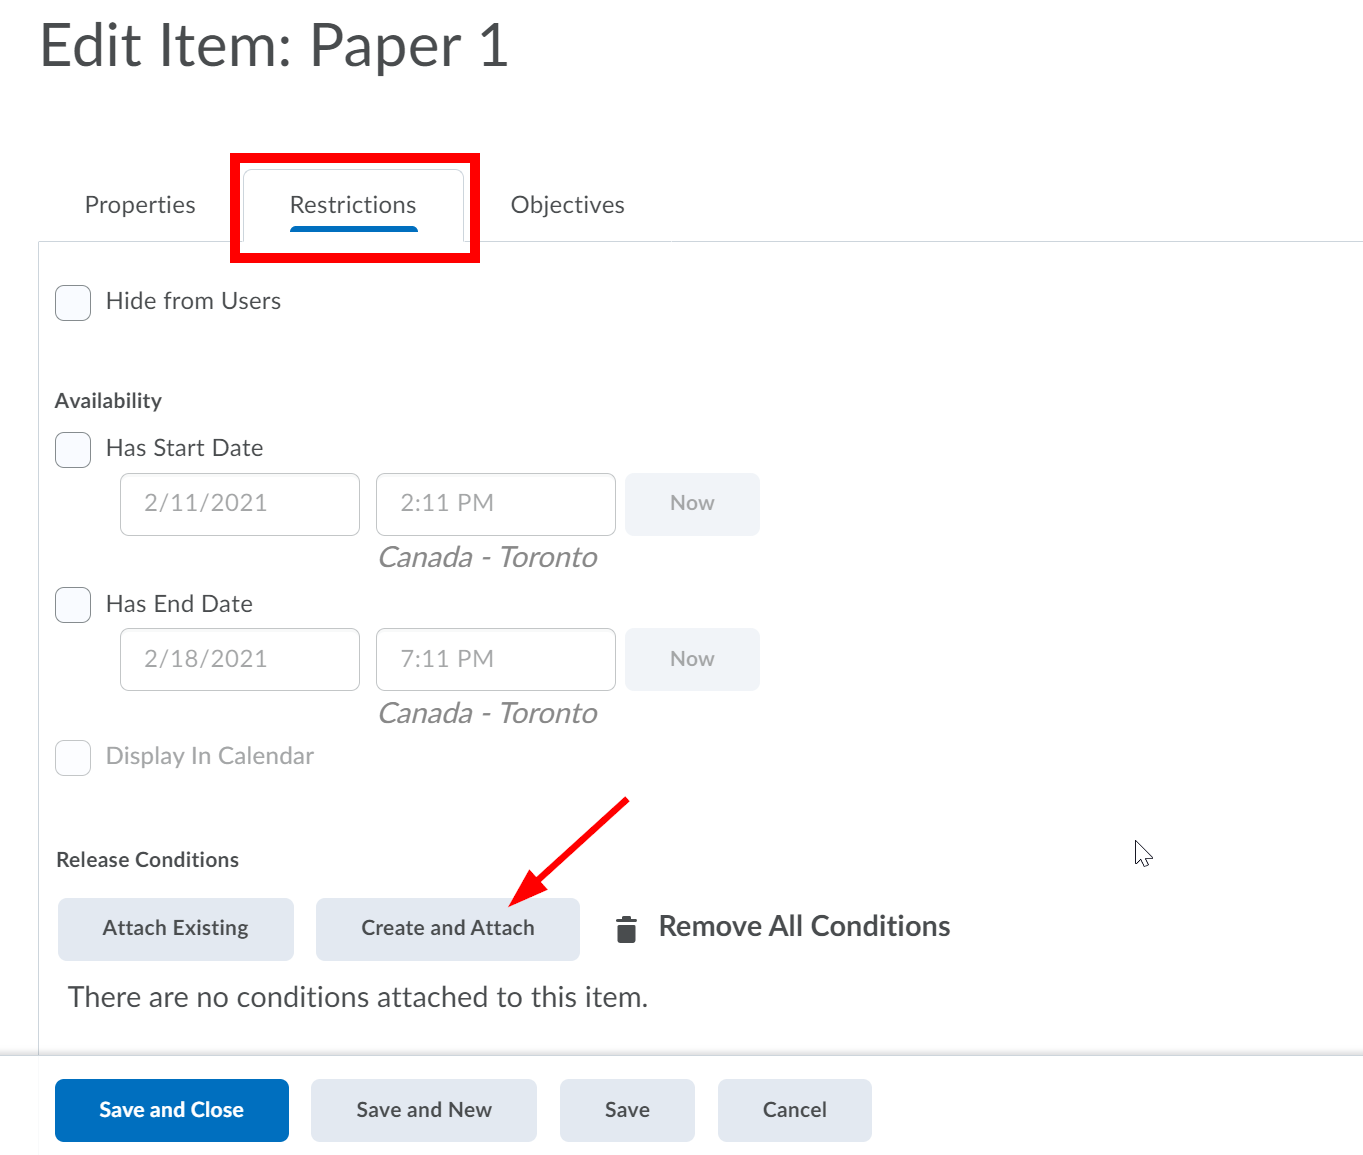
Click the down arrow next to the desired Dropbox item and select Edit . Select the Restrictions tab. You will see a Create and Attach and an Attach Existing button. Attach Existing will only produce results if properties-in-place.
Click Add dates and restrictions.
You should now see a Create and a Browse button under the release conditions section of the page. Browse will only produce results if you have already created Release Conditions.
Click To create a Release condition, click the Create and Attach button. This will open a new window.
From the Condition Type drop-down menu, select the condition type relevant for the module. You must select an indented category option, not the category heading.
Select the Condition Detail that corresponds with the condition type you selected.
Click the the Create buttonbutton.
Click the Save or Save and Close button the Update button to save the release conditions addedcondition.
Adding Release Conditions to a Discussion
...
Click Submit from the course navbar.
Select Discussions from the menu.
Click the down arrow next to the desired item and select Edit Topic.
Select the Restrictions tab. You will see a Create and Attach and an Attach Existing button. Attach Existing will only produce results if you have already created Release Conditions.
Click the Create and Attach button.
From the Condition Type drop-down menu, select the condition type relevant for the module. You must select an indented category option, not the category heading.
Select the Condition Detail that corresponds with the condition type you selected.
Click the Create button.
Click the Save and Close, Save and New, or Save button to save the release conditions added.
Adding Release Conditions to a
...
Dropbox
Click on Grades Submit from the course navbar.
Select Dropbox from the menu.
Click the down arrow next to the desired Grade Item or Grade Category Dropbox and select Edit folder.
Select the Restrictions tab. You will see a Create and Attach and an Attach Existing button. Attach Existing will only produce results if Availability Dates & Conditions from the right-hand side panel.
Click Add Release Conditions. You will see a Create New and Add Existing button. Add Existing will only produce results if you have already created Release Conditionsrelease conditions.
Click the Create and Attach buttonNew.
From the Condition Type drop-down menu, select the condition type relevant for the module. You must select an indented category option, not the category heading.
Select the Condition Detail that corresponds with the condition type you selected.
Click the the Create buttonbutton.
Click the the Save and Close , Save and New, or Save button button to save the release conditions addedcondition.
Adding Release Conditions to
...
On the Course Home, click Announcements in the widget title to access the Announcements tool.
...
Select the desired Announcement.
...
a Grade Item and Grade Categories
Click on Grades from the course navbar.
Click the down arrow next to the desired Grade Item or Grade Category and select Edit.
Select the Restrictions tab. You will see a Create and Attach and an Attach Existing button. Attach Existing will only produce results if you have already created Release Conditions.
Click the Create and Attach button.
From the Condition Type drop-down menu, select the condition type relevant for the module. You must select an indented category option, not the category heading.
Select the Condition Detail that corresponds with the condition type you selected.
Click the Create button.
If it is a new announcement, click Publish or, Save as Draft button. If you are editing an announcement, click the Update buttonClick the Save and Close, Save and New, or Save button to save the release conditions added.
Adding Release Conditions to
...
Quizzes and Surveys
Click Resources Submit from the course navbar.
Select Checklists Quizzes from the drop-down menu. Select
Click the down arrow next to the desired ChecklistDropbox and select Edit.
Select the Restrictions tab. You will see a Create and Attach and an Attach Existing button. Attach Existing will only produce results if you have already created Release Conditions.
Click the Create and Attach button.
From the Condition Type drop-down menu, select the condition type relevant for the module. You must select an indented category option, not the category heading.
Select the Condition Detail that corresponds with the condition type you selected.
Click the Create button.
Click the Save or Save and Closeor Save button to save the release conditions added.
Related Articles
| Filter by label (Content by label) | ||||||
|---|---|---|---|---|---|---|
|
...