On this page
Jump to: Before you record | Start recording | After recording
How to purchase Camtasia
You can purchase Camtasia with education pricing from the Techsmith website.
Before you record
General Setup
- Open Camtasia and select ‘New Project’ under the ‘Get Started’ menu.

- Ensure the materials you require for your video have been set up and are ready to go:
- If using a laptop, make sure it is charged.
- Test your audio and video inputs to ensure they are working.
- Use a headset to record your audio to avoid capturing background noise.
- Have all the visuals you want to show open on your computer (e.g. browser tabs, slides, applications, etc)
Start screen recording
- In the top-left corner of the project window, click the ‘Record’ button.

- A pop-up window will appear with options to enable:
- Screen recording - video input from your computer screen
- Camera recording – video input from your webcam
- Microphone audio recording – audio input from your mic
- System audio recording – audio input from your computer

- Ensure your screen recording and microphone audio recording are enabled; the switch colour should be green. If you are using a microphone instead of your computer’s built-in mic, ensure the correct microphone is selected in the drop-down menu. Click the ‘Start Recording’ button to begin recording. TIP: Don’t worry about long pauses between transitioning between windows or taking pauses while talking, this can be edited later on.
- To stop the recording:
- Press F10 on a Windows computer or the 'Stop' button from the Camtasia recorder pop-up window.
- Press Option + Command + 2 on a Mac, or select ‘Stop recording’ in the top Finder bar.
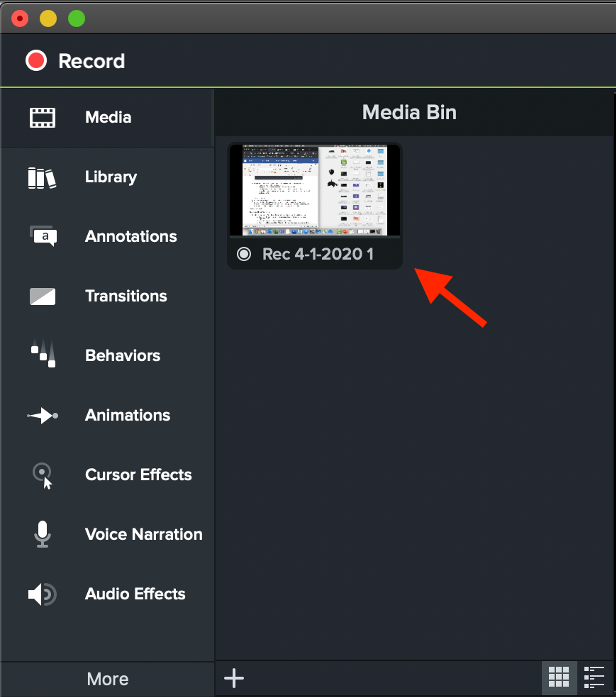
- The video will be added to the Media Bin window.

After recording
Create a video with your screen recording:
- Click and drag clips from the Media Bin to the Timeline below.

- Select tracks in the timeline and play the from the Playback window to preview your video.
Import PowerPoint slides:
- Select ‘Import Media’ from the Media Bin. Select your PowerPoint file and click the ‘Import’ button.

- Camtasia will open PowerPoint to export your slides to PDF, and prepare them for import in Camtasia.
- You can choose to import all, a range, or a single slide.

- The slides will be imported into Media Bin. Click and drag each slide to add to a track in the timeline below.

Cut out unwanted footage:
Two ways you can cut out unwanted footage includes: splitting a clip or stitching a clip.
- Splitting a clip - separates your clip in order to delete the unwanted footage.
- Click on the track you wish to edit in the timeline.
- Click and drag the play head to the position to the start of the unwanted footage. Click the ‘Split clip’ button or Control/Command T.

- Click and drag the play head to the end of the unwanted footage. Click split clip.

- Click on the unwanted footage and press the ‘Delete’ key to remove it from your video.
- Stitching a clip – keeps your clip connected while deleting the unwanted footage in between
- Click on the track you wish to edit in the timeline.
- Click and drag the red play head to select the unwanted footage.

- Right-click and select ‘Ripple delete range’.

- To stitch together two adjacent clips. Select the clips while holding down the Shift key, right-click and select ‘Stitch selected media’. Note: adjacent clips need to be touching in order to be stitched together. Click and drag clips together so that they are touching.

- To unstitch a clip, mouse over the stitch, right click, and select ‘Unstitch media’.

Change your cursor appearance
- Select your clip in the timeline and click on the Properties button. Select the cursor tab.

- To make the cursor larger in the clip: Click and drag the Scale slider to the right.
- To remove the cursor from the clip: Click and drag the opacity slider to 0%.
- To return the cursor to its original state, click on the ‘Reset’ button.
- To highlight the cursor: In the left-hand sidebar, go to ‘Cursor effects’ > click and drag ‘Highlight’ on to the video clip.

Create a freeze frame
- Select your clip in the timeline.
- Hover your cursor over the end of the clip, hold the ‘Option’ key, and click and drag the clip to extend.

Highlight a specific part of your video
- In the left-hand sidebar, select ‘Annotations’. Select the ‘Shapes’ tab and click and drag the desired shape above the video clip.

- To adjust the shape properties, select the shape in the Timeline. Adjust the shape size and position in the playback window. In the right-hand side bar, you can also customize further (e.g. colour, opacity, line thickness).
Zoom into a specific part of your video
Note: Camtasia does not currently have a built-in 'Zoom-n-pan' feature for Mac. |
- Select the track you want to zoom into on your timeline.
- In the left-hand sidebar, click on 'Animations'.
- Select the 'Zoom-n-Pan' tab.
- Resize the video using the zoom handles.

- If you want the zoom to be faster or slower, you can click and extend the left or right end of the arrow in the timeline to adjust the duration.

Add captions
Please see TechSmith's guide on how to add captions.
Crop your recording
- Above the playback window, select the crop tool.

- In the playback window, adjust the crop marks around your video to trim off the desired portions.
- To make your cropped selection full size, go to the right-hand side bar and select the Visual Properties button to adjust the scale of the video until it fills the playback window. To adjust the position of the video, click and drag the video from the playback window.
Export your file
- When your video is complete, go to Share > Local File. Select the desired save location from the drop-down Export format as MP4, and click ‘Export’.


Additional Resources
Related articles
Related articles appear here based on the labels you select. Click to edit the macro and add or change labels.


