Creating an assignment:
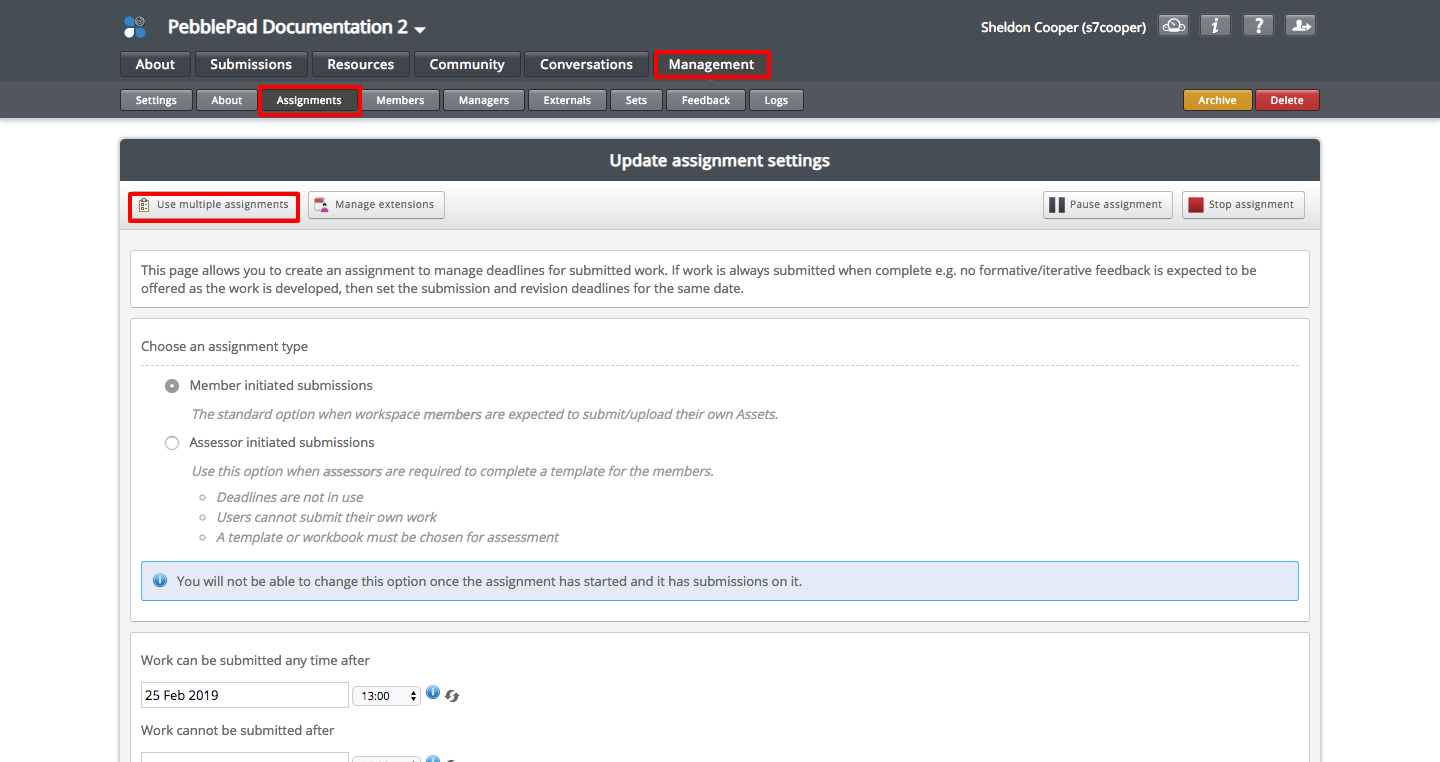
- Log into ATLAS via the link in LEARN.
- Click on the Management Tab
- Click on Assignments

4. If you are only creating one assignment for the workspace you can continue to complete the page with the assignment requirements. If you plan to use multiple assignments for the workspace, click the "Use multiple assignments" button.
Types of Assignments:
There are two types of assignments available when creating a new assignment. Once you select an assignment type and there are submissions you will not be able to modify the assignment type.
- Member initiated submissions: Member initiated submissions are the standard option, where learners share assets for assessment to the assignment.
Or
- Assessor initiated submissions: Assessor initiated submissions do not require the learner to share an asset; instead the assessor completes a template or workbook which then appears on the workspace and in the learner's asset store.
Setting Assignment Dates:
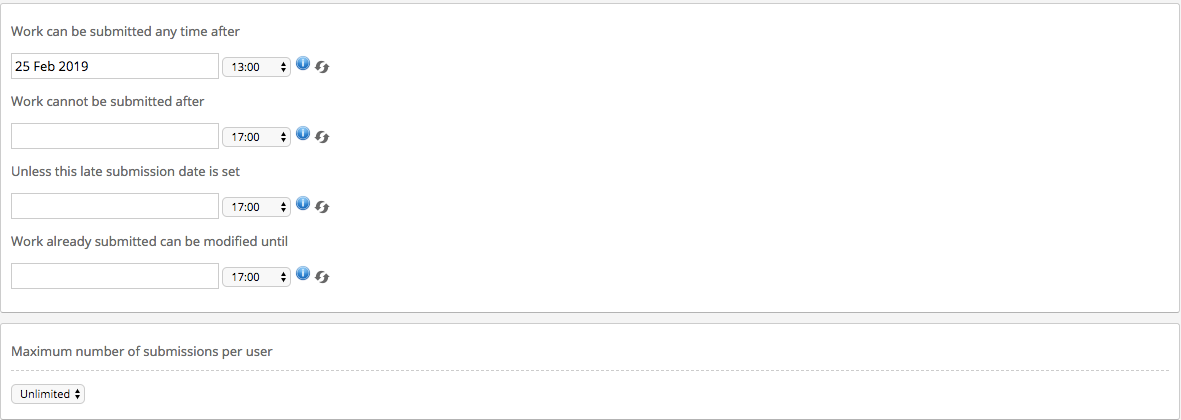
- There are four assignment specific dates for each assignment, not all dates are required.
- The first assignment date is the date "Work can be submitted any time after" and is what allows the students to begin submitting this assignment to the workspace. The default date is the date the assignment is created and should be adjusted accordingly.
| Note: If you plan to use auto submit, the start date of the assignment must be the start of the term of offer or the date you will share the corresponding resource with the students. Students who open the resource prior to this date will cancel the auto submit function, requiring students to manually submit to the assignment. |
- The second assignment date is the date "Work cannot be submitted after" or the due date. Submissions will only be accepted after this date if the late submission option is set. Users can continue to modify already submitted work until the ''Work already submitted can be modified until'' date is reached.
- The next date is the late submission date or the date you will accept late submissions until. Submissions made after the due date but before this date will be flagged as late and will require the Lead Tutor to accept the submission as late before it can be graded.
- The final date option is the date by which "Work already submitted can be modified until".

2. Next you must determine the number of submissions each student can upload for each assignment. The default is set to unlimited and can be left as is or changed to allow 1 - 10 submissions per student. The remaining settings available relate to the types of submissions you will accept.
Note: if you are using auto submit a resource must be made available to the workspace. See Adding a Resource to your workspace for more information. |
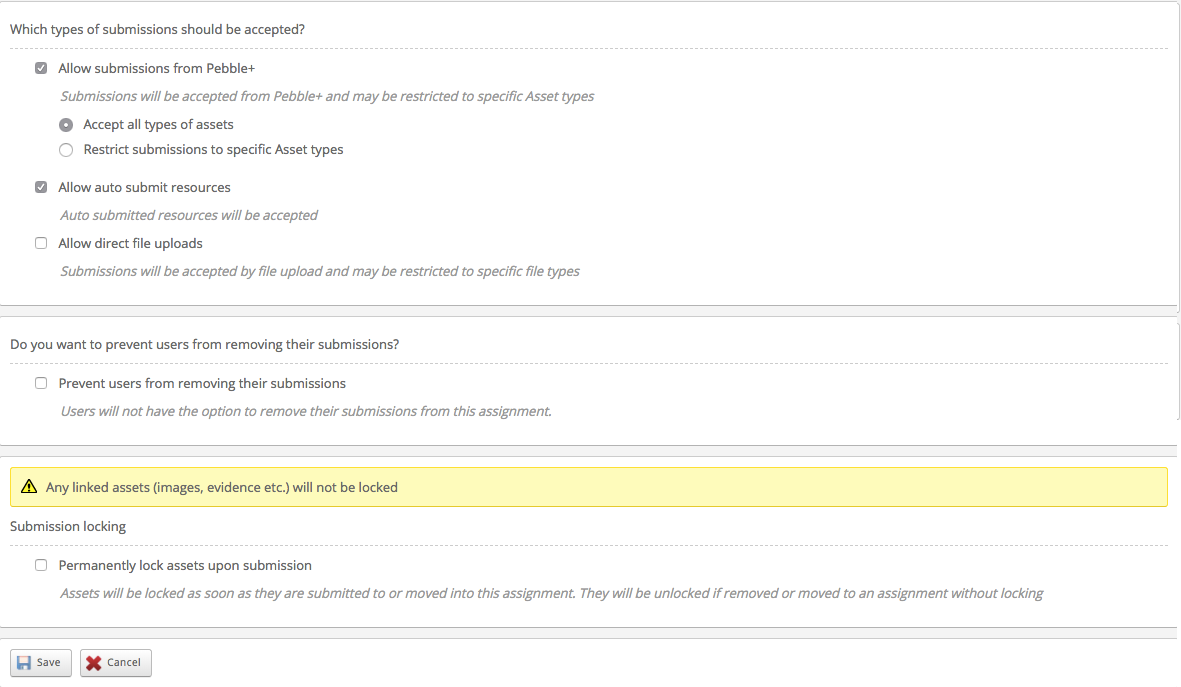
3. The types of submissions available include, submissions from Pebble+, auto submit or direct file uploads.
- Allowing submissions from Pebble+ is most effective if you are not using an auto submit option.
- Using the auto submit feature requires an instructor to provide students with a specific Resource they are expected to complete for this assignment.
- If you choose direct file uploads, students are able to submit files from outside of PebblePad. When choosing direct file uploads there is also an option to restrict file types to specific types of files you will accept.
4. The next assignment creation option is to determine if you will allow students to remove their submissions from the assignment. If you allow students to remove submissions from the assignment students will be required to resubmit prior to the due date.
5. The final option is to determine If you want to permanently lock the student's asset upon submissions. Permanently locking the asset will prevent the student from making any changes after they have submitted.
6. Once you have determine and applied your settings be sure to Save.

Related articles appear here based on the labels you select. Click to edit the macro and add or change labels.


