Groups can be used to help manage your course while also providing students with an opportunity to work in a team.
Users can be enrolled in any number of groups within the course, allowing instructors to create as few or as many groups as are necessary to complete the course work. Each group can have its own discussion forum(s) and topics as well as dropbox folders to work in. Members of groups can be graded as a team or individually.
Understanding how Groups are set up
Before setting up groups you should know how you want them to be organized. A number of things can affect how users are enrolled in groups:
Were groups set up before or after you enrolled users in the course?
Are groups being created based on another group in the course like a lecture, lab or tutorial section?
Are users auto-enrolled in groups?
Are course participants placed in groups randomly?
Can users self-enrol in groups?
What enrolment type did you choose?
It is usually better to set up groups after the majority of users are enrolled in your course. The add period ends approximately 2 weeks after the start of classes each term. Using Groups of # with auto enrol will only populate students added to the course after the groups are created. In order for users to be enrolled in groups automatically the ‘Can be auto-enrolled’ option must be enabled.
|
Types of Groups
# of Groups – No Auto Enrolments
Groups of # - (Auto enrol enabled, but not indicated)
# of Groups - (Auto enrol enabled, but not indicated)
Groups of # - Self enrolment
# of Groups – Self enrolment
# of Groups, Capacity of # - Self Enrollment
Single user, member-specific groups
Creating a Group
See the Types of Groups to determine the options available and what will best suit your needs before creating groups.
Select Connect from the course navbar.
Select Groups.
Select New Category to begin creating groups.
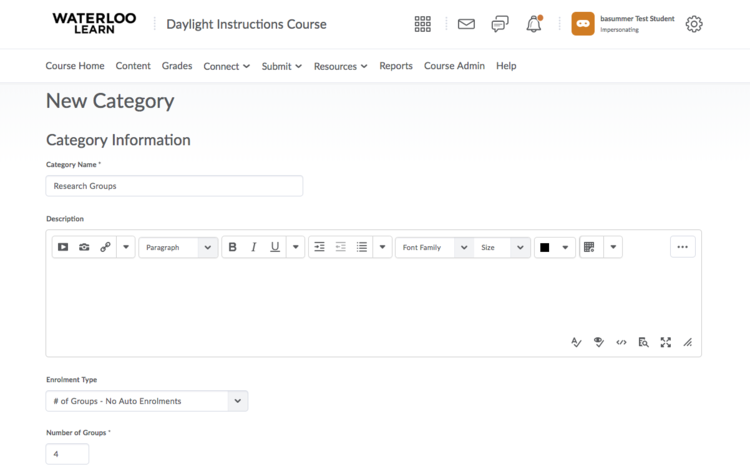
Enter the Category Name (e.g. Research Groups, Groups) and a Description (optional).

Select the Enrolment Type.
Enter the Number of Groups/Number of Users depending on the type of group you are creating.
The three Self-Enrolment group types have Groups Options for setting a Self Enrolment Start Date and/or Expiry Date. If an expiry date is set, there is an additional option to Allocate unenrolled users after the Self Enrolment Expiry Date.
If your groups will be created based on another, already created group like a lecture or lab section, choose the parent group from the Restrict Enrollments to drop-down menu.
Select the corresponding workspace(s) you would like to create by checking the box beside Set up Discussion areas or Set Up Dropbox folders.
Click Save.
Enrolling users in Groups
Users are enrolled in groups based on the enrolment options selected on the Manage Groups page.
Manually enrol users in groups.
Manually change which group a user is enrolled in.
Add users who enrolled late to a group.
Modify or add an enrolment
Select Connect from the course navbar.
Select Groups.
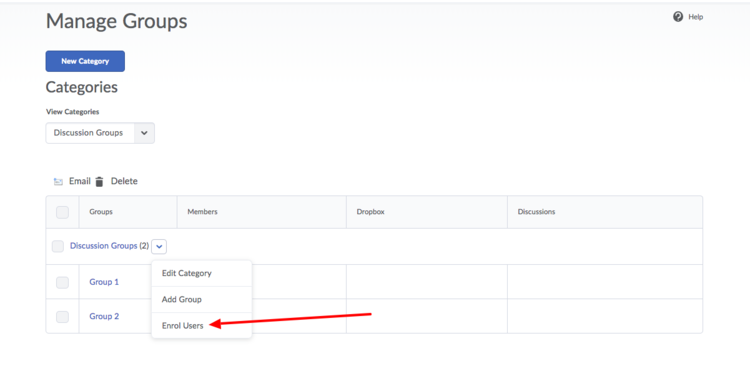
Click the down arrow to the right of the Category Name and select Enrol Users.

Select whether you want to Display All Groups or a specific group.
Enter information in the Search For field to look for a specific user.
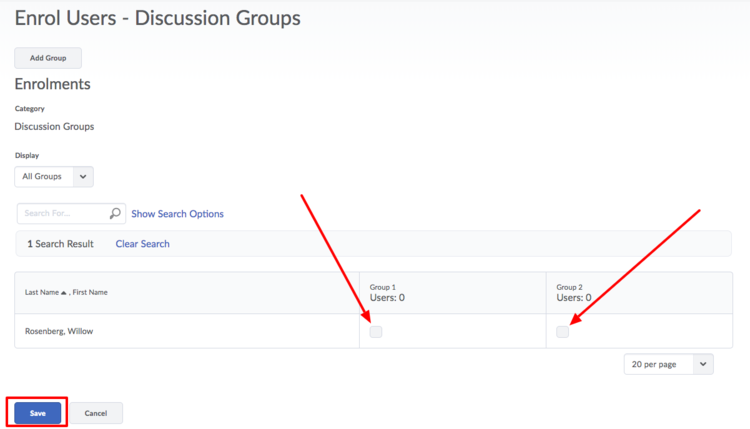
Enrol users or adjust enrollment by selecting or deselecting the checkboxes in the enrol users grid.

Click Save.
Manually enrolling users allows you to exceed the enrolment limit for a group. |
What happens when you move a user to a new group?
Discussion messages remain in the old group and do not count towards a user’s grade if the forum or topic is associated with a grade item. The user must satisfy the discussion message requirements in the new section. You can override a grade using the Grades tool.
Dropbox files submitted for the old group remain with the old group. The user receives the grade achieved by the new group on any group assignments. You can manually change the user’s grade back to the original group’s mark in the Grades tool.
Deleting a user from a group
When a user is deleted from a group, all of their files remain in the system, including Discussion messages and Dropbox folders.
Select Connect from the course navbar.
Select Groups.
Click the down arrow to the right of the Category Name and select Enrol Users.
From the Enrol Users page, clear the check box for the group beside the user’s name.
Click Save.
What users see in the Group Tools
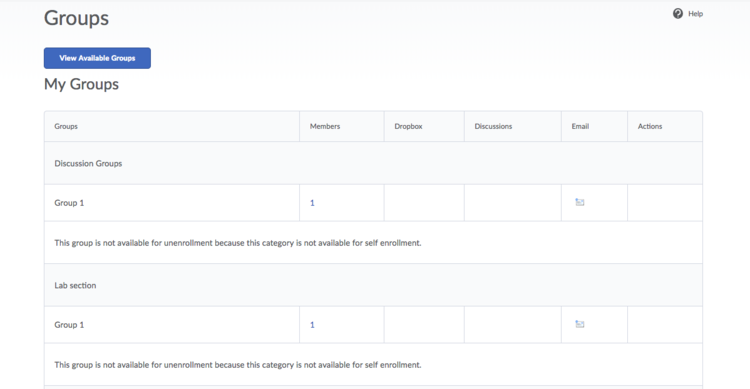
Course participants access the Groups tool by selecting Connect then Groups from the course navbar.
From the Groups page, users can:
Click on View Available Groups and then select the Join Group link in the Actions column to enrol in a new group.
Click on the number in the Members column to view the Member List for a group.
Click on a dropbox folder to view its contents.
Click on a discussion forum to view its postings.
Click the mail icon under Email to email all of the members of a group.

Related Articles
Related articles appear here based on the labels you select. Click to edit the macro add or change labels.

Article Feedback If you’d like to share any feedback about this article, contact LEARNhelp at learnhelp@uwaterloo.ca. |


