This article describes how to move your Mailservices email to your Microsoft 365 (M365) Outlook account or your Connect account by adding the Mailservices account to your M365 or Connect account.
Adding Mailservices to M365 Outlook
Step-by-Step
Navigate to Windows Control Panel > User Accounts > Mail (32-bit)> Email Accounts > New.
Or From the E-mail tab, select NewSelect Manual setup or additional server types, and click Next.
Select POP or IMAP and click Next.
Enter your name and the email address you wish to connect under User Information.
Server Information, complete as follows:
Account type: IMAP
Incoming mail server: mailservices.uwaterloo.ca
Outgoing mail server (SMTP): mailservices.uwaterloo.ca
Enter your login information using your 8-character UWaterloo username (i.e. myuserna) and password.
Select More Settings …
Outgoing Server tab, complete as follows:
Check the box: My outgoing server (SMTP) requires authentication.
Select Use same settings as my incoming mail server.
Advanced tab, complete as follows:
For both incoming/outgoing servers, select TLS (startTLS) for Use the following type of encrypted connection.
Set ports
Incoming server (IMAP):143
Outgoing Server (SMTP): 587.
Click OK.
Click Next >.
Close the Test Account Settings popup.
(There will be a message indicating that it was a success and all statuses should show completed.)Click Finish.
...
Adding M365 or Connect account
Step-by-step
These first steps are to add the account. Instructions to move the email messages are described below.
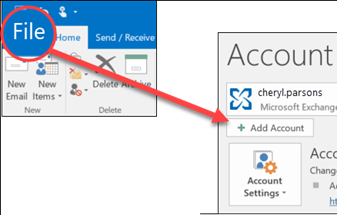
Navigate to Files > Info > +Add Account
2. Enter the Enter your 8-character UWaterloo username @uwaterloo.ca (ie. myuserna@uwaterloo.ca) of the first account and click Connect
...
3. If asked, prompted select :Microsoft 365
...
Exchange if your email is under Connect (which is accessed at connect.uwaterloo.ca)
4. Enter the password of the first account.
Microsoft 365 users will have their @uwaterloo.ca inbox added by now. However, Connect users (username@connect.uwaterloo.ca) will need to follow Configure Outlook for Windows
5. Repeat steps 1 to 3 to add your second account (e.g personal account)
6. Enter your second account password.
7. Restart Outlook to view your new accounts
...
4. If prompted, enter your password, click Sign in.
5. Select OK and Finish to start using your email account in Outlook.
Moving email messages
Now that the two accounts are added to Outlook you can move your email messages. You can either
Moving the entire inbox
We recommend making a backup file of your emails before starting the migration. Please follow these instructions to do so: https://support.microsoft.com/en-us/office/back-up-your-email-e5845b0b-1aeb-424f-924c-aa1c33b18833?ui=en-us&rs=en-us&ad=us
...
Go to Files > Account Settings > Account Settings, choose second account, click Change...
Select All for Download emails for the past:
Close the tab. Go back to your Outlook inbox, right-click on your second inbox and select Copy Folder
Select your first inbox (username@uwaterloo.ca)
Click OK. It will start transferring your email.
Your old email will appear as a subfolder named inbox under your inbox. You should rename it to something to be more clear.
To can verify online that the transfer was successful by visiting portal.office.com
Sign in to the first inbox (username@uwaterloo.ca) to check for the emails
Moving selected emails
We recommend making a backup file of your emails before starting the migration. Please follow these instructions to do so: https://support.microsoft.com/en-us/office/back-up-your-email-e5845b0b-1aeb-424f-924c-aa1c33b18833?ui=en-us&rs=en-us&ad=us
...
4. Sign in to the inbox with the transferred emails to check for the emails
Related articles
| Filter by label (Content by label) | ||||||||||||||
|---|---|---|---|---|---|---|---|---|---|---|---|---|---|---|
|
| Info |
|---|
Need help?Contact the IST Service Desk or 519-888-4567 ext. 44357. |
| Tip |
|---|
Article feedbackIf you’d like to share any feedback about this article, please let us know. |