The Chat tool is a real-time, text-based collaboration tool.
There are two types of Chats you can create
General Chat is a public chat visible to all users
Personal Chat that is only visible to users invited to your chat
While students do not have the appropriate permissions to create General Chats, they are able to create their own Personal Chats. Unless you are invited by the student, you will not be able to view these Personal Chats.
| Info |
|---|
If you have customized your course navbar, the chat tool may not be visible after enabling it. Please contact learnhelp@uwaterloo.ca if you require further assistance |
Enabling Access to the Chat Tool
By default, the Chat tool is turned off. To activate this tool:
Click on Course Admin from the course navbar.
Click Tools.
Enable Chat by toggling the Status checkbox to the right of the tool. A blue checkmark will appear indicating that the tool has been turned on. This page will save automatically.

Refresh the page and click on Connect from the course navbar. Chat should now appear in the Connect menu.
Creating a General Chat
General chats exist within specific courses and are only accessible from the course in which they are created. All users in the course have access to the general chat. You can create multiple chats for the same course.
| Note |
|---|
The Chat type cannot be changed after the Chat has been saved. |
Click on Connect from the course navbar.
Select Chat from the menu.
Click the New Chat button.
Enter a Title and a Description (optional) for the chat.
For type, select General Chat.
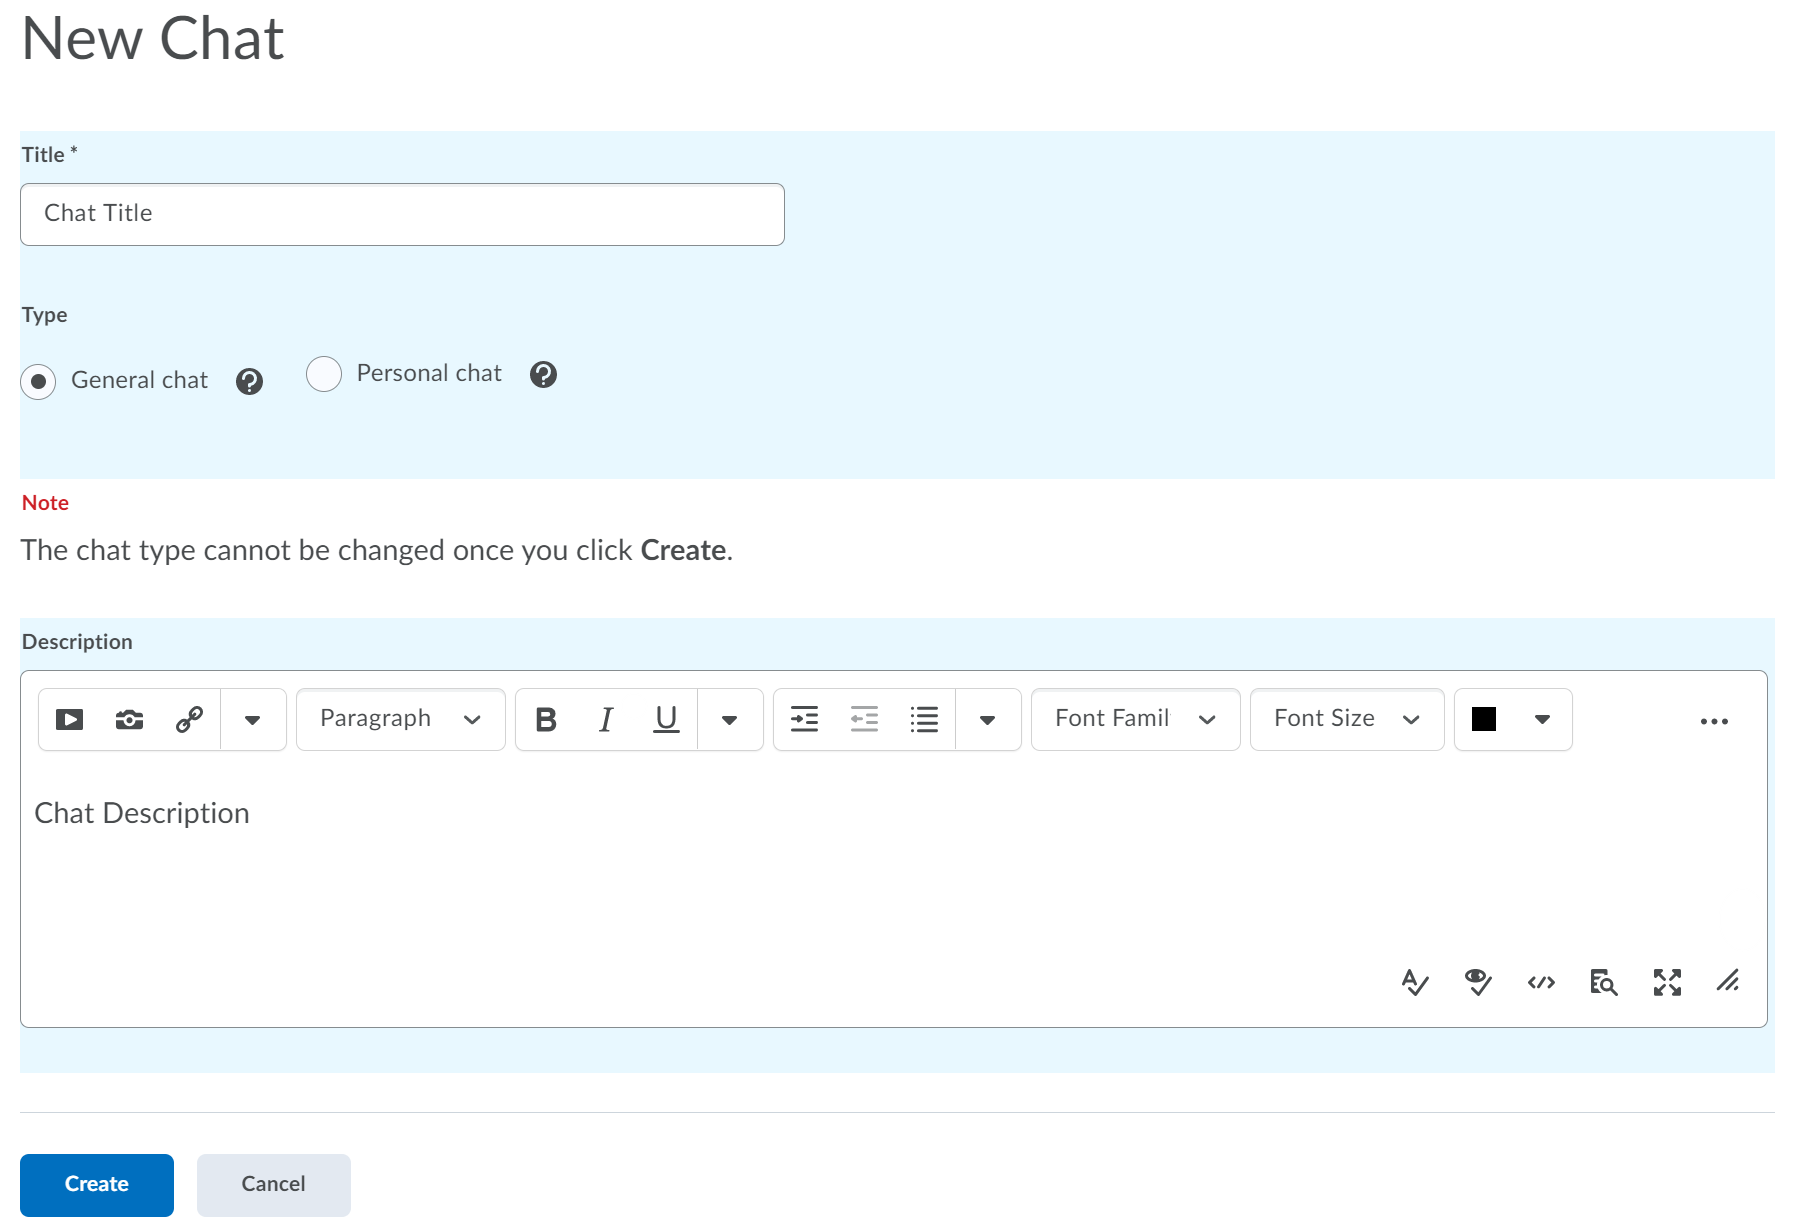
Click Create.
Editing a General Chat Room
You can edit the title and description of general chats that you have already created.
Click on Connect from the course navbar.
Select Chat from the menu.
Click the down arrow beside the chat you want to modify and select Edit.
Make your desired changes to the Title and/or Description.
Click Save.
Deleting a General Chat Room
Click on Connect from the course navbar.
Select Chat from the menu.
Click the down arrow beside the chat you want to modify and select Delete.
Click Delete to confirm the deletion.
Alternatively
Click on Connect from the course navbar.
Select Chat from the menu.
Check the box to the left of the chat you want to delete and click the Delete at the top of the Chat List
Click Delete in the confirmation message.
Creating a Personal Chat
Personal chat rooms can only be accessed by users who have been added to the personal chat’s Participant List. When users are added, the chat room displays under Personal Chats in their list of chats.
Click on Connect from the course navbar.
Select Chat from the menu.
Click the New Chat button.
Enter a Title and a Description for the chat. Giving your chat a unique, descriptive name and providing a description help users distinguish the chat from other chats that they are part of.
For type, select Personal Chat.
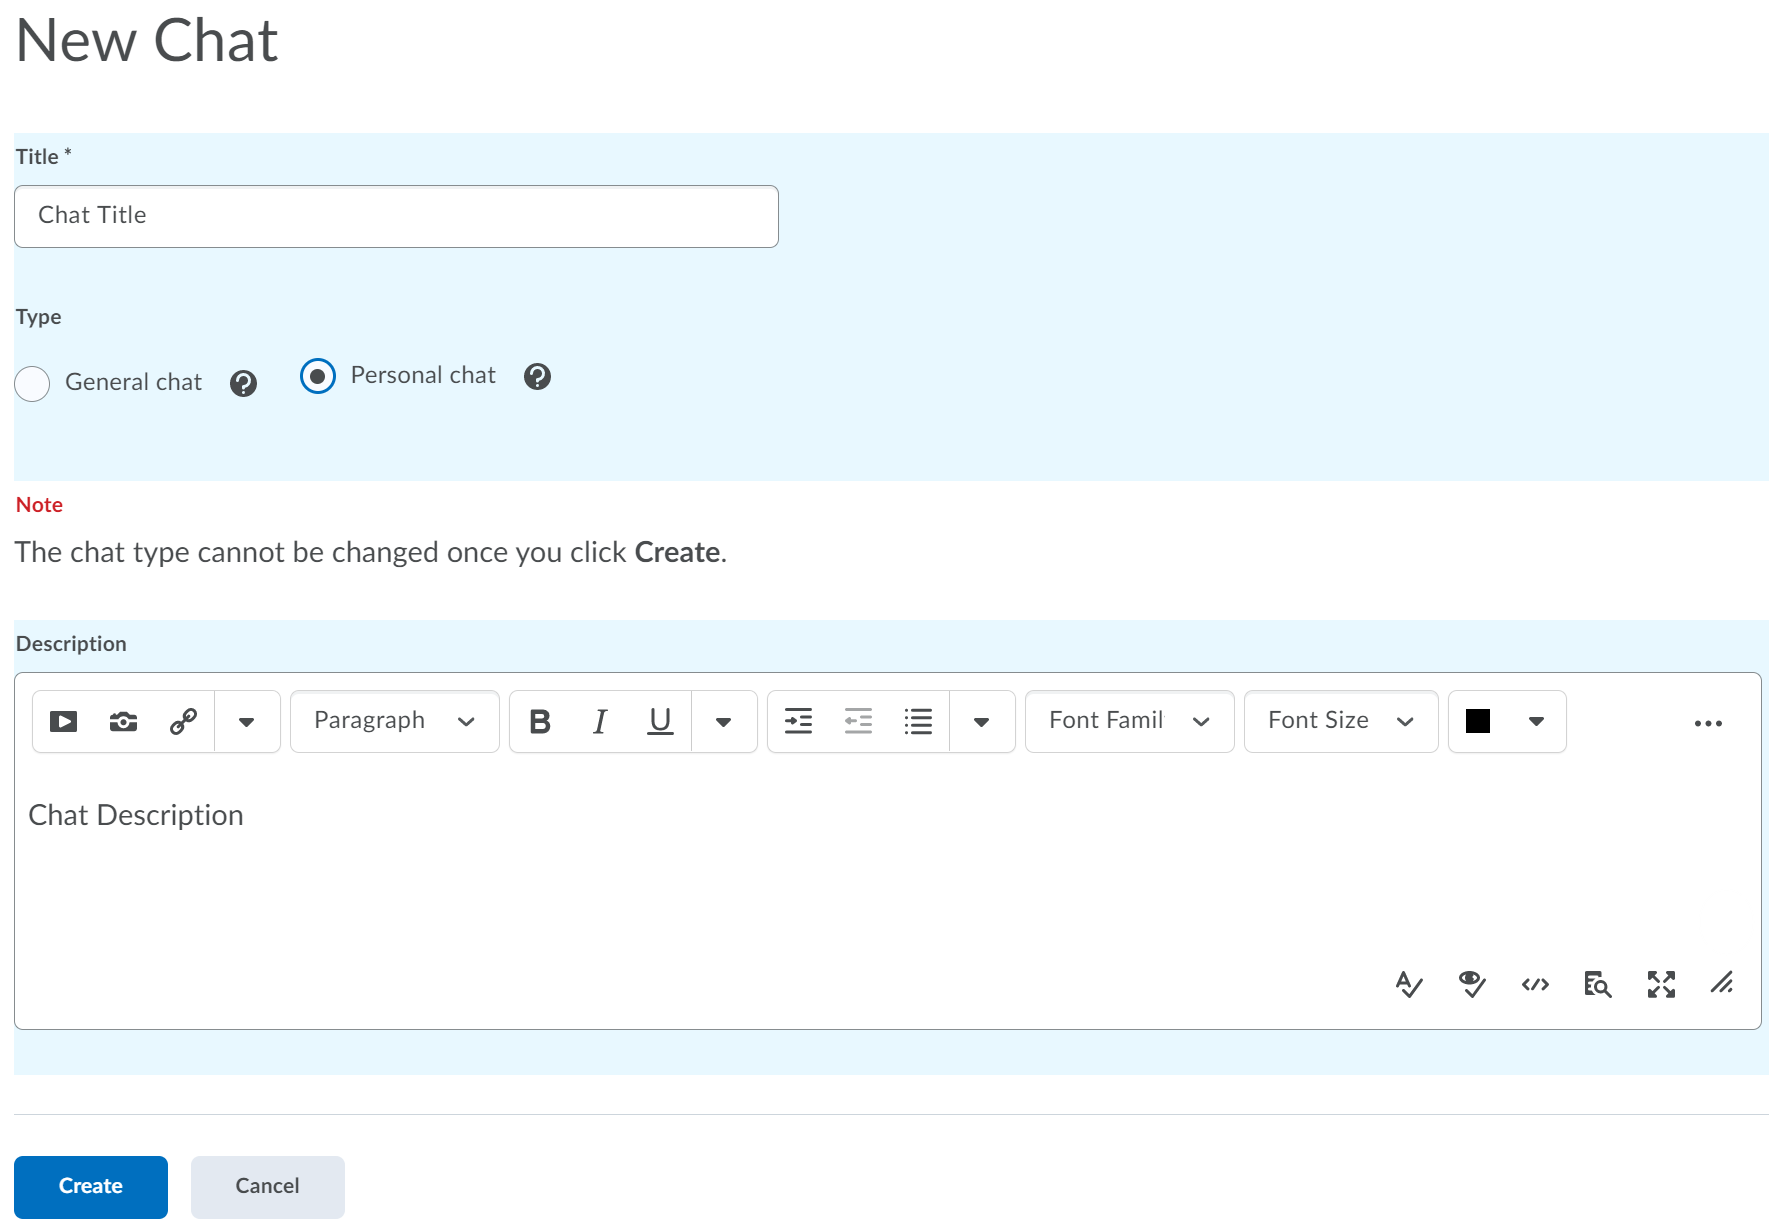
Click Create.
To add users to a personal chat see below.
Adding Members to a Personal Chat
Click on Connect from the course navbar.
Select Chat from the menu.
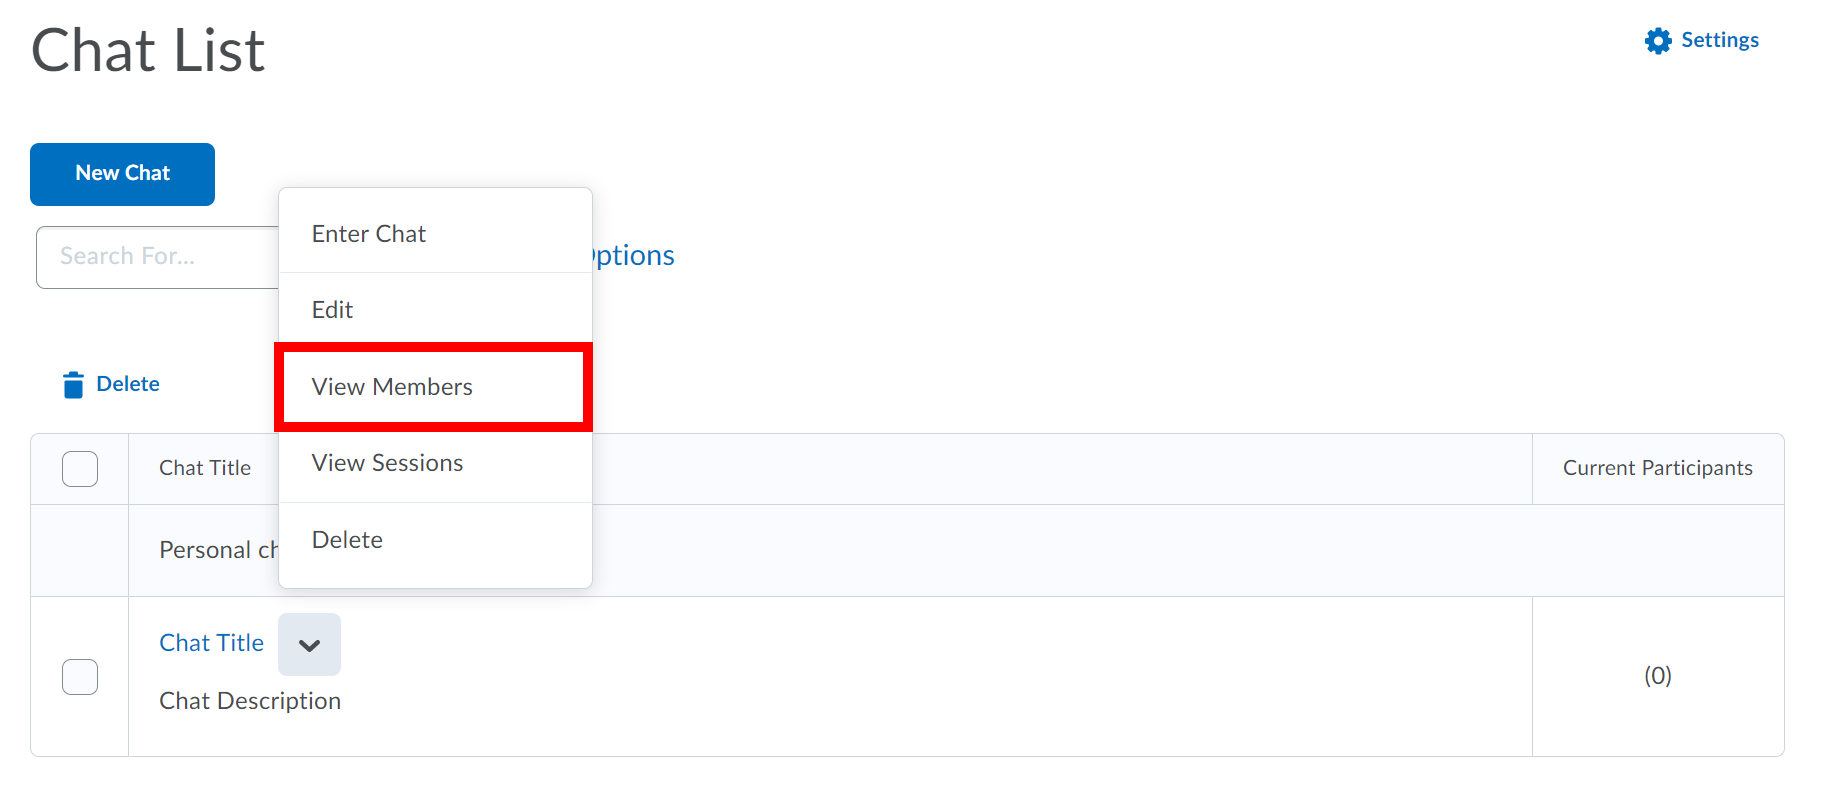
Click on the down arrow beside the personal chat you just created. Click View Members to add users to the chat.
Click Add Members if you want to add users from your course. If you want to add a personal contact, click Add Personal Contact.
Select the check box beside the name(s) of the user(s) you want to add.
Click Add.
Removing users from a Personal Chat
Click on Connect from the course navbar.
Select Chat from the menu.
Click on the down arrow beside the personal chat you just created. Click View Members to add users to the chat.
On the Chat Members page, select the check box beside the users you want to remove.
Click the Delete icon at the top or bottom of the list.
Click Delete to confirm the deletion.
Click Done
Editing a Personal Chat
You can edit the title and description of the chats you create.
Click on Connect from the course navbar.
Select Chat from the menu.
Click the down arrow beside the chat you want to modify and select Edit.
Make your desired changes to the Title and/or Description.
Click Save.
Deleting a Personal Chat
Click on Connect from the course navbar.
Select Chat from the menu.
Click the down arrow beside the chat you want to modify and select Delete.
Click Delete to confirm the deletion.
Participating in a Chat Session
Add a Chat Message
Click on Connect from the course navbar.
Select Chat from the menu.
Click the Chat Title of the chat you would like to join.
Type a message in the text box at the bottom of the chat room, and click Send.
| Info |
|---|
If you think new messages are not appearing on your screen fast enough, click the Refresh icon at the top of the chat. This icon is visible when you have New Messages checked in your Chat Settings. |
See who else is chatting
The Participants pane displays a list of users currently signed into a chat room.
Chat Settings
Click on Connect from the course navbar.
Select Chat from the menu.
Click Settings in one of two locations:
On the Chat List page, click Settings in the top-right corner.
Inside a chat, click Settings along the top of the chat window.
If you want to change the message order, under Message Order select New to Old or Old to New.
If you want to see new messages only, under Only Show select New Messages. This requires you to manually refresh the screen, to see new messages and remove all old ones.
You can also adjust your sound settings. For example, use the Incoming Message Sound menu to select which alert (if any) you would like to hear when you are receiving a new message in Chat.
You can change back to see all messages, which restores all messages for that session, even if they were not visible while New Messages was checked.
Chat Archives
Each chat session is stored in the chat’s archives, where you can view it at a later time.
The system archives a chat session once all chat members leave the room or after more than 20 minutes of inactivity. Chats appear in the Chat Sessions list. See Accessing
Accessing a Chat Session
This allows you to see a record of everything that has been said in a Chat to that point.
| Info |
|---|
You must be in the course in which you created the general chat to see the session archives. |
Click on Connect from the course navbar.
Select Chat from the menu.
Click the down arrow beside the chat you want to modify and select View Session.
Click the link in the Start Date column.
When you are done reviewing the session, click Done.
Deleting a chat session
Click on Connect from the course navbar.
Select Chat from the menu.
Click the down arrow beside the chat you want to modify and select View Session.
Select the checkboxes for the sessions you want to delete.
Click the Delete icon.
| Note |
|---|
Once a chat is deleted, the chat and all of its archives are gone forever. |
Printing a chat session
Click on Connect from the course navbar.
Select Chat from the menu.
Click Print in one of two locations:
Within an archived Chat Session, click Print in the top right-hand corner.
Inside a chat, click Print along the top of the chat window.
Print using your browser’s print functionality.
Click Close when you are done.
Related Articles
| Filter by label (Content by label) | ||||||
|---|---|---|---|---|---|---|
|
| Info |
|---|
Need help?Contact LEARNhelp at learnhelp@uwaterloo.ca or 519-888-4567 ext. 41744 for assistance. |
| Tip |
|---|
Article FeedbackIf you’d like to share any feedback about this article, contact LEARNhelp at learnhelp@uwaterloo.ca. |